Network Registry
What is the Network Registry?
The Network Registry is a list of nodes allowed to interact with others on the network. This is a utility used by HOPR to scale and test the network at a controlled pace.
The Network Registry is only enabled in the staging or production environment by default. If you run a cluster of HOPR nodes locally, the Network Registry is not enabled.
Monte Rosa Release
The Network Registry is being used for the Monte Rosa release, so please make sure you are eligible and have been registered before trying to use this environment. To add your node to the registry, you must first register your interest to participate in the release by completing this form.
The staking address you provide on this form will be the primary indicator of your eligibility to be added to the registry.
Eligibility
From the list of interested participants, an ordered waitlist will be generated. Your rank on the waitlist is determined by the NFTs held in your staking address from past testnets/staking seasons and how much HOPR you have staked currently.
Users from the waitlist will then be given an NFT in blocks of 15. You can use this NFT to register your node on the network registry smart contract.
For every 15 NFTs given out, the majority will go to the next highest-ranking participants on the waitlist, but a few will also be allocated to Dappnode/Avado users. And one of every 15 will be given to someone at random further down the waitlist (so you always have a chance of being chosen even without having participated in previous staking seasons or releases).
Depending on your prefered method of contact, you will either be notified by email when you have been chosen or you can review the waitlist manually here.
Registering your node
If you are chosen to join the registry, you will be sent a network registry NFT to your staking address as well as mHOPR and xDAI to fund your node. Once you have been sent an NFT, you can register your node by following these steps:
Step 1: Stake your NFT
(1) Go to stake.hoprnet.org
(2) Connect your wallet (make sure this is the one containing your NFT). You should see an icon for this on the top right of the site. If you are unsure if this is the right wallet, check the HOPR NFTs & Staked HOPR NFTs section once your wallet is connected to see if your Network Registry NFT is visible.

(3) Scroll down and click on the HOPR NFTs dropdown, You should see your Network Registry NFT under available HOPR NFTs
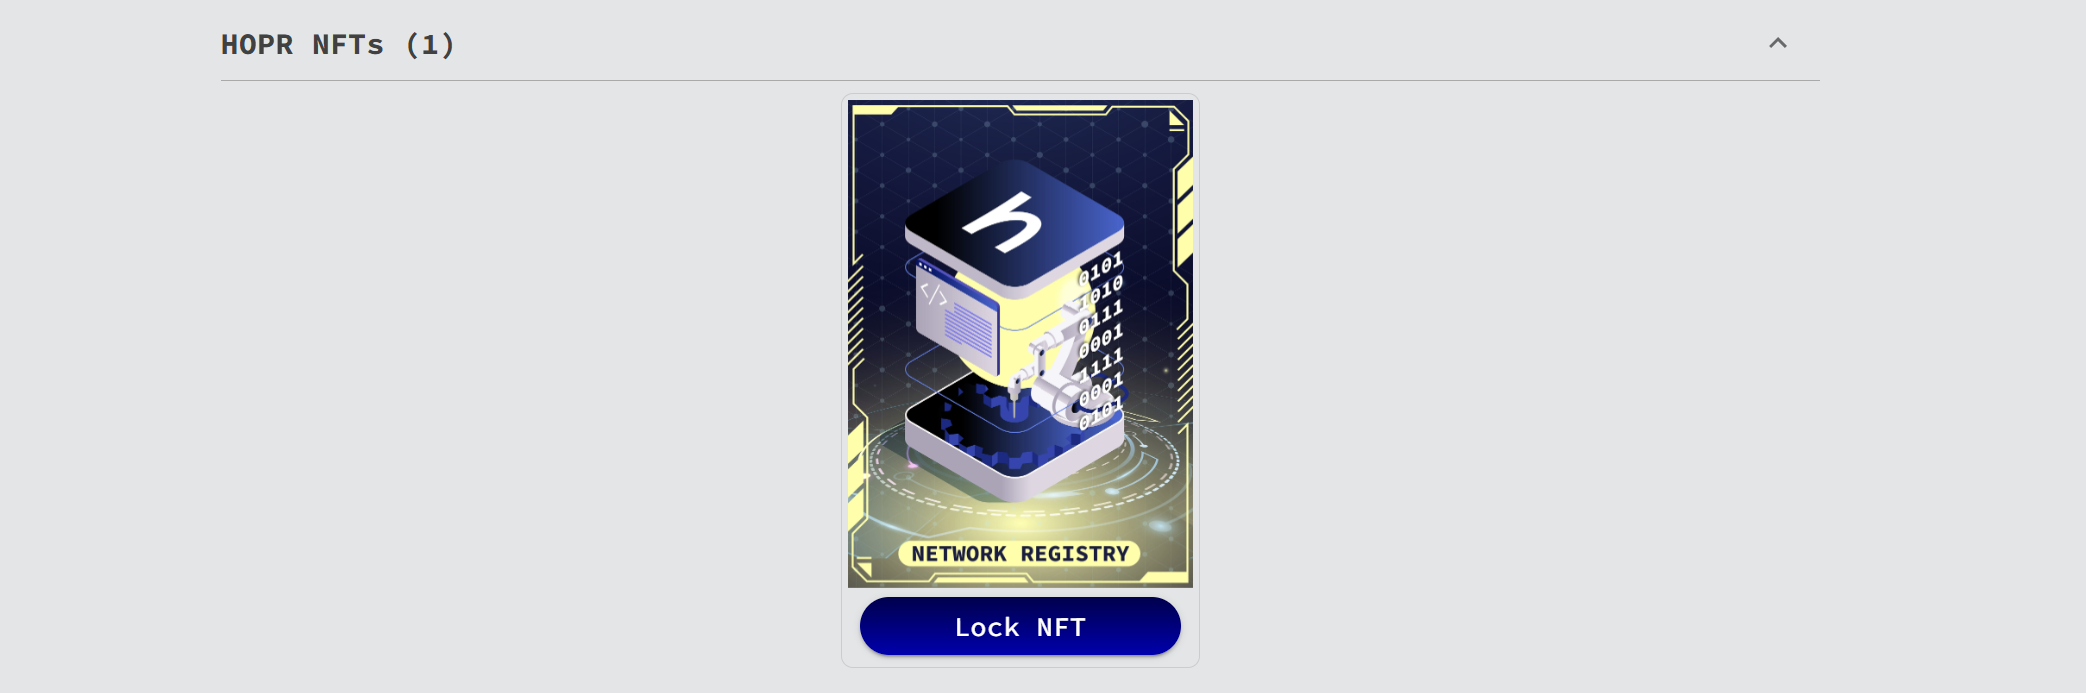
(4) Click Lock NFT
(5) Wait for the transaction to go through and make sure your NFT now appears under 'locked HOPR NFTs'.
Step 2: Get your peerID
To continue, you first need to have installed a HOPR node. You can use one of the following three methods to do so:
If you do not have an Avado or Dappnode, use Docker to install the node on your device.
Continue here once you have installed a node and can see the hopr-admin interface.
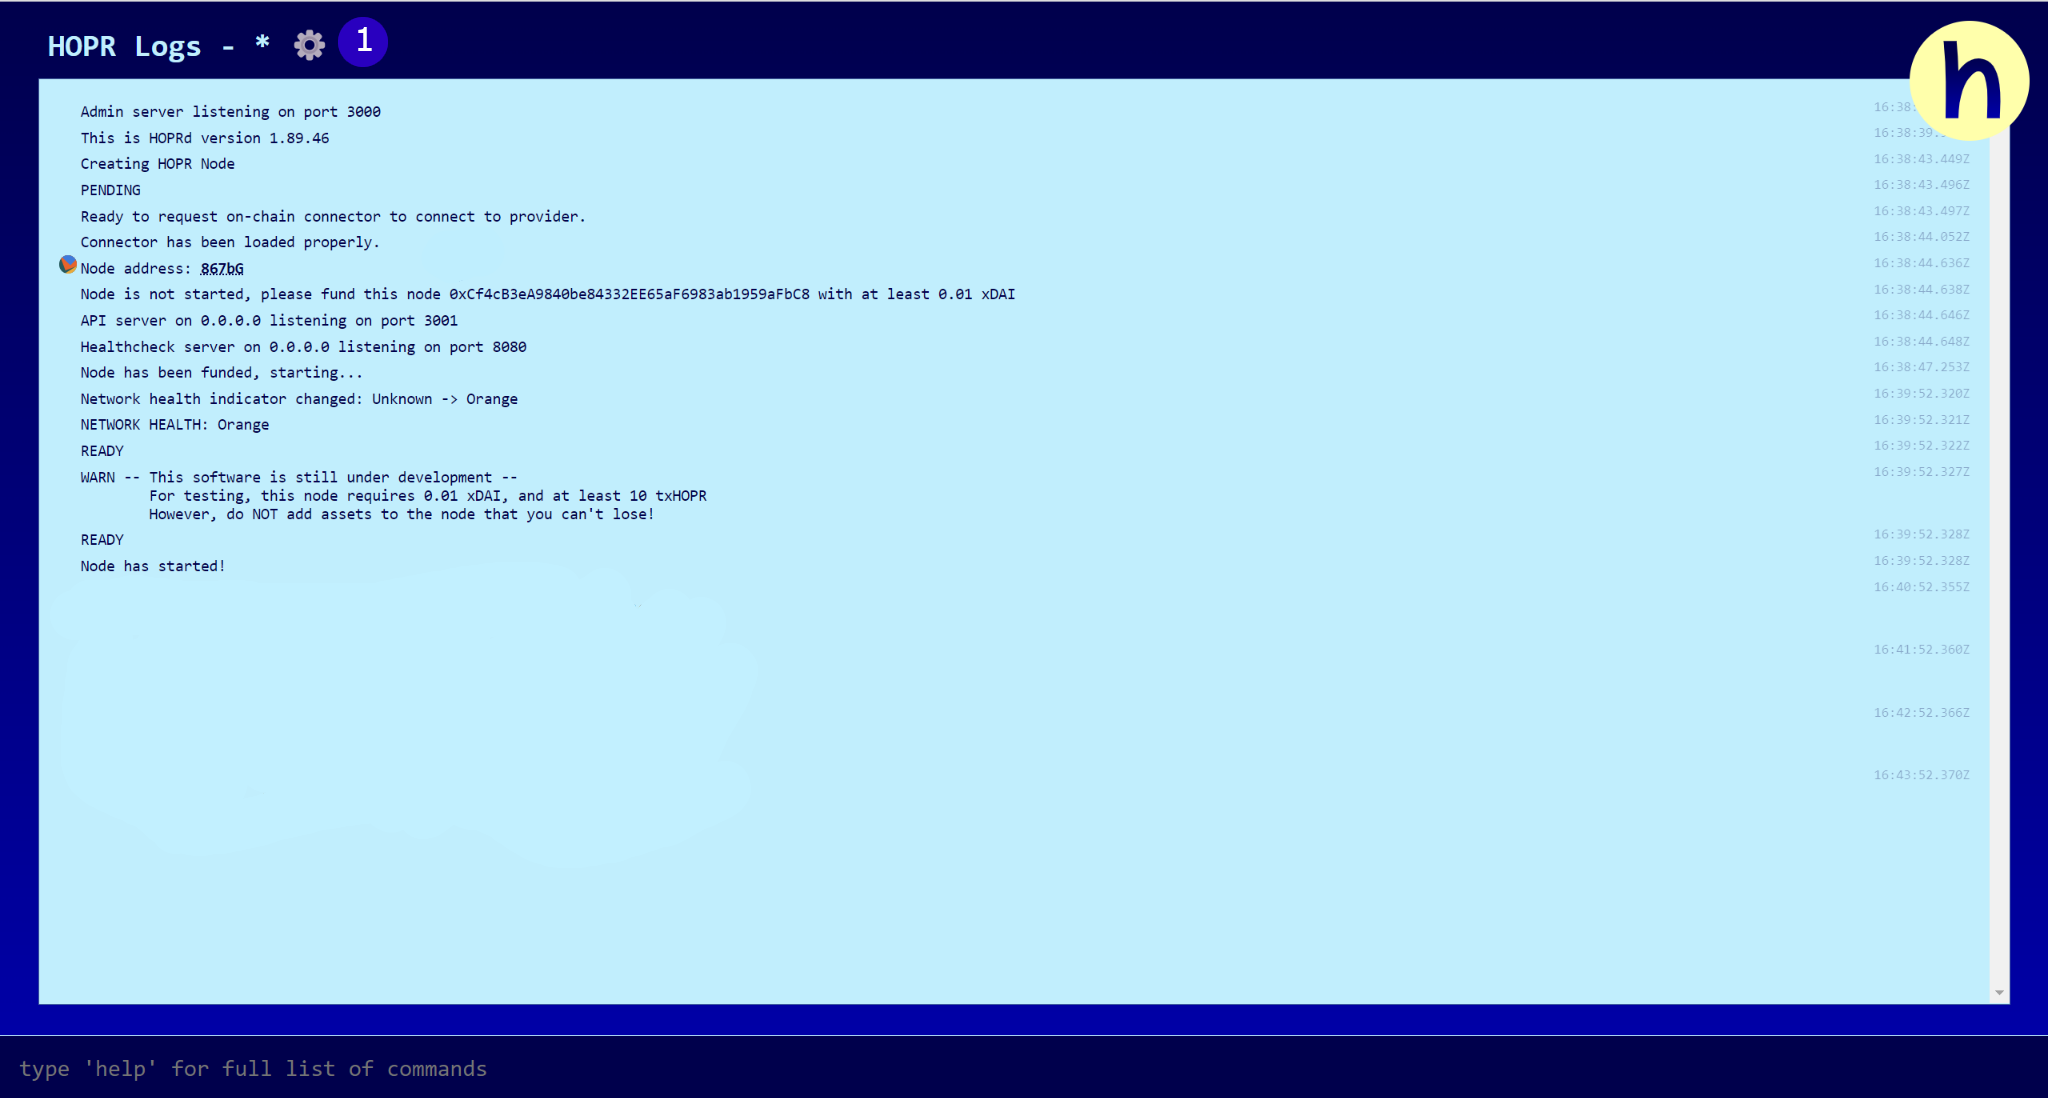
Hopr-admin interface
You should be greeted with a screen similar to the one below, if your screen is yellow and asks you to check your settings, you need to check your security token and API endpoint. (See steps 1 & 2 below.)
(1) Click on the gear icon, this should open a pop-up box.
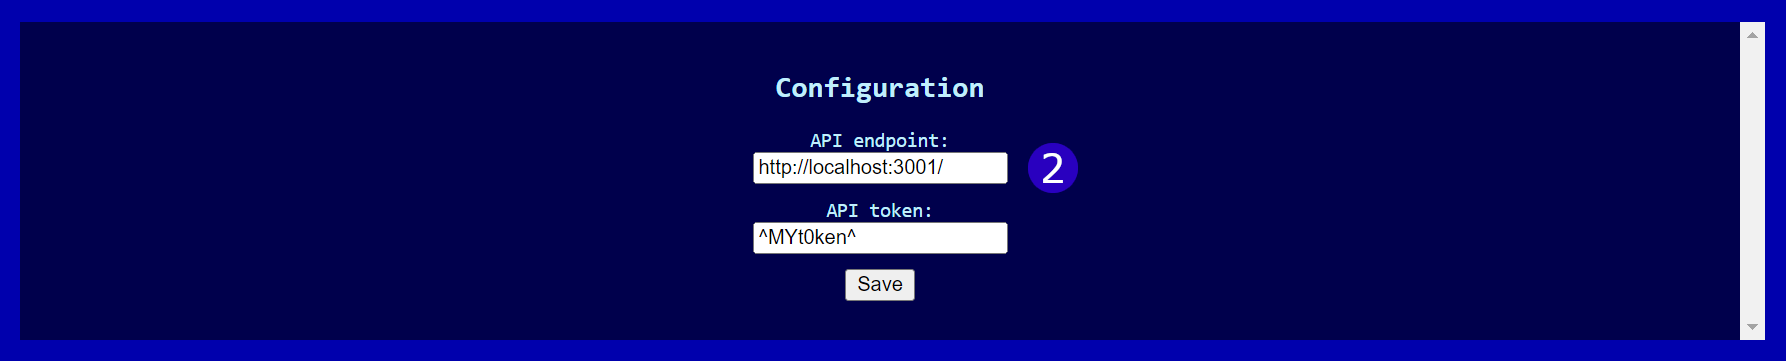
(2) From here, make sure you have the correct information. By default, API endpoint should be set to http://localhost:3001, but you may need to replace localhost with your server IP address if you used a VPS and change the port if you adjusted the mapping on installation.
If you are using an Avado or Dappnode then the endpoints are http://hopr.my.ava.do:3001 and http://hopr.dappnode:3001 respectively.
The API Token is whatever you set your security token as in the installation process.
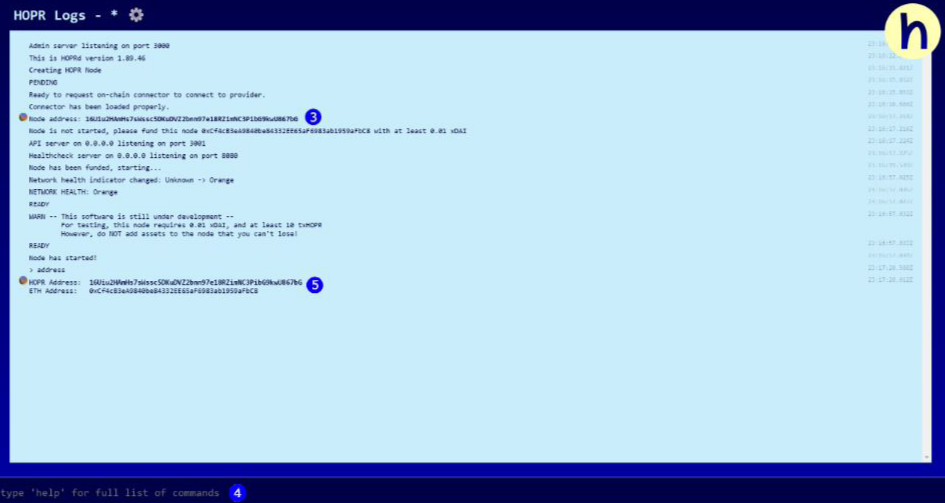
(3) From the admin interface, you should be able to see the peerID labelled as node address. Click on this contracted 5-letter address to expand it to its full length and copy it. The address should look similar to this: 16Uiu2HAmMBYpQVq7rfFxV5iP3JPXJKs1dqRe2Z6HX7zXJgwjTzjV.
(4) Alternatively, you can type ‘address’ into the command line.
(5) your peerID will be outputted as your HOPR address.
At this point, you should have the peerID of the node you want to register copied and your network registry NFT staked. Keep the admin interface open. You may need it to confirm your registration later.
Note: A community NFT will only give you access to run a single node for the initial release. Although, it is possible to de-register a node to register a different one (explained at the end of step 3 below).
Step 3: Registering your peerID
(1) Go to the network registry smart contract on gnosisscan
Scroll down and make sure you are on the Write Contract tab.

(2) Connect the wallet which you used to stake your NFT
(3) Locate the function selfRegister. It should be the 8th function under 'Write Contract'.

(4) In the text field, paste your peerID. The Peer Id must be enclosed in square brackets and quotation marks. Example: ["16Uiu2HAmMBYpQVq7rfFxV5iP3JPXJKs1dqRe2Z6HX7zXJgwjTzjV"]
(5) Click Write and confirm the transaction (if prompted to do so by your wallet).
If you have connected a wallet which has staked an NFT and entered a valid peerID, this transaction should succeed. You can find your block confirmation on Gnosisscan.
If it fails, make sure you:
- Have entered the correct peerID
- Have staked your NFT
- Are connected to this contract using the same wallet you staked your NFT with
If all of the above is true and the transaction still fails, message us on telegram, and a member of our team will assist you.
De-registering your peerID
You may want to de-register your peerID to use a different node since each community NFT currently only allows access to a single node.
You can do this using the selfDeregister function under 'Write Contract'. Follow the same steps as when registering your node. Enter the peerID of the node you wish to de-register whilst having your wallet connected. The connected wallet must be the same as the one used to stake your NFT. The Peer Id must be enclosed in square brackets and quotation marks. Example: ["16Uiu2HAmMBYpQVq7rfFxV5iP3JPXJKs1dqRe2Z6HX7zXJgwjTzjV"]
Then, follow step 3 above to register the node you want to use.
Step 4: Confirm your registration
Once the transaction has successfully been completed, you can use the same smart contract to confirm your registration.
Note: you will not be registered instantly and should wait a few minutes before checking.
To check if you have been registered:
(1) Switch to the Read Contract tab.

(2) Find the functon isNodeRegisteredAndEligible, it should be the 4th function under 'Read Contract'.

(3) Enter your peerID into the text field and click Query.
(4) If your node has been registered, you should receive the text output: (bool) : true.
(5) If it returns false, wait a few minutes and try again.
The registration process is now complete! You can proceed to our hopr-admin tutorial.
Note: Your node must have at least one payment channel open to be eligible for rewards. You can read more about this below under Monte Rosa rewards, but we recommend completing the tutorial to familiarise yourself with payment channels.
Alternative method: Using hopr-admin
(1) Open the hopr-admin interface, you should hopefully have kept it open from step 2. If not, reopen it.
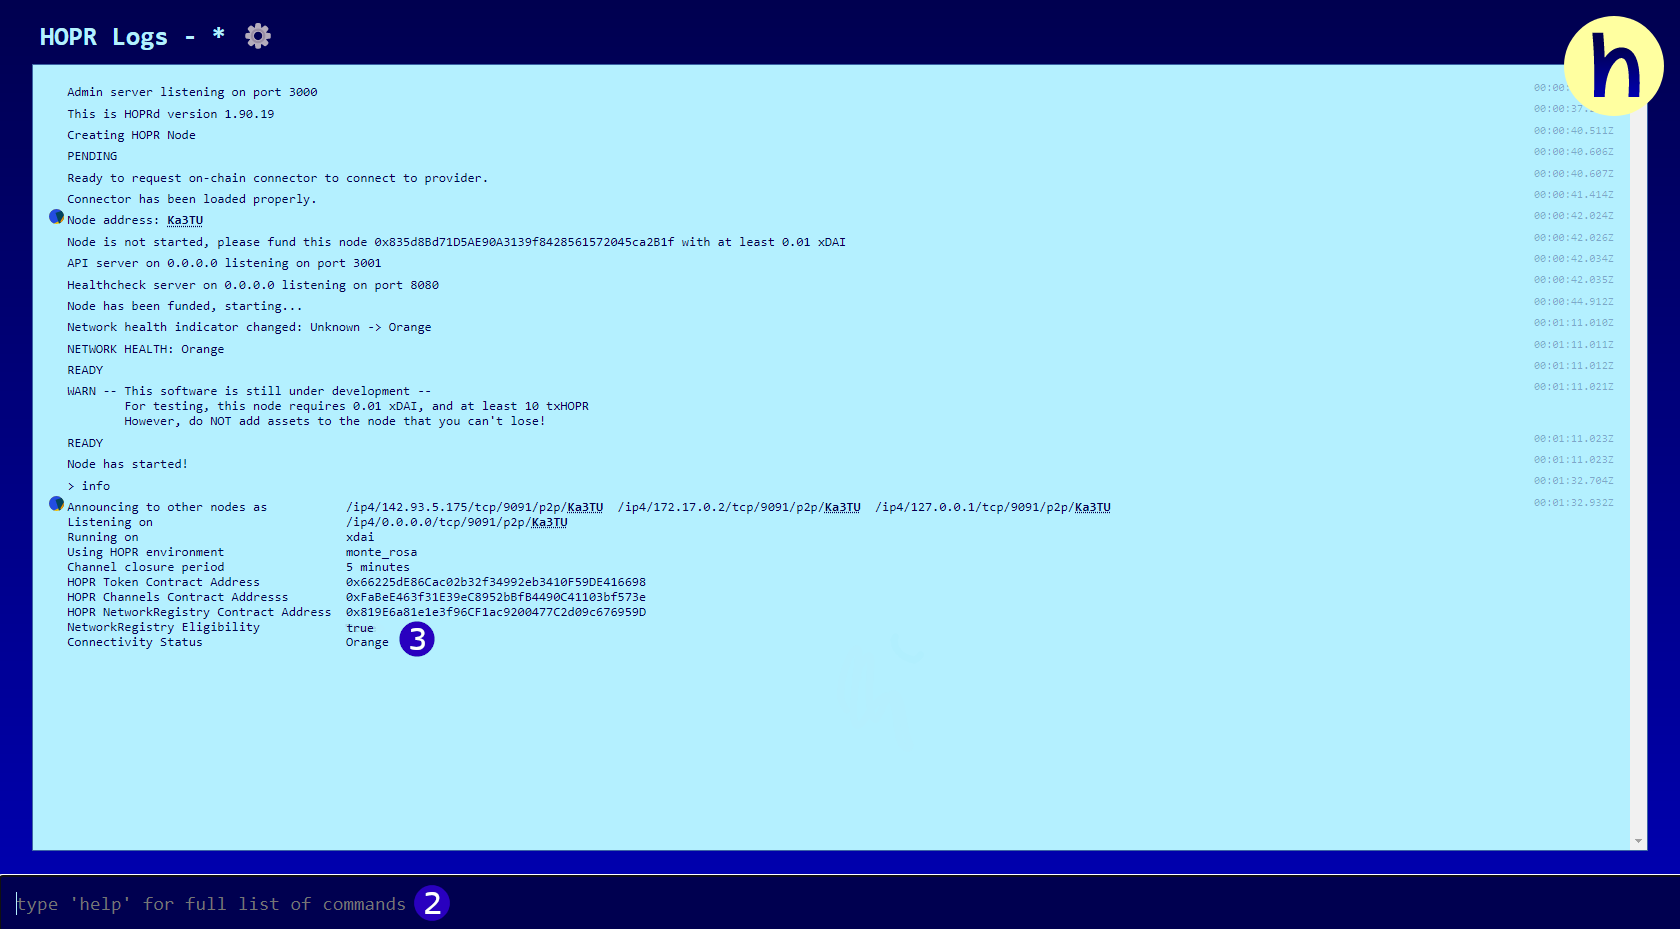
(2) Type ‘info’ into the command line
(3) Check that Network registry eligibility is set to ‘true’
(4) If it is still false, wait a few minutes and check again
Monte Rosa rewards
Participants of the Monte Rosa release will be rewarded depending on their uptime. The more active and available your node is, the higher you will score. Your uptime (and score) will be measured through pings sent out by four nodes controlled by HOPR.
To become visible to these nodes, you should:
- Open a payment channel with any node on the network
- Ping each of the HOPR-controlled nodes
If you are unfamiliar with HOPR commands, start by completing the hopr-admin tutorial.
Nodes to ping:
16Uiu2HAmTHiLF5msGmRzQDLZv1XLTSR3BcoDsn912JA5rVESupWb
16Uiu2HAkz3qkpDZmqC8sdGCZghG7RWfGwd2ACAKWjRutqMvSSowZ
16Uiu2HAkxDbueSuUZ2Kd7YFF5fFjG1fCHLnTNfjexu6mGcgEdZoJ
16Uiu2HAm5FwCGb7MhYuw1ddto12LBhsc5bKfZ1XEjegUMBzAWbv4
These four nodes will ping each node on the network registry at randomised intervals throughout the day and record whether or not the ping was received and its latency if received. This is publicly viewable at network.hoprnet.org.
You can use this site to search your peerID (or any peerID on the network) and view its availability, average latency, and total pings received. HOPR will use these metrics to give each node a score, and at the end of the initial release, rewards will be distributed as follows:
- Top 25% receive a diamond NFT
- 25-50% receive a gold NFT
- 50-75% receive a silver NFT
- Bottom 25% receive a bronze NFT
Each NFT gives a sizeable APR boost when staking HOPR tokens, with higher ranked NFTs providing both a better APR and a better rank on future waitlists. As HOPR NFTs are often used as an indicator to decide participants for early access. So if you are not using a hardware node such as Avado or Dappnode, consider the following setups to maximise your uptime:
- Using Tmux or Screen on a VPS to run your node 24/7
- Using a machine that can remain plugged in throughout the day. E.g. avoid laptops