Using Docker
The instructions below are for Linux and macOS. If you have Windows, please use a VPS.
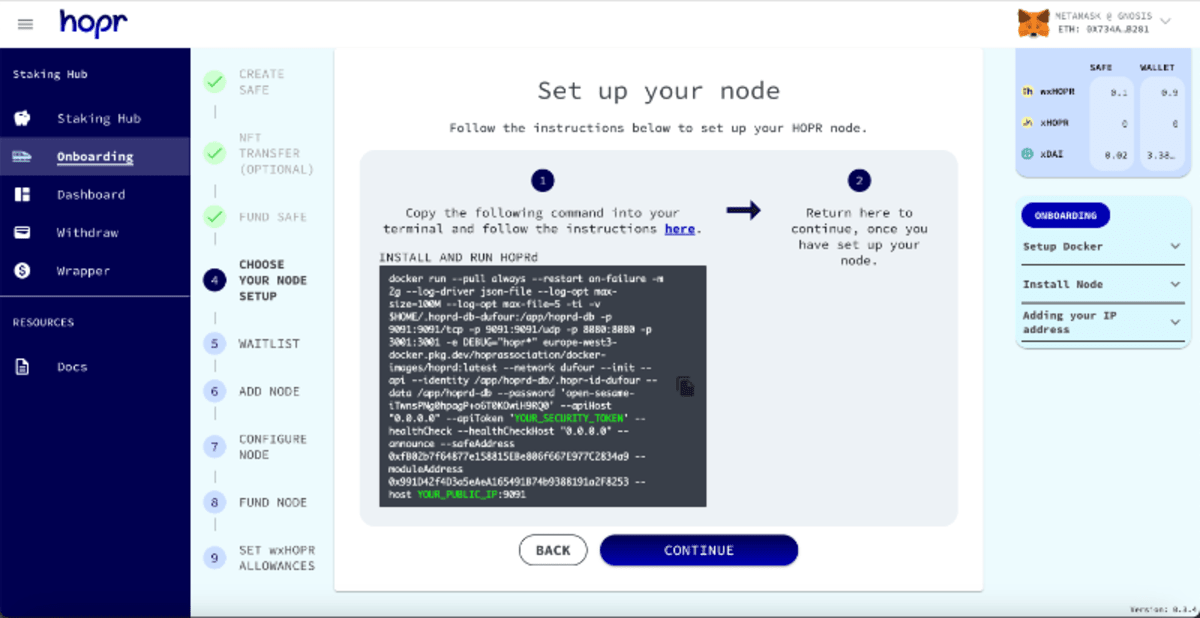
Do not start installing a HOPR node without a HOPR Safe. To create a HOPR Safe and run a node please follow the onboarding process here.
1. Install Docker
Before doing anything else, you need to install Docker Desktop on your machine.
- Linux
- macOS
Depending on your distribution, please follow the official guidelines to install and run Docker on your workstation.
- Visit Docker and download Docker Desktop to your computer.
- Follow the wizard steps to ensure Docker is installed.
- Ensure the installation was successful by running
docker psin your terminal.
2. Configure Command
The default command provided below will look similar to the one provided during the onboarding process. Whether you are onboarding a new node or trying to re-run an old one, the default command needs to be configured before you can use it to run a node.
Default command (do not copy, use the command provided within the onboarding process):
docker run --pull always -d --restart always -m 3g --platform linux/x86_64 --log-driver json-file --log-opt max-size=100M --log-opt max-file=5 -ti -v $HOME/.hoprd-db-dufour:/app/hoprd-db -p 9091:9091/tcp -p 9091:9091/udp -p 8080:8080 -p 3001:3001 -e DEBUG="hopr*" europe-west3-docker.pkg.dev/hoprassociation/docker-images/hoprd:stable --network dufour --init --api --identity /app/hoprd-db/.hopr-id-dufour --data /app/hoprd-db --password 'open-sesame-iTwnsPNg0hpagP+o6T0KOwiH9RQ0' --apiHost "0.0.0.0" --apiToken 'YOUR_SECURITY_TOKEN' --healthCheck --healthCheckHost "0.0.0.0" --announce --safeAddress <SAFE_WALLET_ADDRESS> --moduleAddress <Module_ADDRESS> --host <YOUR_PUBLIC_IP>:9091 --provider CUSTOM_RPC_PROVIDER
Note: Only use the default command as a starting point if you are restarting an old node and not registering you're node through the onboarding process. If you are setting up this node for the first time, please use the command provided to you within the onboarding process in the Staking Hub. This can also be found in your Staking Hub Dashboard.
2.1 Adjust the API Token
(1) Create a Security Token (password) which satisfies the following requirements:
Security token should contain:
- at least eight symbols
- a lowercase letter
- uppercase letter
- a number
- a special symbol (don't use
%or whitespace)
This ensures the node cannot be accessed by a malicious user residing in the same network.
(2) Replace the apiToken within your docker command with your own security token.
For example: replace --apiToken 'YOUR_SECURITY_TOKEN' with --apiToken 'My#S3cur1ty#Token'.
Note: Make sure to make a note of the API token you have created. You will need it to access HOPR Admin.
2.2 Adjust Safe & Module Addresses
If you have copied the docker command from your Staking Hub onboarding process, you will already have your Safe & Module address by default and can skip this step and go directly to step 2.3.
If you have not copied the command from the onboarding process, you will likely need to replace the Safe and Module addresses and should follow the instructions below:
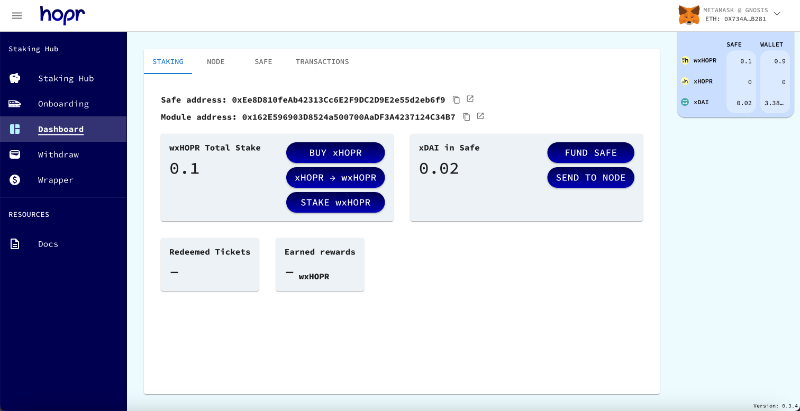
(1) Head over to the Staking Hub Dashboard, and you should find your Safe and Module address at the top of the staking section.
(2) replace the safeAddress and moduleAddress within your docker command with your own security token.
For example replace:
--safeAddress <SAFE_WALLET_ADDRESS>
with
--safeAddress 0xEe8D810feAb42313Cc6E2F9DC2D9E2e55d2eb6f9
And replace:
--moduleAddress <Module_ADDRESS>
with
--moduleAddress 0x0cE0dD1532e58C09bd60bb2a50fad9BB03c541B2
Note: Make sure that the spacing between words is as above. Do not remove the spaces.
2.3 Adjust Public IP Address
You will need to edit your public IP address within the Docker command:
(1) Find your public IP address. If you do not know it, you can follow the instructions here.
(2) Replace the host within your docker command with your own public IP.
For example: replace --host <YOUR_PUBLIC_IP>:9091 with --host 8.8.8.8:9091.
Make sure not to remove the port :9091 at the end.
Note: Dynamic IPs will not work for this, as once your IP address changes, your node will no longer be reachable.
2.4 Adjust custom RPC provider
You will have to adjust with a custom RPC provider. There are several methods to get an RPC provider on the Gnosis chain:
- running your own Gnosis node
- using RPC providers from third parties
- utilizing public RPC endpoints from the chainlist.org website
To obtain the RPC provider URL, you can find guidelines here.
An example with an RPC provider from a third party, replace --provider CUSTOM_RPC_PROVIDER with --provider https://rpc.ankr.com/gnosis.
3. Start Your Node
Once you have configured your docker command correctly, you can start your node by using the now adjusted docker command.
(1) Open your terminal.
(2) Check that Docker is installed by running the following command:
docker --help
If you see an output of available docker commands, Docker is installed. If the docker command is not found, please make sure you have correctly installed Docker.
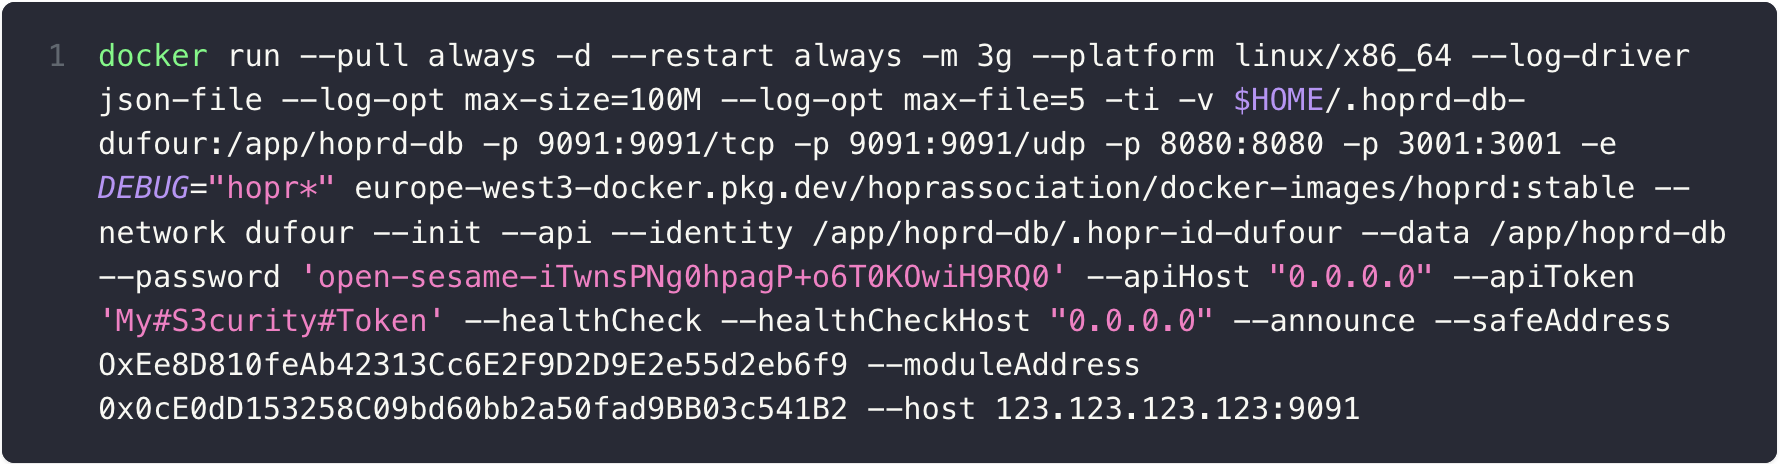
(3) With Docker installed, paste your adjusted docker command into the terminal and execute it. Your adjusted command should look similar to the following below.
Note: Please do not copy this command and use your own, as it will not work. It is provided just as an example.
(4) After running the command, wait for 2-3 minutes. Open a second terminal window on your machine where HOPRd is running and execute the command to gather node details:
docker logs $(docker ps -qf "ancestor=europe-west3-docker.pkg.dev/hoprassociation/docker-images/hoprd:stable") | grep -E 'Node information|Node peerID|Node address'

(5) Copy your Node address and go back to the Staking Hub to register to the waitlist or if you have been approved to join the network, to complete your onboarding.
4. Link Your Node to Your Safe
Only do this if you have been approved to join the network. If you are still on the waitlist, please wait until you have been approved to join the network.
For Linux/macOS
(1) Open your terminal
(2) Paste and execute your configured docker command. If you do not have it saved, you can configure the default command by following the instructions here.
(3) After running the command, wait for 2-3 minutes. Open a second terminal window on your machine where HOPRd is running and execute the command to gather node details:
docker logs $(docker ps -qf "ancestor=europe-west3-docker.pkg.dev/hoprassociation/docker-images/hoprd:stable") | grep -E 'Node information|Node peerID|Node address'
Update Your Node
When a new more stable release is published it is important to update your node to beneifit from the latest software and maximum stability. To update your node, you simply need to kill your old container and run the latest command again.
(1) Enter the following command into your terminal:
docker ps
This should provide you with a list of Docker containers you are currnetly running. Among them locate the one with the label europe-west3-docker.pkg.dev/hoprassociation/docker-images/hoprd:stable and note the container ID.

In the image above the container ID is: a5711c818f75. In your system, the Docker container ID will be different.
(2) Kill the container using the following command:
docker kill {Your_Container_ID}
Note: Replace {Your_Container_ID} with the container ID you noted in step 1. You can also alternatively run the command docker kill $(docker ps -q) to kill all the containers you are currently running if you would like to remove them all.
(3) Run the latest configured command to update your node.
Configure Docker Command with YAML File (Optional)
Instead of passing all of the individual arguments through the CLI, you can pass a single argument pointing to a .yaml file containing all of the individual arguments.
--configurationFilePath=some_config.yaml
Here, the some_config.yaml file would be replaced by the path to the YAML file containing all the configuration parameters. You can view all the possible configurations as well as an example configuration file here.
Run Multiple Nodes With One Device
To run multiple nodes on the same device or VPS, change the ports associated with your node and the location of your node database.
For example:
- Change
-p 9091:9091/tcp -p 9091:9091/udp -p 8080:8080 -p 3001:3001to-p 9092:9092/tcp -p 9092:9092/udp -p 8081:8081 -p 3002:3002 - Change
-v $HOME/.hoprd-db-dufour:/app/hoprd-dbto-v $HOME/.hoprd-db-dufour-2:/app/hoprd-db - Add
--apiPort 3002 - Make sure to suffix your IP address with the new port instead of
9091in this example it would now be9092
All these changes implemented would be similar to the following:

Here, the first node's command (on the left in the image above) is:
docker run --pull always -d --restart always -m 3g --platform linux/x86_64 --log-driver json-file --log-opt max-size=100M --log-opt max-file=5 -ti -v $HOME/.hoprd-db-dufour:/app/hoprd-db -p 9091:9091/tcp -p 9091:9091/udp -p 8080:8080 -p 3001:3001 -e DEBUG="hopr*" europe-west3-docker.pkg.dev/hoprassociation/docker-images/hoprd:stable --network dufour --init --api --identity /app/hoprd-db/.hopr-id-dufour --data /app/hoprd-db --password 'open-sesame-iTwnsPNg0hpagP+o6T0KOwiH9RQ0' --apiHost "0.0.0.0" --apiToken 'YOUR_SECURITY_TOKEN' --healthCheck --healthCheckHost "0.0.0.0" --announce --safeAddress <SAFE_WALLET_ADDRESS> --moduleAddress <Module_ADDRESS> --host <YOUR_PUBLIC_IP>:9091 --provider CUSTOM_RPC_PROVIDER
And the second node's command (on the right in the image above) is:
docker run --pull always -d --restart always -m 3g --platform linux/x86_64 --log-driver json-file --log-opt max-size=100M --log-opt max-file=5 -ti -v $HOME/.hoprd-db-dufour:/app/hoprd-db -p 9092:9092/tcp -p 9092:9092/udp -p 8081:8081 -p 3002:3002 -e DEBUG="hopr*" europe-west3-docker.pkg.dev/hoprassociation/docker-images/hoprd:stable --network dufour --init --api --identity /app/hoprd-db/.hopr-id-dufour --data /app/hoprd-db --password 'open-sesame-iTwnsPNg0hpagP+o6T0KOwiH9RQ0' --apiHost "0.0.0.0" --apiPort 3002 --apiToken 'YOUR_SECURITY_TOKEN' --healthCheck --healthCheckHost "0.0.0.0" --announce --safeAddress <SAFE_WALLET_ADDRESS> --moduleAddress <Module_ADDRESS> --host <YOUR_PUBLIC_IP>:9092 --provider CUSTOM_RPC_PROVIDER