Set Up & Use Docker
The instructions below are for Linux and macOS. If you have Windows, please use a VPS.
Do not start installing a HOPR node without a HOPR Safe. To create a HOPR Safe and run a node please follow the onboarding process here.
There are two installation methods for Docker users:
- Docker
- Docker compose
Most users should use the default simple installation method. The configuration file allows you to make much more detailed and granular changes to your node and how it interacts with the protocol, which is mainly a feature for advanced users.
1. Install Docker
Before doing anything else, you need to install Docker Desktop on your machine.
- Linux
- macOS
Depending on your distribution, please follow the official guidelines to install and run Docker on your workstation.
- Visit Docker and download Docker Desktop to your computer.
- Follow the wizard steps to ensure Docker is installed.
- Ensure the installation was successful by running
docker psin your terminal.
2. Configure Command
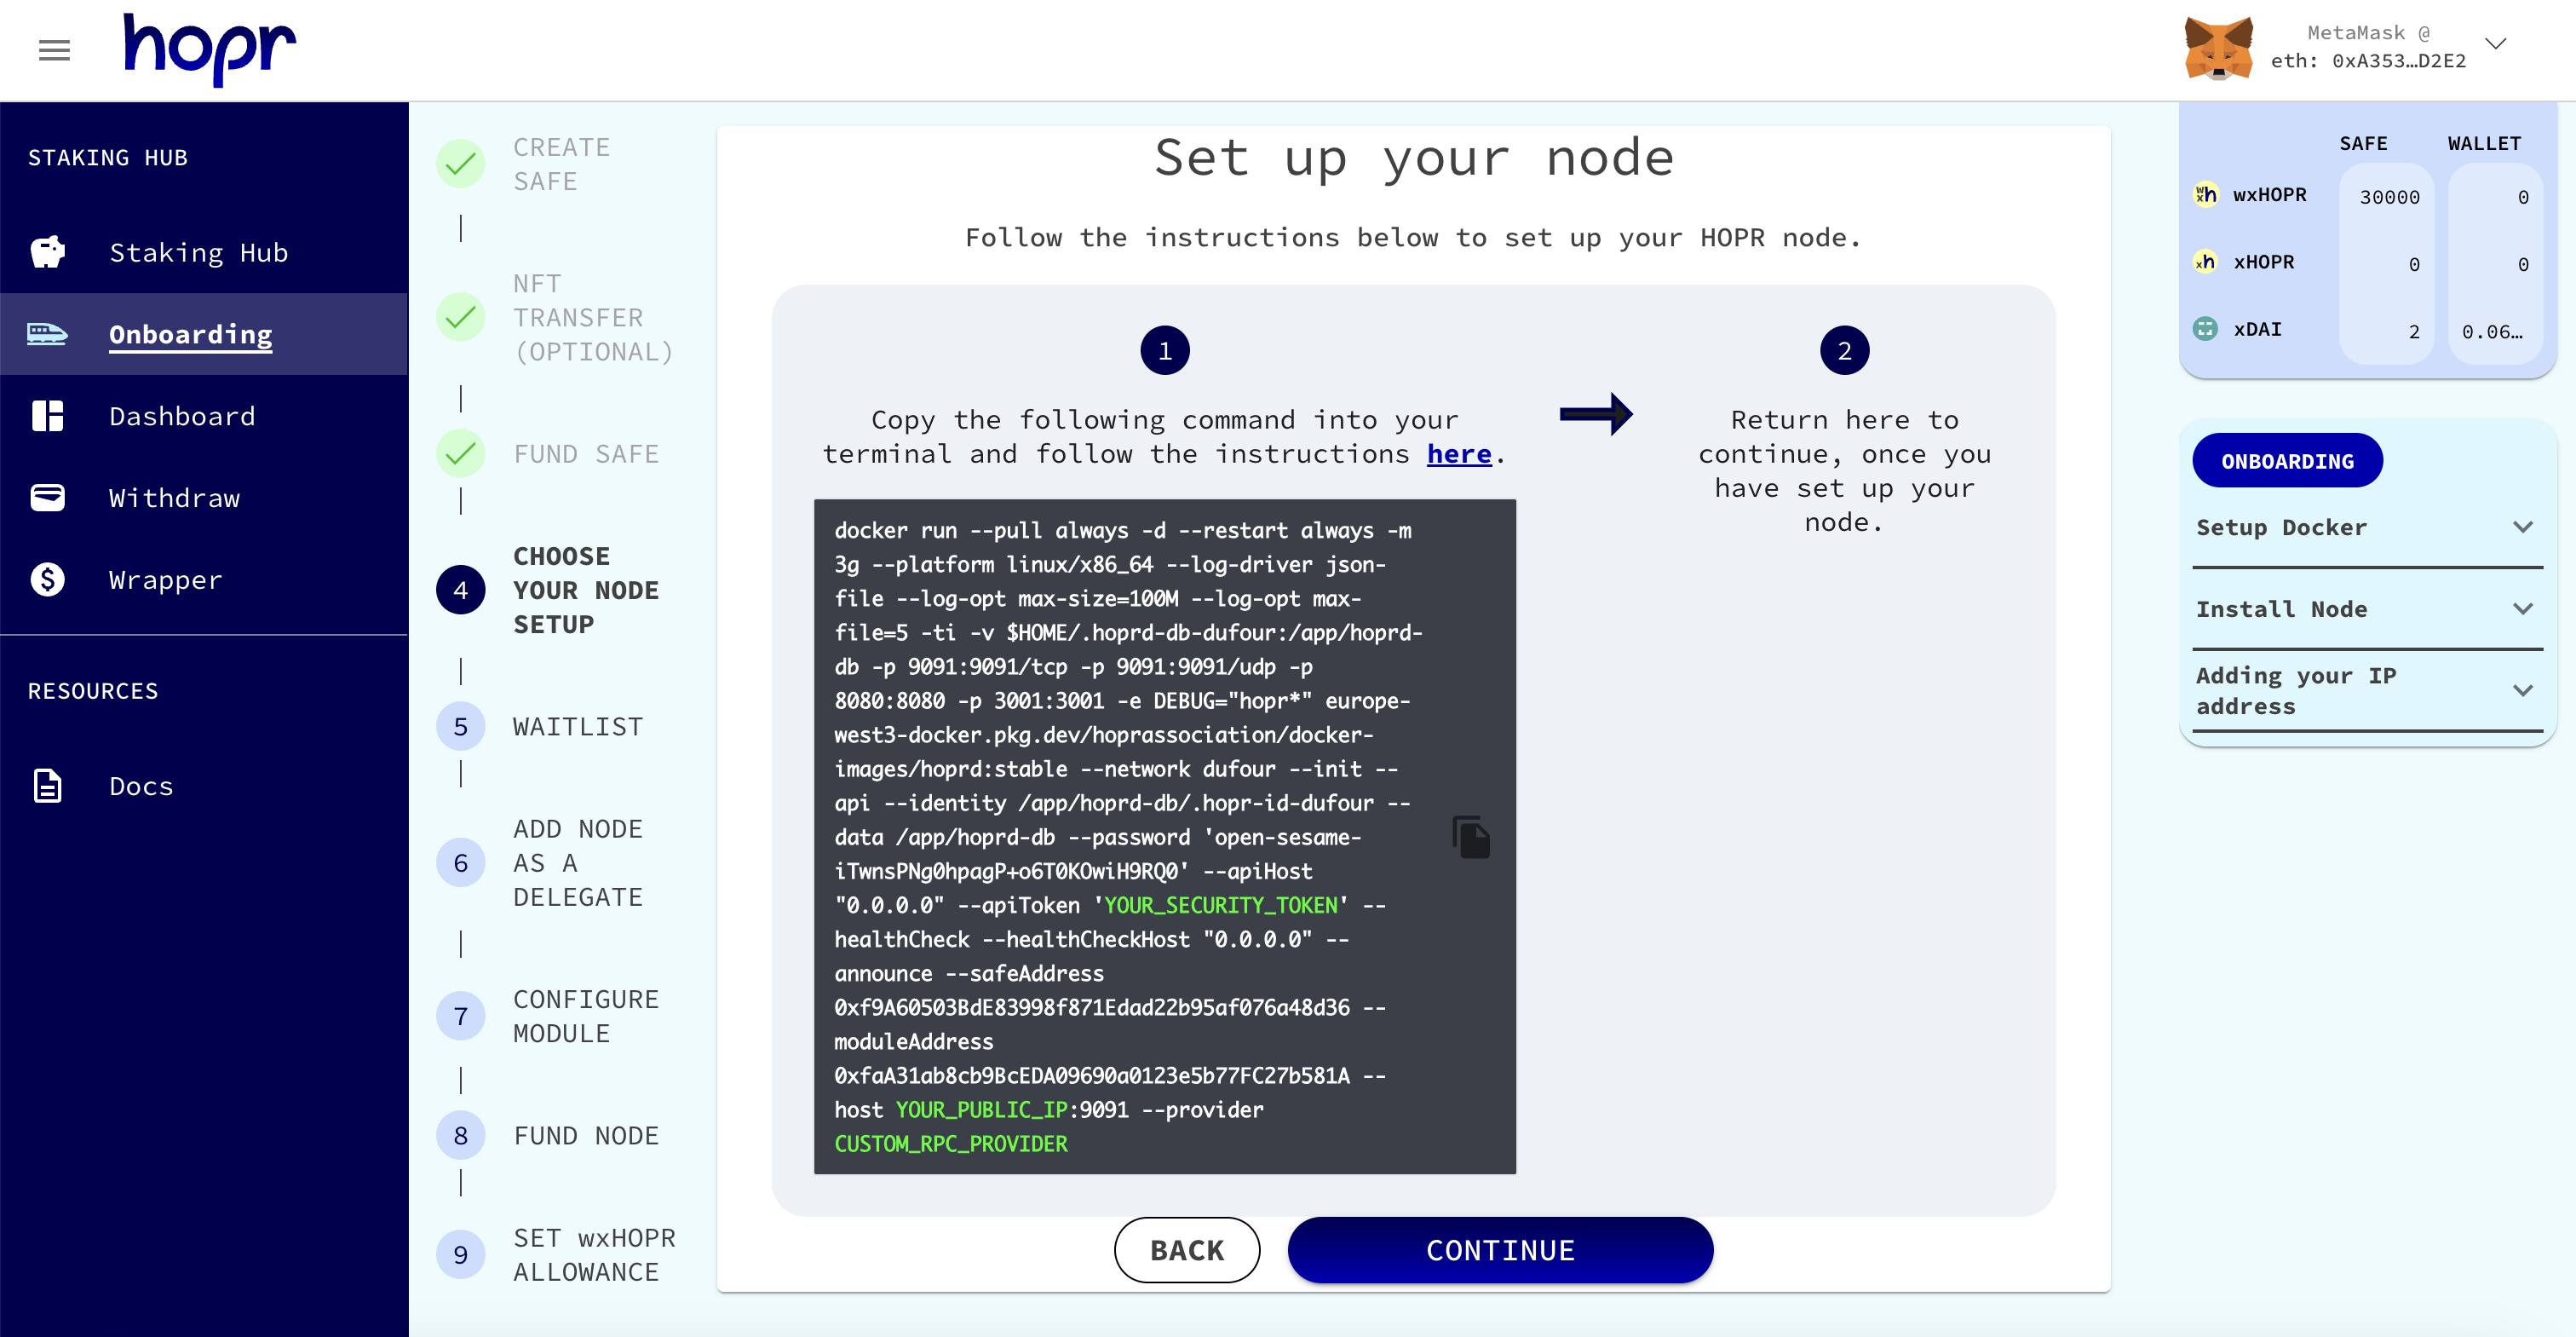
The default command provided below will look similar to the one provided during the onboarding process. Whether you are onboarding a new node or trying to re-run an old one, the default command needs to be configured before you can use it to run a node.
Default command (do not copy, use the command provided within the onboarding process):
docker run --pull always -d --restart on-failure -m 2g --security-opt seccomp=unconfined --platform linux/x86_64 --log-driver json-file --log-opt max-size=100M --log-opt max-file=5 -ti -v $HOME/.hoprd-db-dufour:/app/hoprd-db --name hoprd -p 9091:9091/tcp -p 9091:9091/udp -p 3001:3001 -e RUST_LOG=info europe-west3-docker.pkg.dev/hoprassociation/docker-images/hoprd:stable --network dufour --init --api --announce --identity /app/hoprd-db/.hopr-id-dufour --data /app/hoprd-db --apiHost '0.0.0.0' --apiToken '<YOUR_SECURITY_TOKEN>' --password 'open-sesame-iTwnsPNg0hpagP+o6T0KOwiH9RQ0' --safeAddress <SAFE_WALLET_ADDRESS> --moduleAddress <MODULE_ADDRESS> --host <YOUR_PUBLIC_IP>:9091 --provider <CUSTOM_RPC_PROVIDER>
Note: Only use the default command as a starting point if you are restarting an old node and not registering you're node through the onboarding process. If you are setting up this node for the first time, please use the command provided to you within the onboarding process in the Staking Hub. This can also be found in your Staking Hub dashboard.
2.1 Adjust API Token
(1) Create a Security Token (password) which satisfies the following requirements:
Security token should contain:
- at least eight symbols
- a lowercase letter
- uppercase letter
- a number
- a special symbol (don't use
%or whitespace)
This ensures the node cannot be accessed by a malicious user residing in the same network.
(2) Replace the apiToken within your docker command with your own security token.
For example: replace --apiToken '<YOUR_SECURITY_TOKEN>' with --apiToken 'My#S3cur1ty#Token'.
Note: Make sure to make a note of the API token you have created. You will need it to access HOPR Admin.
2.2 Adjust Safe & Module Addresses
If you have copied the docker command from your Staking Hub onboarding process, you will already have your Safe & Module address by default and can skip this step and go directly to step 2.3.
If you have not copied the command from the onboarding process, you will likely need to replace the Safe and Module addresses and should follow the instructions below:
(1) Head over to the Staking Hub dashboard, and you should find your Safe and Module address at the top of the staking section.

(2) replace the safeAddress and moduleAddress within your docker command with your own security token.
For example replace:
--safeAddress <SAFE_WALLET_ADDRESS>
with
--safeAddress 0xEe8D810feAb42313Cc6E2F9DC2D9E2e55d2eb6f9
And replace:
--moduleAddress <Module_ADDRESS>
with
--moduleAddress 0x0cE0dD1532e58C09bd60bb2a50fad9BB03c541B2
Note: Make sure that the spacing between words is as above. Do not remove the spaces.
2.3 Adjust Public IP Address
You will need to edit your public IP address within the Docker command:
(1) Find your public IP address. If you do not know it, you can follow the instructions here.
(2) Replace the host within your docker command with your own public IP.
For example: replace --host <YOUR_PUBLIC_IP>:9091 with --host 123.123.123.123:9091.
Make sure not to remove the port :9091 at the end.
Important: Dynamic IPs will not work for this, as once your IP address changes, your node will no longer be reachable. If you have a dynamic IP, please use a DDNS and enter that as your public IP within the docker command. You can see instructions on how to do this here.
2.4 Adjust Custom RPC provider
You will have to adjust with a custom RPC provider. There are several methods to get an RPC provider on the Gnosis chain:
- running your own Gnosis node
- using RPC providers from third parties
- utilizing public RPC endpoints from the chainlist.org website
To obtain the RPC provider URL, you can find guidelines here.
An example with an RPC provider from a third party, replace --provider CUSTOM_RPC_PROVIDER with --provider https://rpc.gnosischain.com/.
2.5 Change Database Password (Recommended)
Do not change the database password after your node has been created. Using a new password will generate an entirely new identity file. Only change the default password on node creation.
(1) Create a Password which satisfies the following requirements:
Security token should contain:
- at least eight symbols
- a lowercase letter
- uppercase letter
- a number
- a special symbol (don't use
%or whitespace)
This ensures the node cannot be accessed by a malicious user residing in the same network.
(2) Replace the default password within your docker command with your new one.
For example: replace --password 'open-sesame-iTwnsPNg0hpagP+o6T0KOwiH9RQ0' with --password 'My#Un1que#Password'.
3. Start Your Node
Once you have configured your docker command correctly, you can start your node by using the now adjusted docker command.
(1) Open your terminal.
(2) Check that Docker is installed by running the following command:
docker --help
If you see an output of available docker commands, Docker is installed. If the docker command is not found, please make sure you have correctly installed Docker.
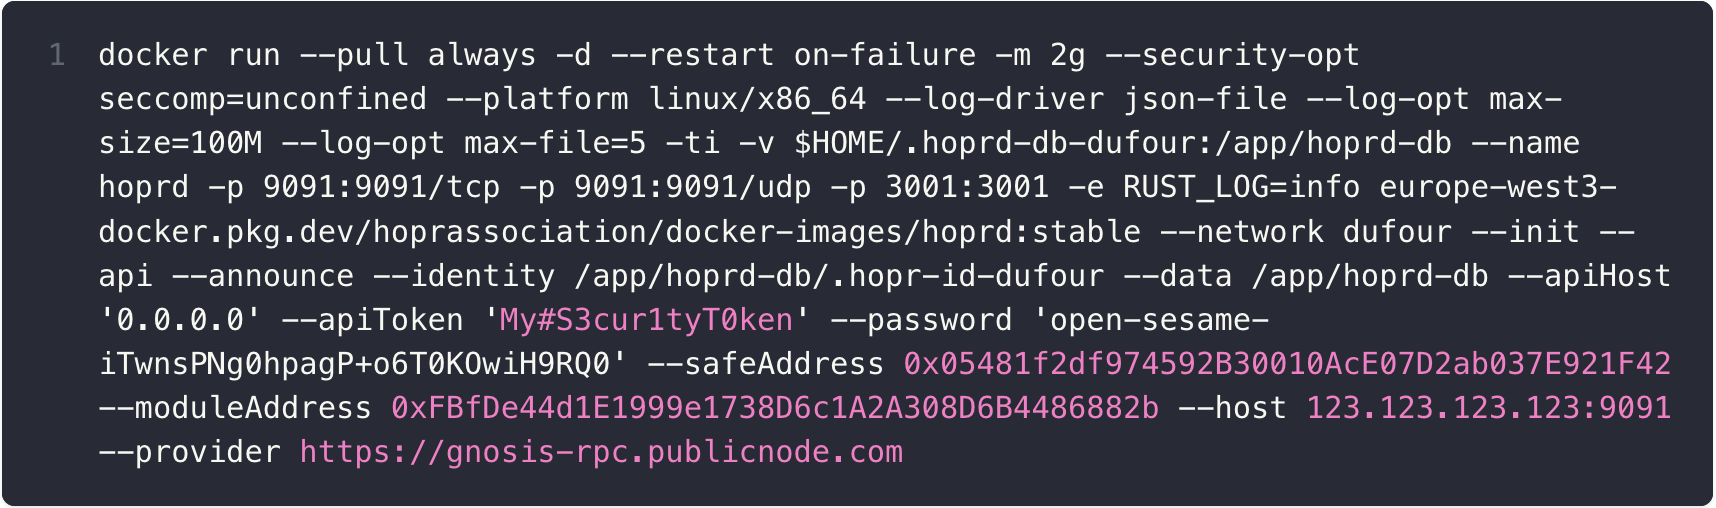
(3) With Docker installed, paste your adjusted docker command into the terminal and execute it. Your adjusted command should look similar to the following below.
Note: Please do not copy this command and use your own, as it will not work. It is provided just as an example.
(4) After running the command, wait for 2-3 minutes. Open a second terminal window on your machine where HOPRd is running and execute the command to gather node details:
docker logs $(docker ps -qf "ancestor=europe-west3-docker.pkg.dev/hoprassociation/docker-images/hoprd:stable") | grep -E 'Node information|Node peerID|Node address'

(5) Copy your Node address and go back to the Staking Hub to register to the waitlist or if you have been approved to join the network, to complete your onboarding.
3.1 Backup Your Identity file
For Docker the identity file is automatically created and stored on your OS at the path specified: /<computer username>/.hoprd-db-dufour/.hopr-id-dufour.
(1) Access this file at the path /<computer username>/.hoprd-db-dufour/.hopr-id-dufour and copy it.
(2) Store this file somewhere safe along with your DB password, in case you ever need to restore your node.
Note: Your DB password is set to open-sesame-iTwnsPNg0hpagP+o6T0KOwiH9RQ0 by default, unless you changed it, when configuring your command.
4. Link Your Node to Your Safe
Only do this if you have been approved to join the network. If you are still on the waitlist, please wait until you have been approved to join the network.
For Linux/macOS
(1) Open your terminal
(2) Paste and execute your configured docker command. If you do not have it saved, you can configure the default command by following the instructions here.
(3) After running the command, wait for 2-3 minutes. Open a second terminal window on your machine where HOPRd is running and execute the command to gather node details:
docker logs $(docker ps -qf "ancestor=europe-west3-docker.pkg.dev/hoprassociation/docker-images/hoprd:stable") | grep -E 'Node information|Node peerID|Node address'
5. Next Steps
Once you've completed the above steps, you should have a working HOPR node. You will then want to access the HOPR admin panel to interact with your node. You can read how to access and set up HOPR admin here.
Set Up Node Using Configuration File
Using the configuration file will allow you to customize your node's settings at a much more detailed level, which is otherwise impossible.
(1) First, set up your own custom configuration file. You can find instructions on how to do that here.
Note: Make sure you save the configuration file within your database directory as suggested within the instructions.
(2) With your configuration file saved, copy the following command and make sure the path to the configuration file is correct.
docker run --pull always -d --restart on-failure -m 2g --security-opt seccomp=unconfined --platform linux/x86_64 --log-driver json-file --log-opt max-size=100M --log-opt max-file=5 -ti -v $HOME/.hoprd-db-dufour:/app/hoprd-db --name hoprd -p 9091:9091/tcp -p 9091:9091/udp -p 3001:3001 -e RUST_LOG=info europe-west3-docker.pkg.dev/hoprassociation/docker-images/hoprd:stable --configurationFilePath '/app/hoprd-db/hoprd.cfg.yaml'
Note: If your database is located in the default directory, .hoprd-db-dufour and you have saved your configuration file there. Then you have nothing to adjust.
(3) With Docker installed, paste your docker command into the terminal and execute it.
(4) After running the command, wait for 2-3 minutes. Open a second terminal window on your machine where HOPRd is running and execute the command to gather node details:
docker logs $(docker ps -qf "ancestor=europe-west3-docker.pkg.dev/hoprassociation/docker-images/hoprd:stable") | grep -E 'Node information|Node peerID|Node address'
(5) Copy your Node address and go back to the Staking Hub to register to the waitlist or if you have been approved to join the network, to complete your onboarding.
Here's an improved version of your content, organized for clarity and ease of understanding:
Setting Up a Node with Docker Compose
Docker Compose provides a sophisticated setup, allowing the use of a configuration file and node monitoring tools to enhance your node management experience.
1. Download the "compose" Folder
Start by downloading the "compose" folder from the HOPR repository to your local machine:
wget -O saint-louis.zip https://github.com/hoprnet/hoprnet/archive/refs/heads/release/saint-louis.zip && unzip saint-louis.zip "hoprnet-release-saint-louis/deploy/compose/*" -d extracted_files && mv extracted_files/hoprnet-release-saint-louis/deploy/compose . && rm -rf saint-louis.zip extracted_files
2. Set Up Environment Variables
Inside "compose" folder, rename .env.example to .env and adjust the following environment variables as needed:
HOPRD_API_PORT: The REST API port, default is 3001. (Connects your node with the Admin UI)HOPRD_P2P_PORT: The peer-to-peer communication port, default is 9091. (This port should be exposed to enable external connections to your node)
mv .env.example .env
3. Configure the YAML File
Modify the configuration file hoprd.cfg.yaml according to these guidelines.
4. Manage the Identity File
Note: If you have previously run a node, move the identity file into the "compose" folder and rename it to hopr.id. If this is your first time running a node, hopr.id will be generated automatically when you launch the HOPRd node.
5. Organize Multiple Nodes
If you are running multiple nodes, adjust the folder name "compose" to a unique name for each instance to avoid conflicts. How to run multiple HOPRd nodes under the docker compose setup follow here
6. Launch with Docker Compose
Docker Compose supports multiple profiles: hoprd for the node, admin-ui for the user interface. Ensure you are in the "compose" folder when executing these commands:
To launch the HOPR node only:
COMPOSE_PROFILES=hoprd docker compose up -d
To launch the HOPR Admin UI only:
COMPOSE_PROFILES=admin-ui docker compose up -d
To launch both the HOPRd node and the HOPR Admin UI:
COMPOSE_PROFILES=hoprd,admin-ui docker compose up -d
This structured setup guide should help streamline your node deployment process using Docker Compose, enhancing both management and operational efficiency.
Update the HOPR node
Before updating your HOPR node, please make sure to write down the following information, which you will need during the update process: Database password, safe & module address, host.
Please note that significant changes have been introduced between versions 2.0.x and 2.1.x. During the upgrading process, there are additional steps you'll need to take:
When a new more stable release is published it is important to update your node to benifit from the latest software and maximum stability. To update your node, you simply need to kill your old container and run the latest command again.
(1) Backup your identity file. Please follow the instructions here.
(2) Enter the following command into your terminal:
docker ps
This should provide you with a list of Docker containers you are currnetly running. Among them locate the one with the label europe-west3-docker.pkg.dev/hoprassociation/docker-images/hoprd:stable and note the container ID.

In the image above the container ID is: a5711c818f75. In your system, the Docker container ID will be different.
(3) Kill the container using the following command:
docker kill <Your_Container_ID>
Note: Replace <Your_Container_ID> with the container ID you noted in step 1. You can also alternatively run the command docker kill $(docker ps -q) to kill all the containers you are currently running if you would like to remove them all.
(4) Run the latest configured command to update your node.
Restart Your Node
If your node has the --restart on-failure tag (added by default), your node will restart automatically when it fails or crashes.
If you want to restart your node manually, you can follow the exact same instructions as you would when updating your node.
Restore an Old Node
If you start using a new VPS or have to restore an old node for whatever reason, you will need:
- The identity file of your old node, which you should have backed up.
- The database password you set when you originally made your old node.
(1) Paste your old node's identity file to the new VPS or OS.
(2) In the latest docker command, change the --identity to point to the new location of your identity file.
(3) Change the --password tag to exactly the same database password you set for your previous node.
(4) Change the --data tag to point to the directory you want to store your node's data
(5) Configure the remainder of the command as you normally would and then run it.
You should now be running your old node.
Run Multiple Nodes with Docker
To run multiple nodes on the same device or VPS, change the ports associated with your node and the location of your node database. Every node has to have different ports and they should not match between each nodes you are running on the same device or VPS.
For example, the second node should make these changes:
- Change
-p 9091:9091/tcp -p 9091:9091/udp -p 3001:3001to-p 9092:9092/tcp -p 9092:9092/udp -p 3002:3002 - Change
-v $HOME/.hoprd-db-dufour:/app/hoprd-dbto-v $HOME/.hoprd-db-dufour-2:/app/hoprd-db - Add
--apiPort 3002(where first defaults to 3001) - Make sure to suffix your IP address with the new port instead of
9091in this example it would now be9092 - Give a different name to your second node by changing
--name hoprdto--name hoprd-2
All these changes implemented would be similar to the following:

Here, the first node's command (on the left in the image above) is:
docker run --pull always -d --restart on-failure -m 2g --security-opt seccomp=unconfined --platform linux/x86_64 --log-driver json-file --log-opt max-size=100M --log-opt max-file=5 -ti -v $HOME/.hoprd-db-dufour:/app/hoprd-db --name hoprd -p 9091:9091/tcp -p 9091:9091/udp -p 3001:3001 -e RUST_LOG=info europe-west3-docker.pkg.dev/hoprassociation/docker-images/hoprd:stable --network dufour --init --api --announce --identity /app/hoprd-db/.hopr-id-dufour --data /app/hoprd-db --apiHost '0.0.0.0' --apiToken '<YOUR_SECURITY_TOKEN>' --password 'open-sesame-iTwnsPNg0hpagP+o6T0KOwiH9RQ0' --safeAddress <SAFE_WALLET_ADDRESS> --moduleAddress <MODULE_ADDRESS> --host <YOUR_PUBLIC_IP>:9091 --provider <CUSTOM_RPC_PROVIDER>
And the second node's command (on the right in the image above) is:
docker run --pull always -d --restart on-failure -m 2g --security-opt seccomp=unconfined --platform linux/x86_64 --log-driver json-file --log-opt max-size=100M --log-opt max-file=5 -ti -v $HOME/.hoprd-db-dufour-2:/app/hoprd-db --name hoprd-2 -p 9092:9092/tcp -p 9092:9092/udp -p 3002:3002 -e RUST_LOG=info europe-west3-docker.pkg.dev/hoprassociation/docker-images/hoprd:stable --network dufour --init --api --announce --identity /app/hoprd-db/.hopr-id-dufour --data /app/hoprd-db --apiHost '0.0.0.0' --apiPort 3002 --apiToken '<YOUR_SECURITY_TOKEN>' --password 'open-sesame-iTwnsPNg0hpagP+o6T0KOwiH9RQ0' --safeAddress <SAFE_WALLET_ADDRESS> --moduleAddress <MODULE_ADDRESS> --host <YOUR_PUBLIC_IP>:9091 --provider <CUSTOM_RPC_PROVIDER>
Run Multiple Nodes with Docker Compose
To operate multiple nodes on the same device or VPS, you must use distinct "compose" folders for each node and ensure that their assigned ports do not overlap.
Example Configuration for a Second Node
To set up an additional node, follow these steps to avoid conflicts and ensure proper operation:
1. Rename the Compose Folder
- Change the folder name from
composetoHOPRd-node-2to differentiate this node's environment.
2. Modify Environment Variables
Make adjustments under .env file within your new HOPRd-node-2 folder:
- Change the
HOPRD_API_PORTfrom3001to3002. - Adjust the
HOPRD_P2P_PORTfrom9091to9092.
3. Modify YAML file
Make adjustments under configuration file hoprd.cfg.yaml:
- Change the hopr -> host -> port from
3001to3002. - Adjust the
HOPRD_P2P_PORTfrom9091to9092.
4. Modify identity file
If you have previously run a node, move the identity file into the HOPRd-node-2 folder and rename it to hopr.id. If this is your first time running a node, hopr.id will be generated automatically when you launch the HOPRd node.
5. Launch multiple nodes
Make sure you are on a directory where all the Nodes docker compose folders are listed in one place. Then execute this command to launch all the nodes:
COMPOSE_PROFILES=hoprd find . -maxdepth 1 -type d -not -path "." -exec bash -c "cd {} && docker compose up && cd .." \;
These changes ensure that each node operates independently without interference, allowing for efficient management and scalability.