How to use hoprd
This is a guide on how to use hoprd through hopr-admin or the hoprd UI. It is not exhaustive and is intended only as a brief overview of its functionality and use.
Make sure you have installed a hoprd node either through Docker or with a hardware node such as Avado or Dappnode. If you have not completed the installation process, please start here.
Please be aware that it can take 10 minutes for your hoprd node to boot up.
Network Registry: If you have registered your node on the network registry, you will have been airdropped mHOPR/xDAI along with your NFT. In step three of Admin UI & Funding below, make sure to use the mHOPR and xDAI provided instead of purchasing wxHOPR.
If you don't see your "mHOPR" within your wallet, make sure to import the token using the contract address 0x66225dE86Cac02b32f34992eb3410F59DE416698
Admin UI & Funding
If you used Docker to install your node, you should be able to access it at: http://localhost:3000 (replace localhost with your server IP address if you are using a VPS). Otherwise, locate the HOPR client on your hardware node's associated browser. You should end up with an interface that looks like this:
Note: You may be greeted with a yellow screen asking you to check your settings. You can fix this by entering the correct API endpoint and token (see steps 1 & 2).
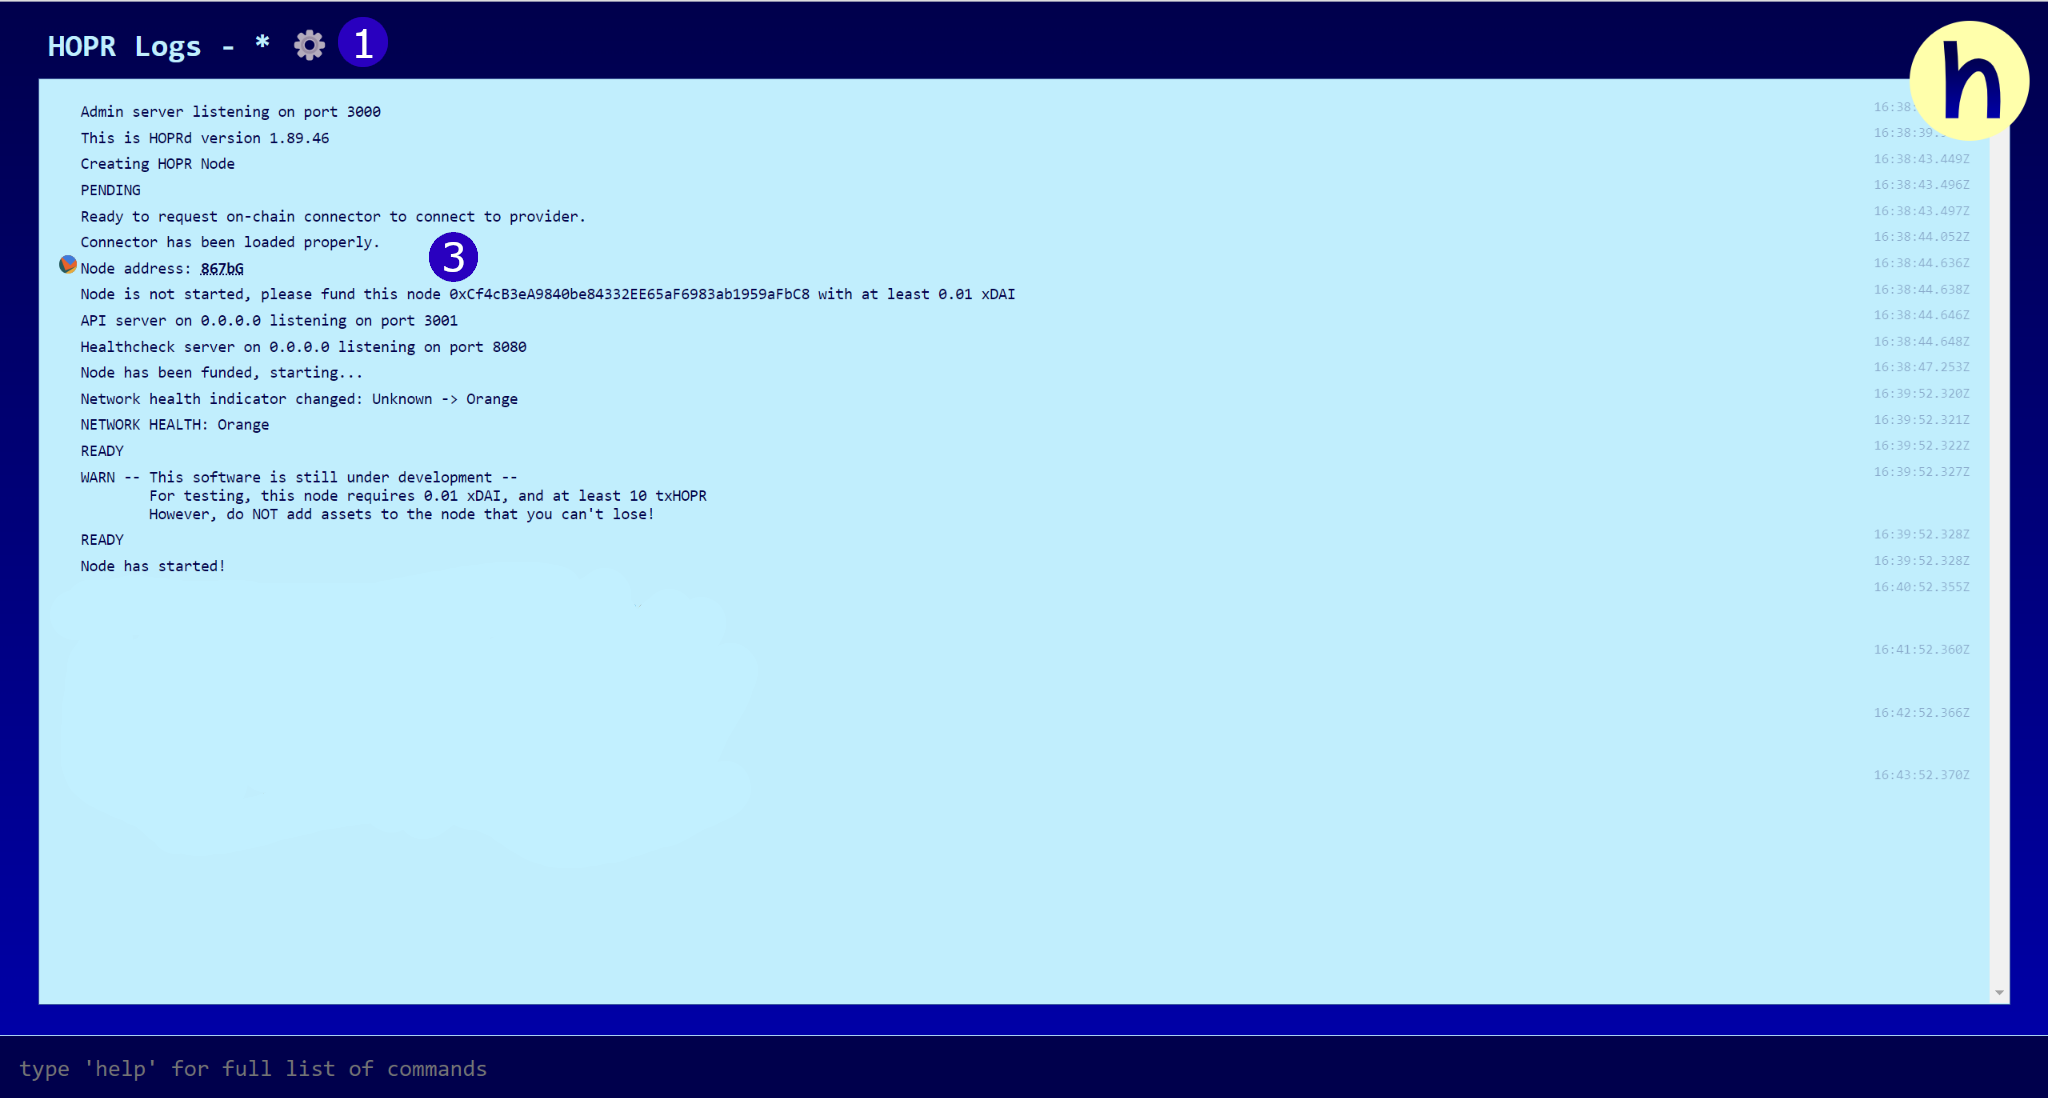
(1) First, click on the gear icon. This should give you a pop-up similar to the one below.

(2) From here, make sure you have the correct information. By default, API endpoint should be set to http://localhost:3001, but you may need to replace localhost with your server IP address if you used a VPS and change the port if you adjusted the mapping on installation.
If you are using an Avado or Dappnode then the endpoints are http://hopr.my.ava.do:3001 and http://hopr.dappnode:3001 respectively.
The API Token is whatever you set your security token as in the installation process.
(3) You will see a newly generated ETH & Node address. Use the ETH address to send xDAI and HOPR tokens to in order to fund your node. Your node will not start until it is funded.
Monte Rosa release: If you are participating in the Monte Rosa release (this will be the case if you followed the Docker/Avado/Dappnode installation instructions), send the mHOPR and xDAI you have been airdropped.
Local network: If using a local network (e.g. for testing), we recommend you fund your node with 0.01 xDai & 10 wxHOPR.
After funding your node, you will have to wait a few minutes for it to start. When the process is complete, you should see the output: Node has started!
Please be aware that we have three types of tokens on the xDAI/Gnosis Chain network:
mHOPR, the ERC-20 token used by the monte rosa environment,wxHOPR, the ERC-777 token used by local networks,xHOPR, the ERC-677 token, the xDAI/Ethereum bridgedHOPRtoken
If you are using the Monte Rosa environment, use mHOPR.
Otherwise, you can use the cross-chains bridge to convert from HOPR to xHOPR or vice versa.
And you can always use our token wrapper to wrap/unwrap xHOPR/wxHOPR.
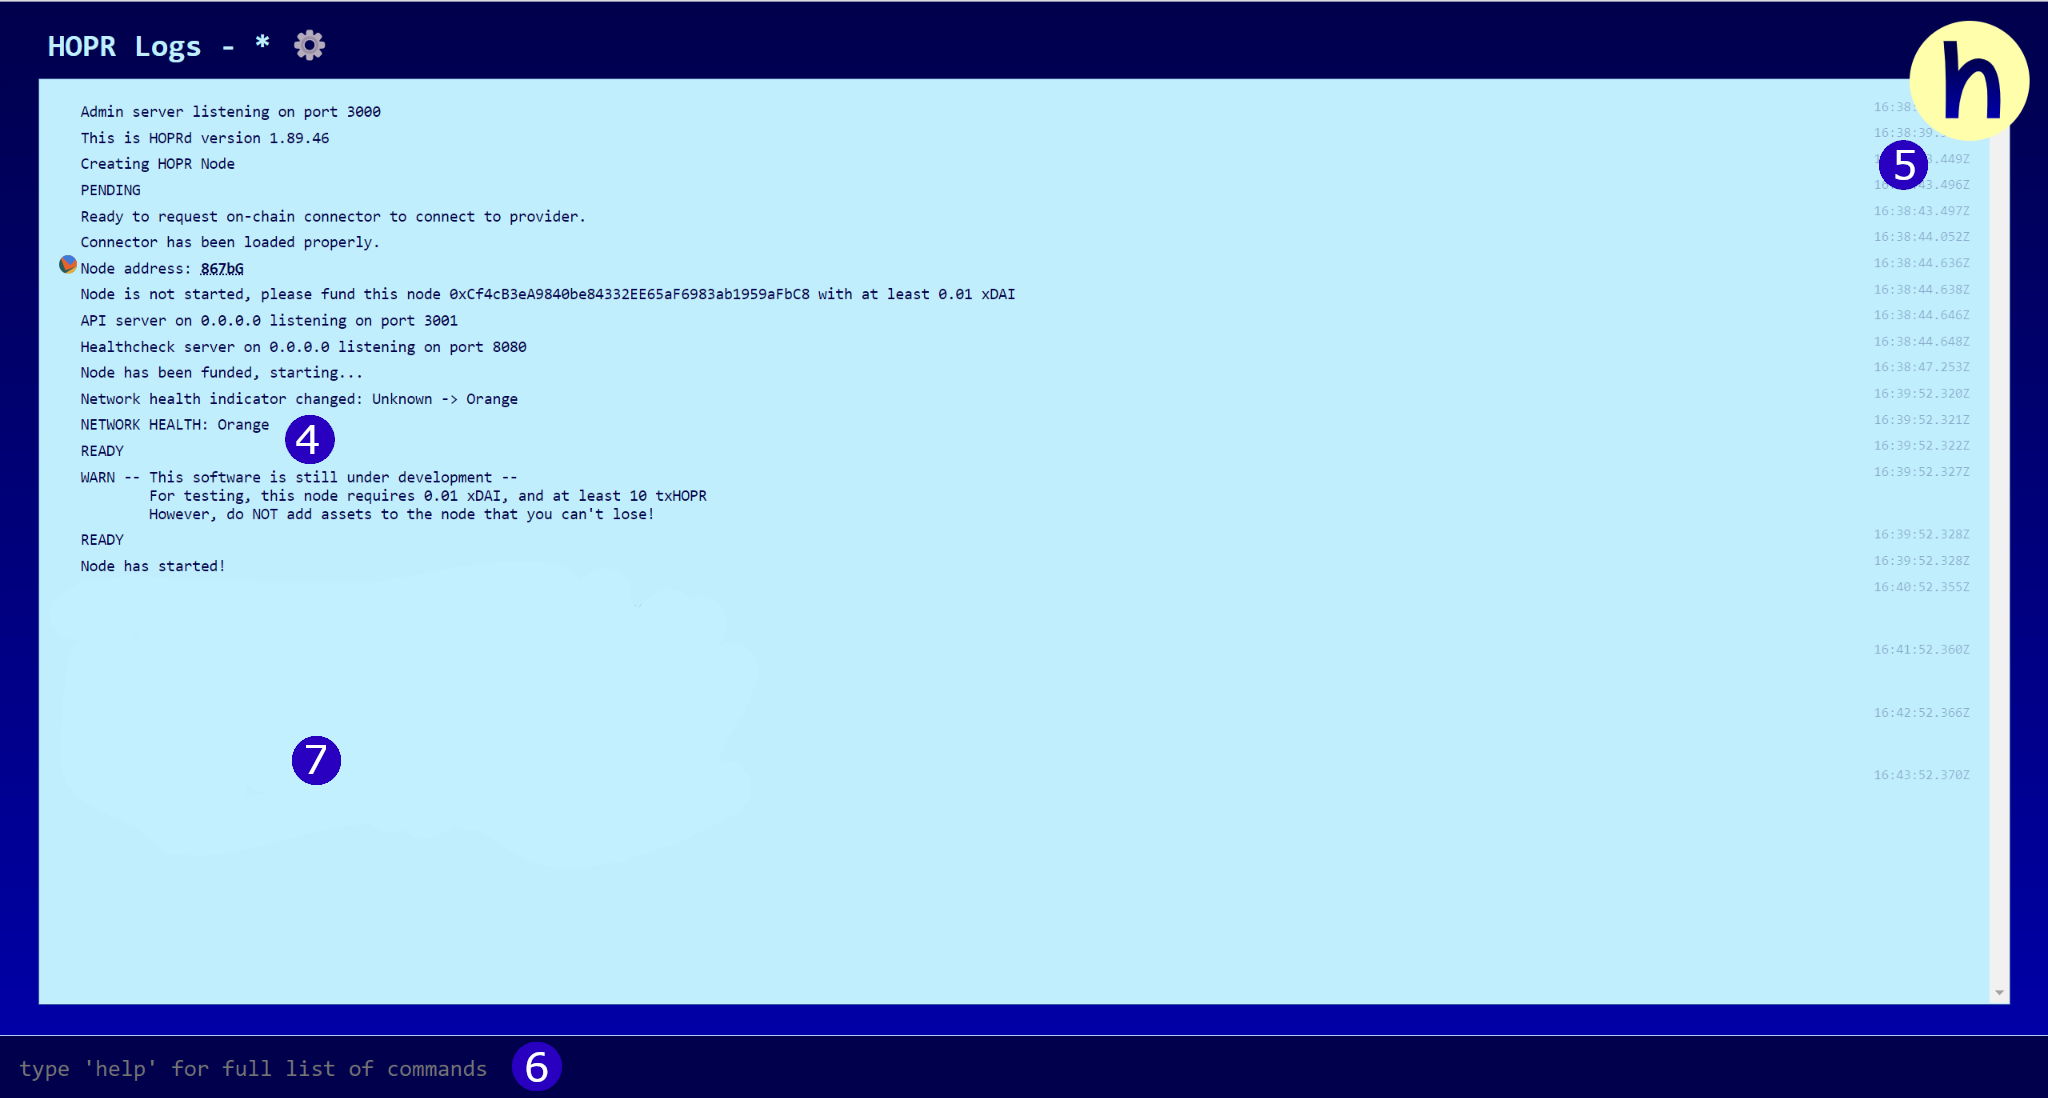
(4) You will see your Network Health Indicator. Depending on your connection to the network, this can be either Red, Orange, Yellow or Green. It's normal for it to be Red when you first start your node, you should wait a few minutes to see if it improves, but this is not required.
(5) Click on the HOPR logo to see your node's connected peers.
(6) You can type commands and execute actions here.
(7) Output is displayed here.
Before we start, you can find all the commands explained here: Hopr-admin commands.
Mentioned HOPR and ETH addresses are examples. Make sure you replace them with the addresses you are interacting with.
Interacting with your node
Now that you have started your node, what exactly is your node and what are its features? There is a lot that goes into making the HOPR node function but let's start with the following properties:
- Identity file
- ETH address & Peer ID
- Balance
Identity file
The identity file contains your private key and is essentially your wallet for the node. When you installed your node, you supplied --identity and --password arguments.
docker run --pull always --restart on-failure -m 2g --log-driver json-file --log-opt max-size=100M --log-opt max-file=5 -ti -v $HOME/.hoprd-db-monte-rosa:/app/hoprd-db -p 9091:9091/tcp -p 9091:9091/udp -p 8080:8080 -p 3001:3001 -e DEBUG="hopr*" gcr.io/hoprassociation/hoprd:1.93.5 --environment monte_rosa --init --api --identity /app/hoprd-db/.hopr-id-monte-rosa --data /app/hoprd-db --password 'open-sesame-iTwnsPNg0hpagP+o6T0KOwiH9RQ0' --apiHost "0.0.0.0" --apiToken 'YOUR_SECURITY_TOKEN' --healthCheck --healthCheckHost "0.0.0.0"
--identity is a path to where the file is located, and --password is used to decrypt the file.
If a file exists at the specified location and is decrypted using the provided password, then your existing private key is used to access your funds and start up your node.
If one doesn’t exist, it is created, encrypted and stored at the given location with a newly generated private key.
Backing up your identity file
If you used Docker to install your node, then your identity file will be stored on your OS at the path you specified: /<computer username>/.hoprd-db-bogota/.hopr-id-bogota, so you can skip this step.
If you are using Dappnode or Avado, you can download your identity file on their interfaces.
Note: You should download your identity file as soon as possible. As downloading the backup or DB folder will also download the database, which can get quite large in size if you’ve been running your node for a while.
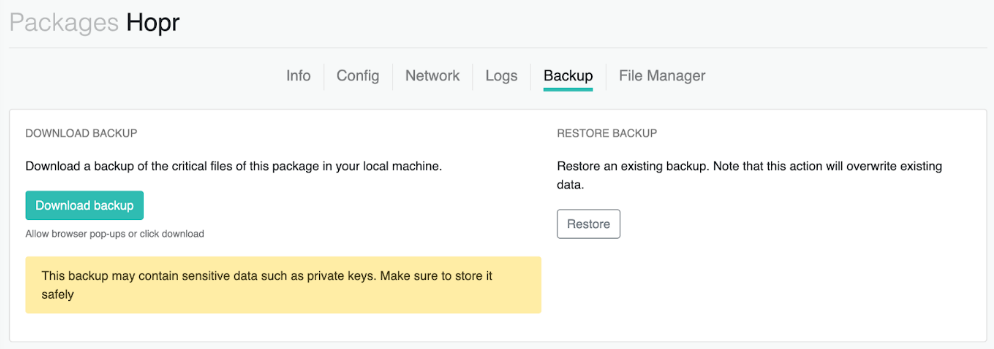
DAppNode – Find HOPR in your packages and navigate to the backup section. From there, all you have to do is click 'Download backup'. This will download a .zip file containing your identity file. For DAppNode, you should use this zipped file to restore your node if needed.
How to view your DAppNode identity file:
You will not be able to use the identity file alone to restore your old node on DAppNode and should use the entire zipped backup file. The instructions below are simply to view your identity file.
(1) Extract the zipped file downloaded to see the DB folder and identity file.
(2) Once extracted, open the folder: db.

(3) You will see the file identity if hidden files are visible.
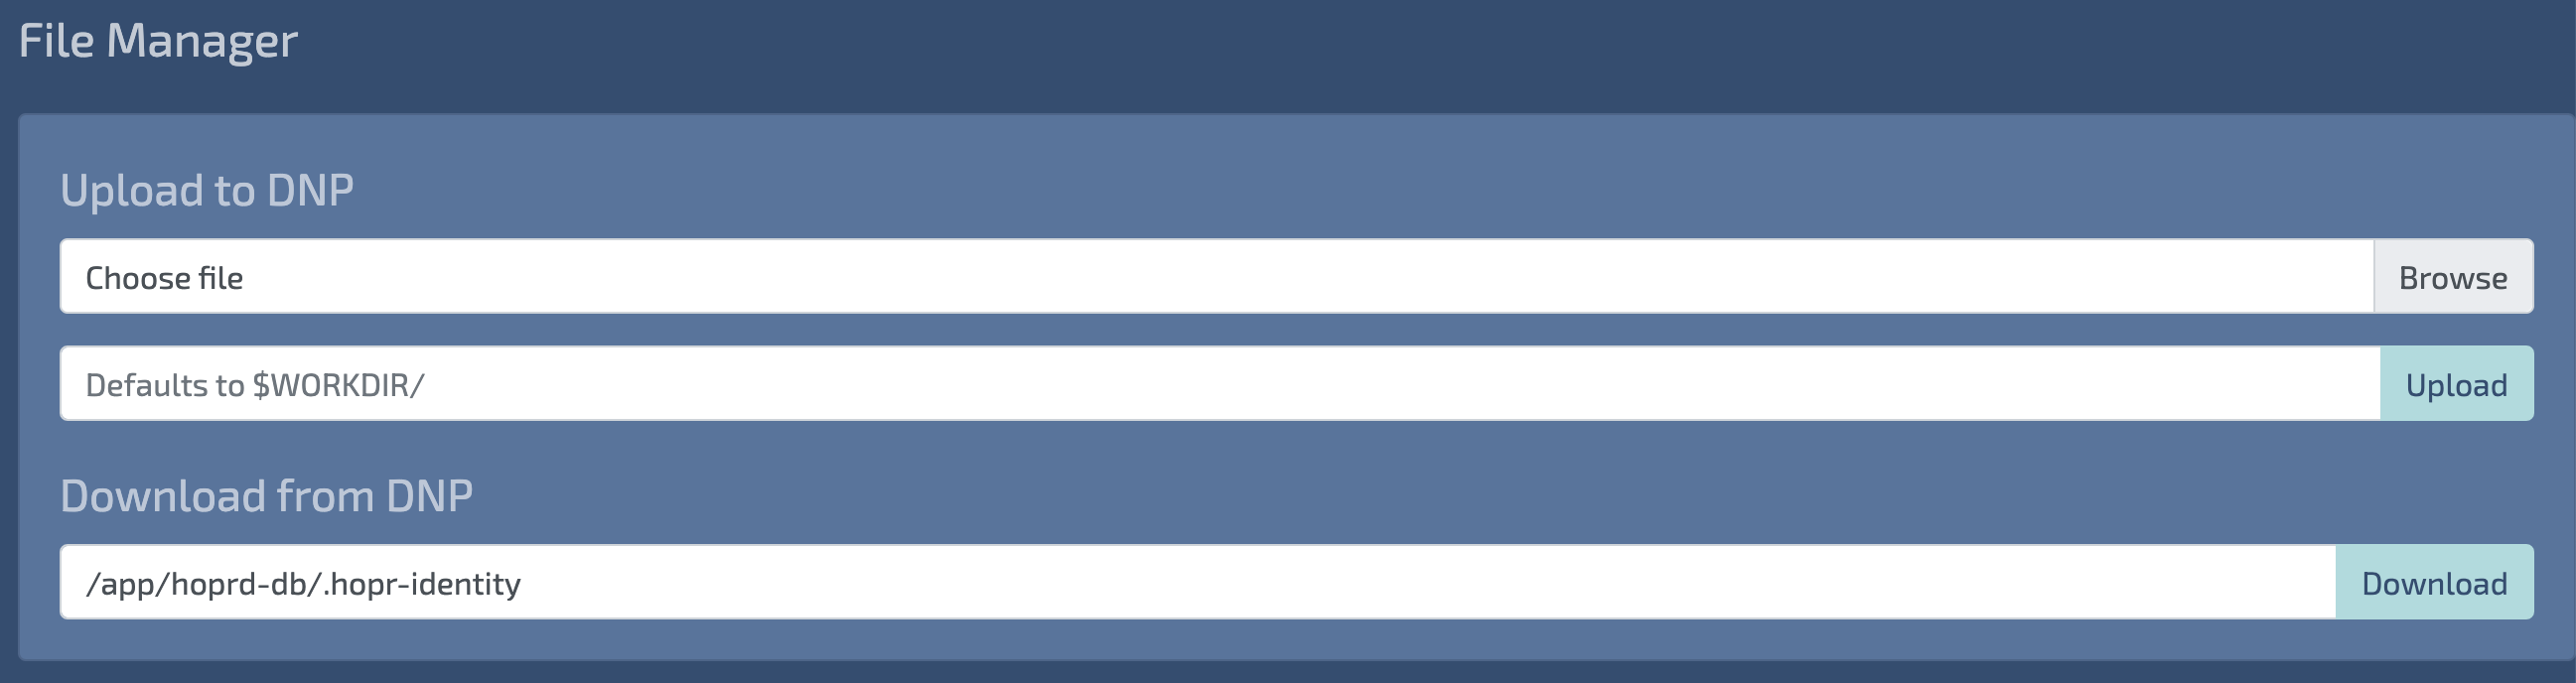
Avado – For Avado, you have to specify you want to download /app/hoprd-db in the Avado UI. Locate your HOPR package and click on the 'manage' icon.

From here, scroll down to the file manager and enter /app/hoprd-db/.hopr-identity in the field under Download from DNP. Then click 'Download'. This will download the file hopr-identity.tar.gz which you will need to rename to .hopr-identity.
Use the identity file to restore your node if needed.
Note: Make sure you enter /app/hoprd-db and not /app/hoprd-db/.
Now that you’ve backed up your identity file and have noted your password, you will always be able to access your private key and node (as long as you keep them safe). You can also use this file to import your funds to your MetaMask wallet.
ETH address & peerID
From the private key, your ETH address and HOPR address are generated.
Your HOPR address, aka your peer ID, is what other nodes on the network will use to interact with your node—an address for them to ping or send data.
To view this information, type address into the admin command line.
address
Expected output:
HOPR Address:  M6psb
ETH Address:   0x81057b10E5ed35949C1a75b114818dc553755016
By default, your HOPR address will only show the last five characters. Click them to expand the full address.
Balance
Now that you have funded your node, you can check your node's balance by typing balance.
balance
Expected output:
HOPR Balance:     0.12
Native Balance:   0.9915287
HOPR Balance – Either wxHOPR or mHOPR, depending on the network. These HOPR tokens fund payment channels/pay nodes to relay data.
ETH Balance – This will show the native tokens used to pay gas fees, currently xDAI. For example, opening and closing payment channels would require on-chain transactions paid for in xDAI.
Interacting with other nodes
Now that we have gone through a few of the properties of your node let's try and interact with other nodes on the network.
Finding other nodes
First, let’s look at the available nodes for you to connect to. Type peers into the command line:
peers
Expected output:
122 peers have announced themselves on chain:

/ip4/34.65.239.77/tcp/9091/p2p/T7ZVk
/ip4/34.65.27.47/tcp/9091/p2p/qmf5r
/ip4/34.65.38.133/tcp/9091/p2p/XwAcq
/p2p/SZiPp
/ip4/34.65.75.129/tcp/9091/p2p/MWXqD
/ip4/176.63.10.184/tcp/32013/p2p/6JHN6
/ip4/34.65.83.15/tcp/9091/p2p/jTzjV
...
This shows all the nodes that have announced themselves onto the network. The HOPR addresses are contracted, so click on them to expand the full address.
For this tutorial, if you aren’t using Playground, you will have to find two or more responsive nodes on the network. You can do this by pinging other nodes.
Pinging other nodes
Replace the following address with one from your list of peers
ping 16Uiu2HAmMBYpQVq7rfFxV5iP3JPXJKs1dqRe2Z6HX7zXJgwjTzjV
Expected output:
Pong received in: 84 ms
You should receive a pong and a latency report. This indicates the health of the target node as well as your own.
But the main thing to see is if you received a response or not. If your output was: Could not ping node. Timeout, it means you could not ping the node, and you should keep pinging other nodes until you find a responsive one.
Setting aliases for other nodes
You can now give one of the responsive nodes an alias:
alias 16Uiu2HAmMBYpQVq7rfFxV5iP3JPXJKs1dqRe2Z6HX7zXJgwjTzjV Betty
Expected output:
Set alias 'Betty' to 'jTzjV'.
This is useful as you can use the alias in place of their HOPR address when using commands.
At this point, you should ideally have found two responsive nodes and given them both an alias. I will be using Betty and Chāo.
Check aliases
Type alias to see a list of all the aliases you have set.
alias
Expected Output:
me ->  M6psb
Betty -> jTzjV
Chāo -> FskLs
By default, you will have the alias me set to your own address. If you don't see this you should set it manually as I will be using it quite often in this tutorial.
All of these aliases can be used in place of their corresponding HOPR address. For example, if you want to ping Betty’s node 16Uiu2HAmMBYpQVq7rfFxV5iP3JPXJKs1dqRe2Z6HX7zXJgwjTzjV, you can use:
ping Betty
Note: you can assign multiple aliases to a single node, but you cannot assign the same alias to multiple nodes. E.g. two separate HOPR addresses can not be aliased Betty
If you want to remove an alias, use:
alias remove Betty
Sending a direct/0-HOP message
Now that we have found nodes we want to interact with, we can send a simple direct message to one of them.
send ,Betty Hello Betty!
Expected output:
Message sent
Note: Don't forget to add the comma and use the correct alias. Betty is an alias I assigned to a previously found responsive node. Otherwise, you can just write their HOPR address:
send ,16Uiu2HAmMBYpQVq7rfFxV5iP3JPXJKs1dqRe2Z6HX7zXJgwjTzjV Hello Betty!
This is a direct message or a 0-HOP message. It sends the message directly to another node without intermediaries and is costless.
The node you messaged (in my case, Betty) will receive an output that looks like this:
#### NODE RECEIVED MESSAGE ####

Message: Hello Betty!

Latency: 295 ms
Change includeRecipient type
If you want the recipient to know you sent the message, you can change your includeRecepient settings.
settings includeRecipient true
Expected output:
Settings updated.
Now, if you message a node, it will receive an output including your address:
#### NODE RECEIVED MESSAGE ####

Message: M6psb:Hello Betty!

Latency: 170 ms
By default, your includeRecipient type is set to false. You can check its current setting by typing settings:
settings
Expected output:
includeRecipient  true     Prepends your address to all messages (true|false)
strategy          passive  Set an automatic strategy for the node. (passive|promiscuous)
Ignore the strategy setting. For now, this is explained down below. If you want to go back to being anonymous, simply reset it to false:
settings includeRecipient false
Payment channels & path selection
So far, you’ve only sent a direct (0-HOP) message to another node. A direct message is not mixed or private. To make your message private, you must send it through other nodes.
To use another node on the network to relay data, you have to pay them for their service in HOPR tokens. This is where payment channels come in.
Payment channels
Payment channels are funded edges between two nodes. They are a link between two nodes with some HOPR tokens staked in them to pay the nodes that relay data for the sender.
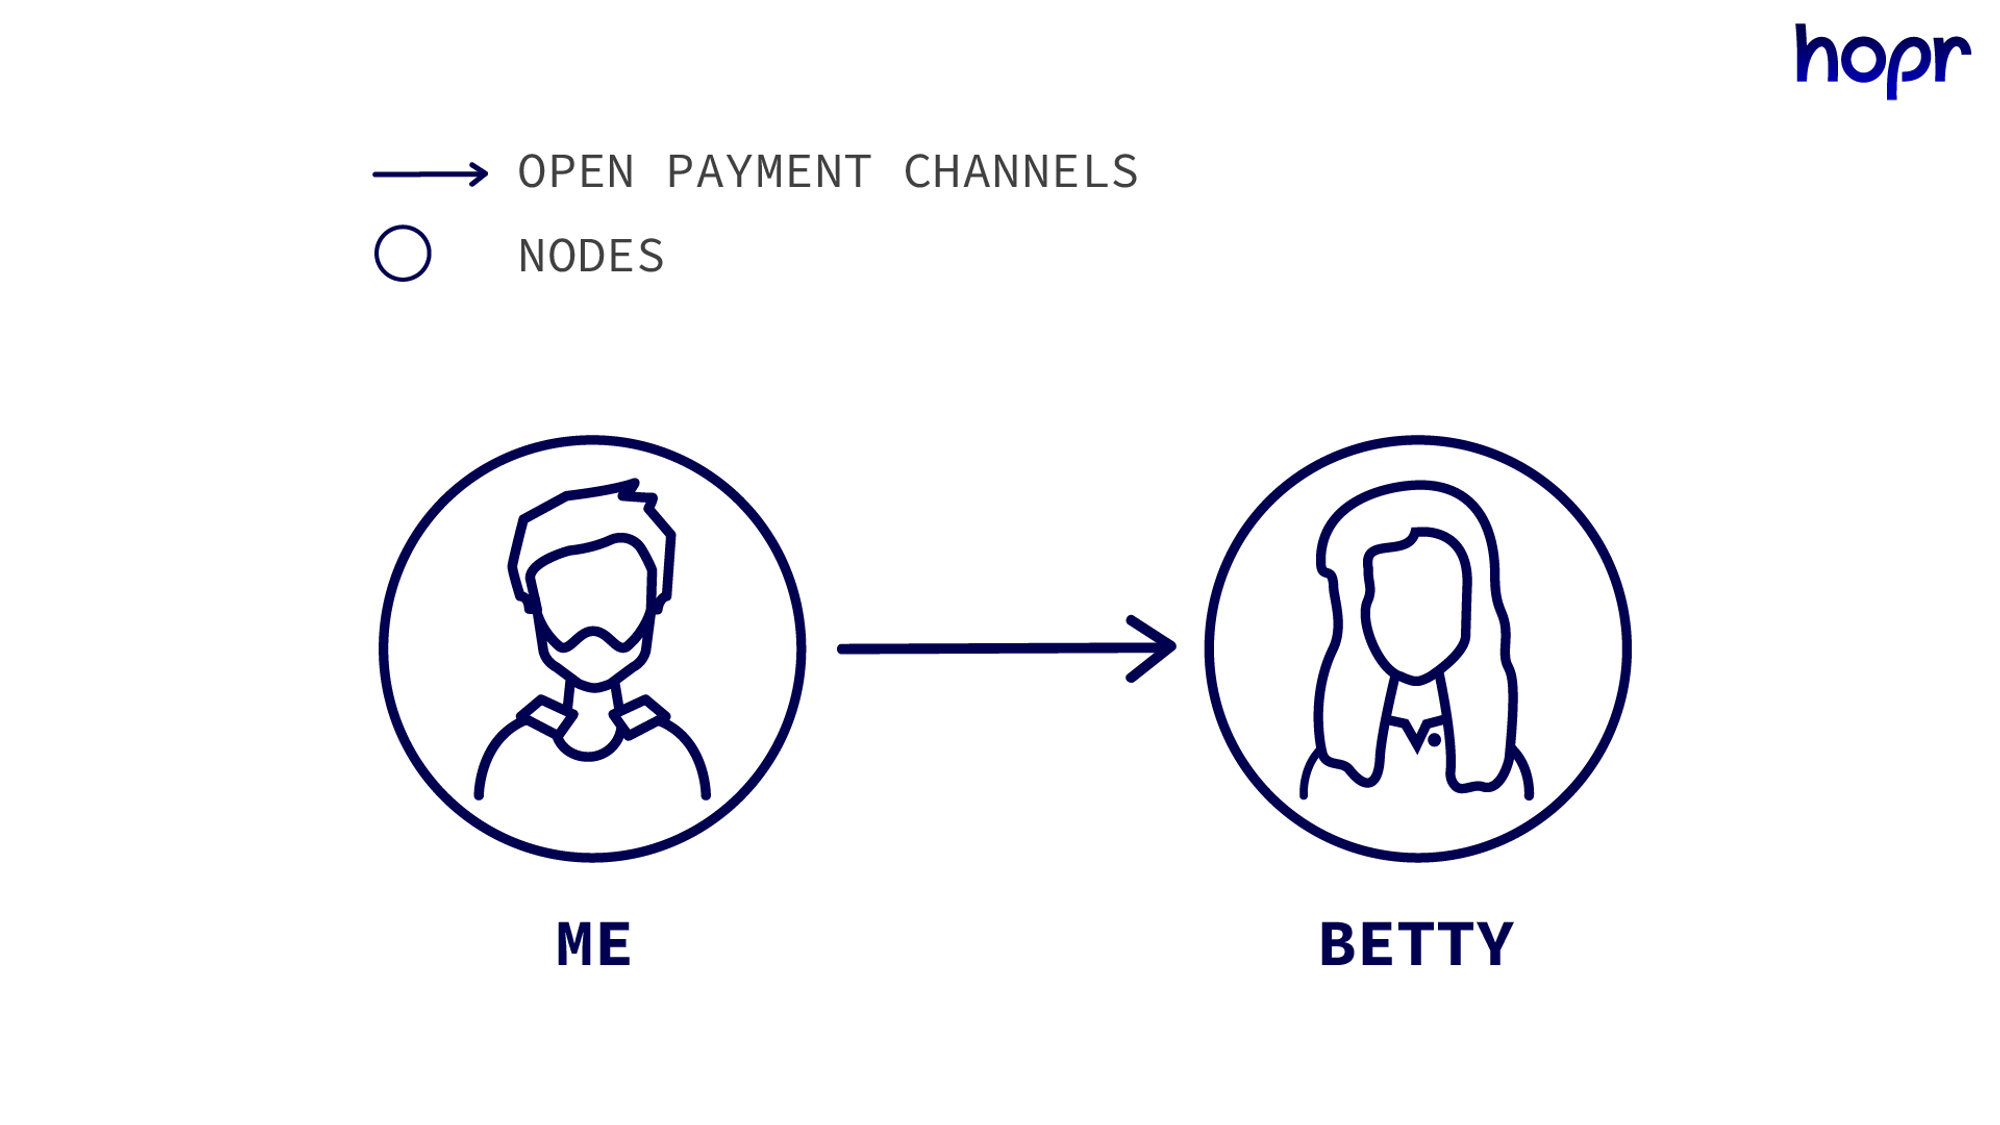
Opening a channel
When opening a channel, you need to choose a node to open the channel with and the amount of HOPR tokens you want to stake. You should stake at least 0.2 HOPR tokens to complete this tutorial.
You can open a payment channel with Betty by using:
open Betty 0.2
The general format is:
open [HOPR address] [amount]
Expected output:
Opening channel to node "jTzjV".

Successfully opened channel to node "jTzjV".
This will open a channel from you to Betty with 0.2 HOPR staked in it. You can use these tokens to pay Betty and all the other nodes in any relay you use, where Betty is the first intermediary node.
Note: Channels are unidirectional; opening this channel does not mean a channel from Betty to your node exists.
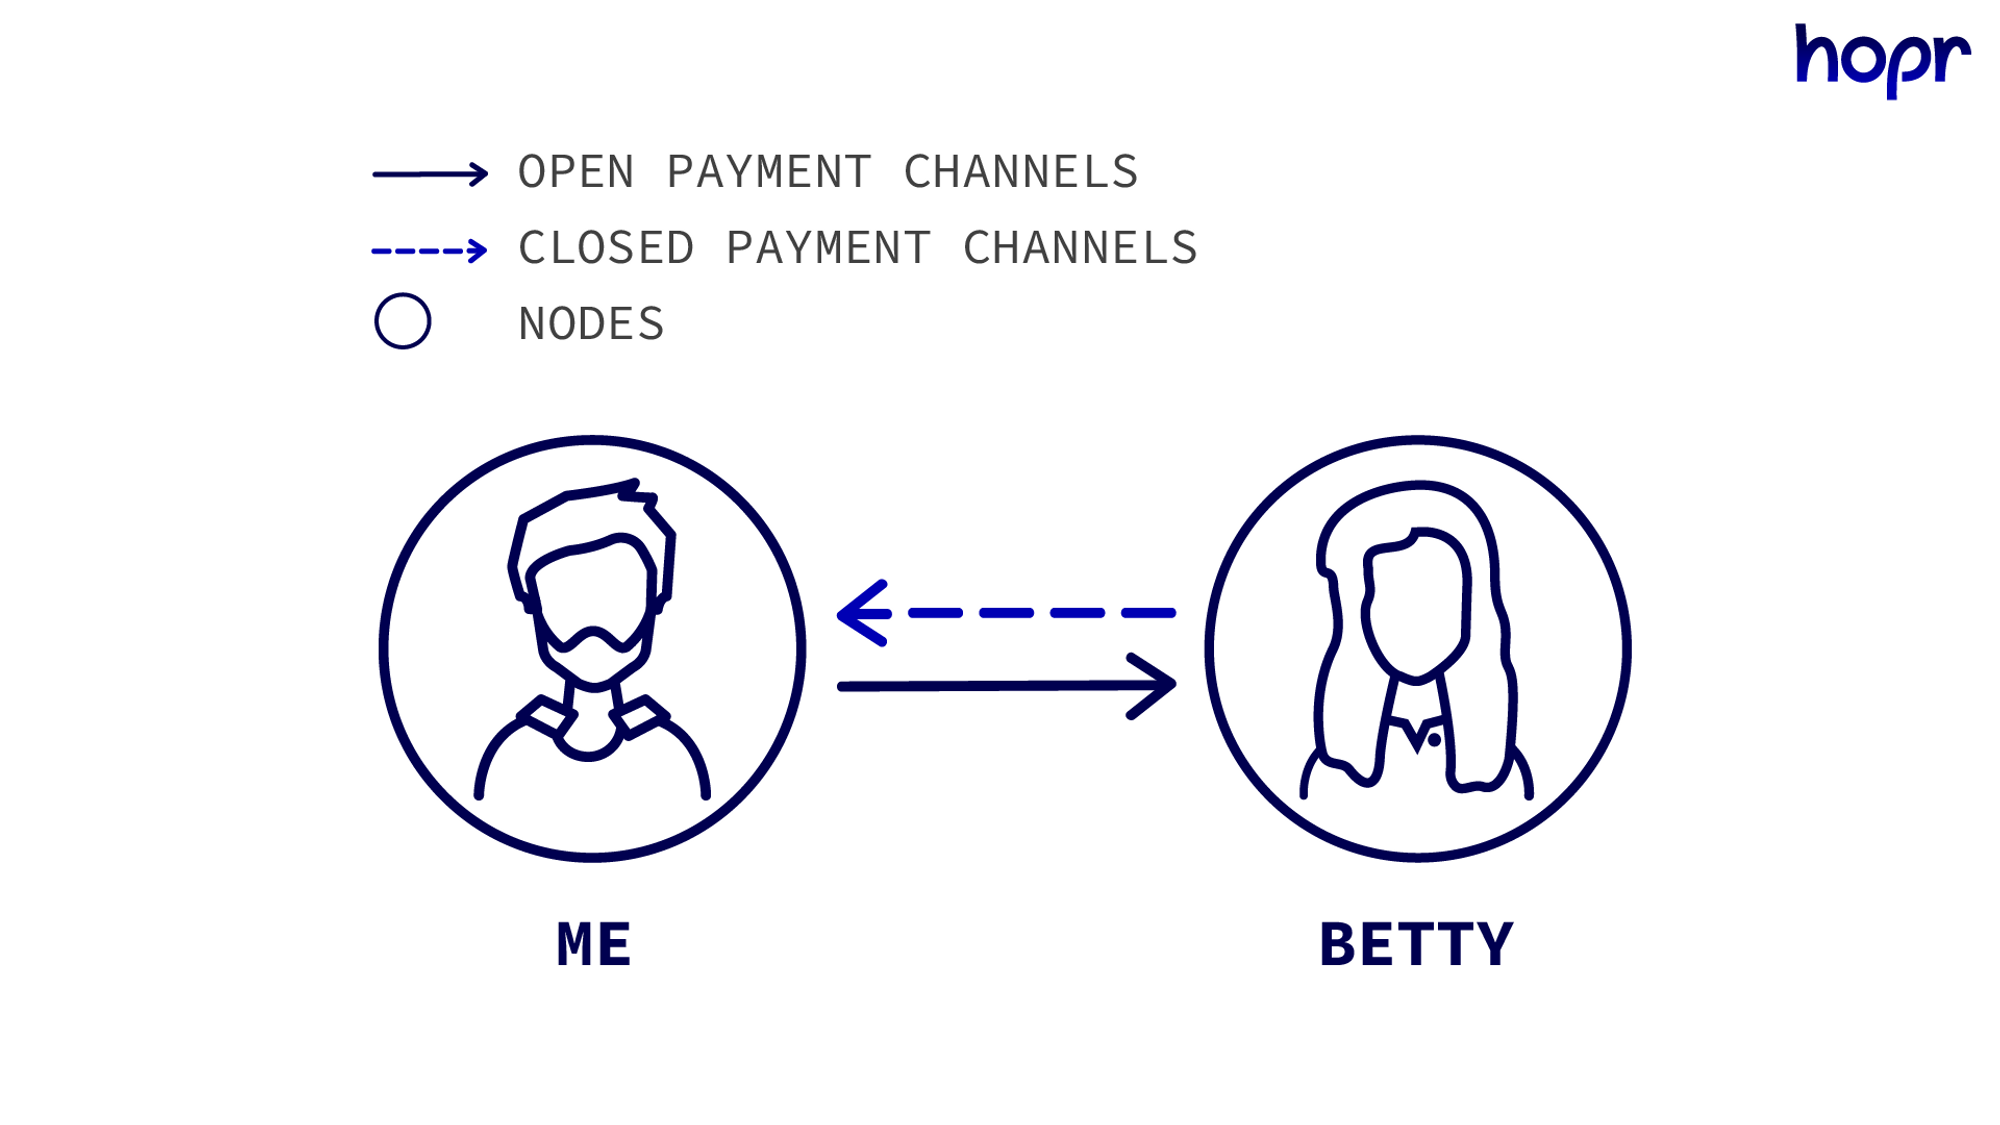
Only one channel can exist in a single direction between two nodes. You can have both a channel from Betty → Chāo & Chāo → Betty but not more than one channel from Betty → Chāo.
Once you have opened a channel to Betty, trying to open another one will fail.
open Betty 0.01
Expected output:
Opening channel to node "jTzjV".

Failed to open a channel to jTzjV.
Closing a channel
You should have a channel open with Betty or either one of your responsive nodes by now with at least 0.2 HOPR tokens staked.
If you have underfunded the channel linked to Betty, you can close the channel and retrieve all the funds staked before opening a new channel with Betty:
close Betty
Expected output:
Closing channel to "jTzjV".

Initiated channel closure, the channel must remain open for at least 1 minute. Receipt: "0x4c529ee1d44249e42633b14036d9c037daf4d9f077ea853ef02ac37e458b41ba".
This will take a minute as your funds need to be retrieved. You can view the progress of the channel closure by checking your open channels.
Check open channels
You can check on all your open channels by entering channels:
channels
You should have a single outgoing channel to Betty’s address and no incoming channels (if you haven't closed the channel).
fetching channels...

Outgoing Channel:       0xb0e3f7d81f0bd6d1783f3d44cf11653128e4f9ee95b98d49a07e4a8323cceb01
To:                     jTzjV
Status:                 Open
Balance:                0.2

No open channels to node.
If you see an incoming channel, someone has opened a channel with your node, which might have happened, but won’t affect this walkthrough too much.
You may also see channels with the status PendingToClose if they are closing or WaitingForCommitment if they are opening.
Note: If you closed your channel with Betty, make sure you have reopened it with 0.2 HOPR tokens staked before continuing this tutorial.
Send a 1-HOP message
Now that you have an open channel with Betty, you can use them as an intermediary node to relay your message.
send Betty,me This is a message for me!
The general format is:
send [HOP address],[Recipient address] [message]
Where the HOP address is the node you want to relay your data through. Make sure you don't add spaces around the comma (,).
Expected output:
Message sent

#### NODE RECEIVED MESSAGE ####

Message: This is a message for me!

Latency: 445ms
Note: I have includeRecipient set to false. Your output might look slightly different.
In this example, we’re using Betty’s node to relay a message back to ourselves. This works because the last HOP to the receiver doesn’t require funding. So is possible without an open payment channel.
This is also why 0-HOP/direct messages are possible without open payment channels.
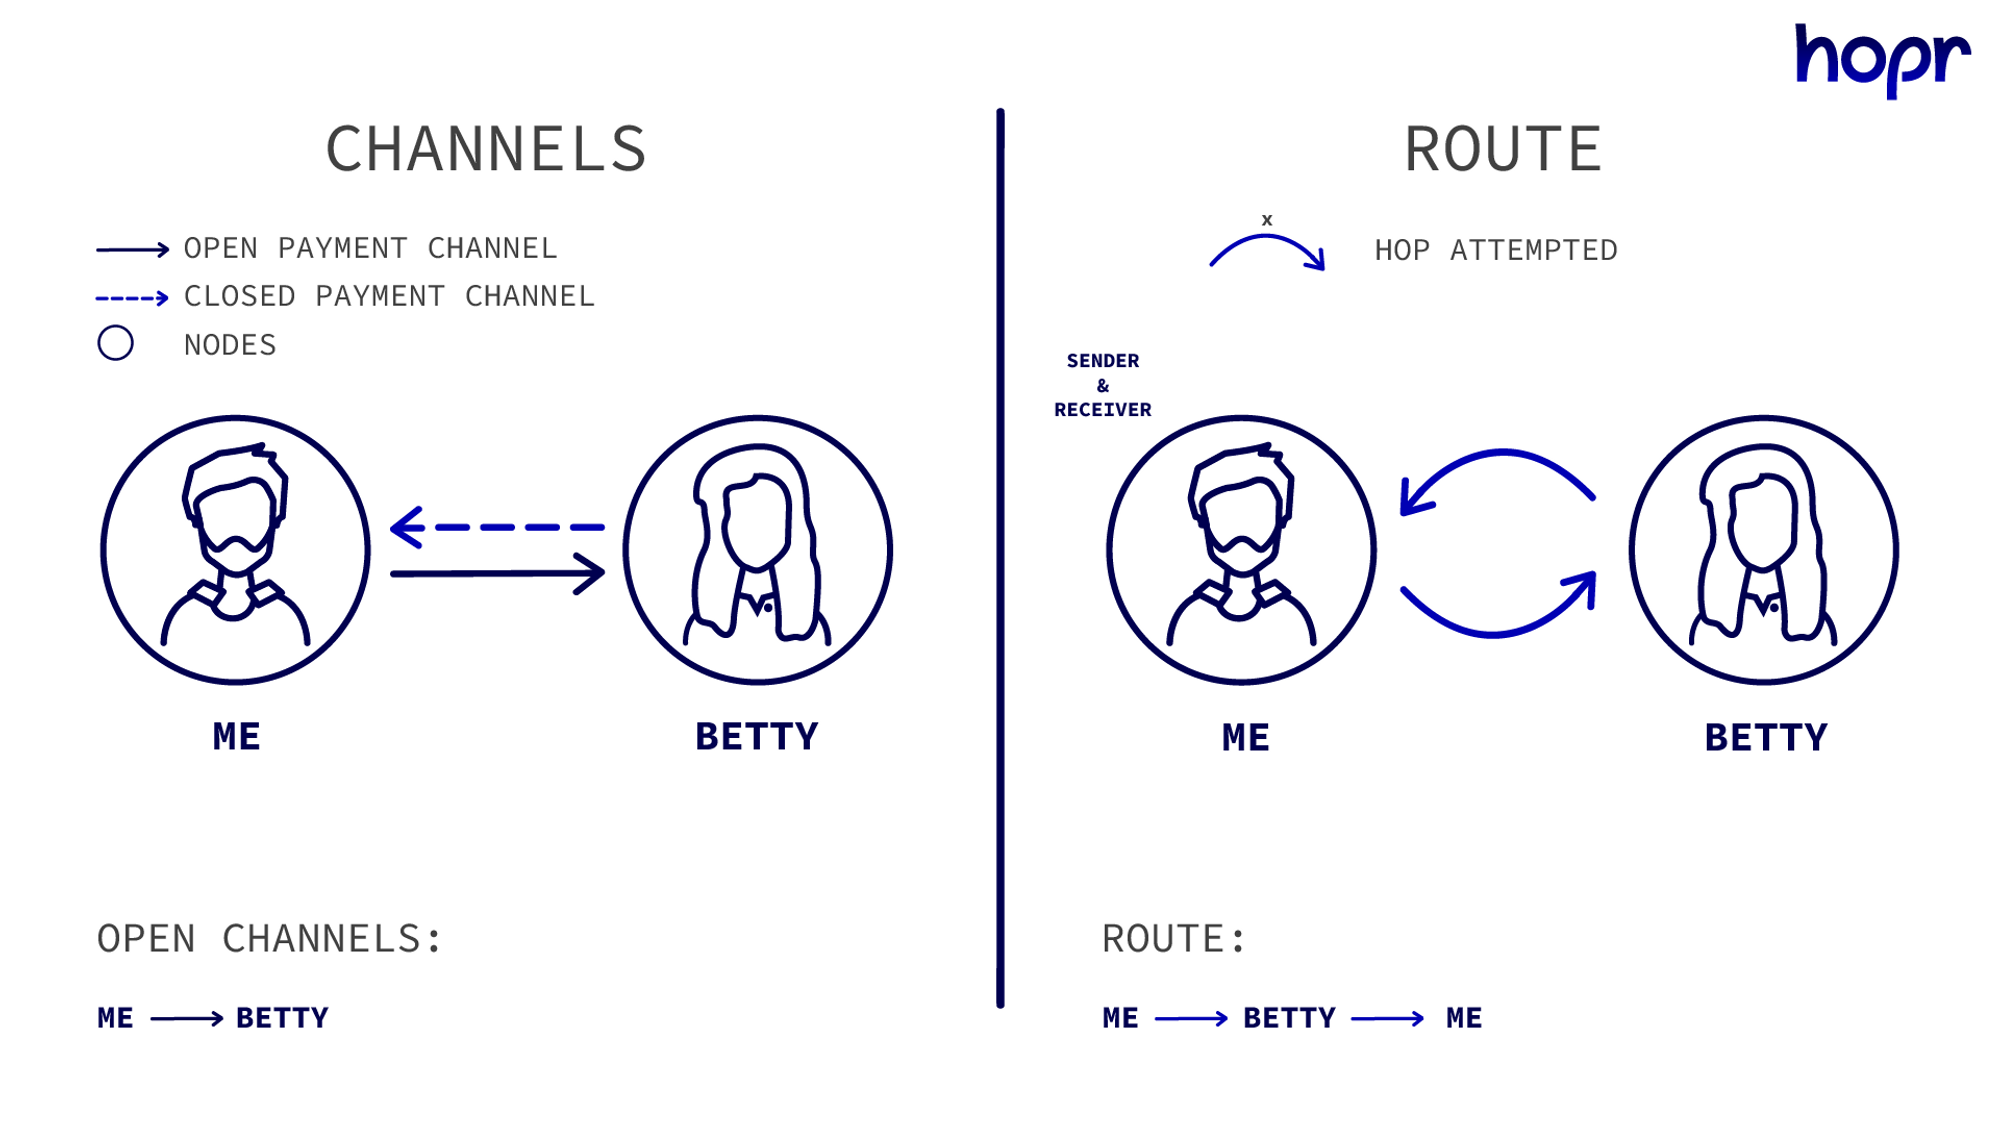
This is a manually selected 1-HOP path. If you try and replicate this with Chāo, it should fail as you have no open channels with Chāo.
send Chāo,me This is a message for me!
Expected output:
Failed to send message.
Maximum HOP length
You can use more than one node as an intermediary, with a maximum of three. The HOPR network will only select 3-HOP paths when you use automatic pathing; all longer paths will not be considered and will also fail in manual path selection.
Longer paths require more information to be stored in packet headers, which makes them distinguishable from standard relays. This difference in packet header is a metadata leak that HOPR tries to avoid.
0-HOP, 1-HOP and 2-HOP paths use padded headers to stay consistent with this requirement but are not as mixed or as private as a 3-HOP path. But for the purpose of this walkthrough they are fine.
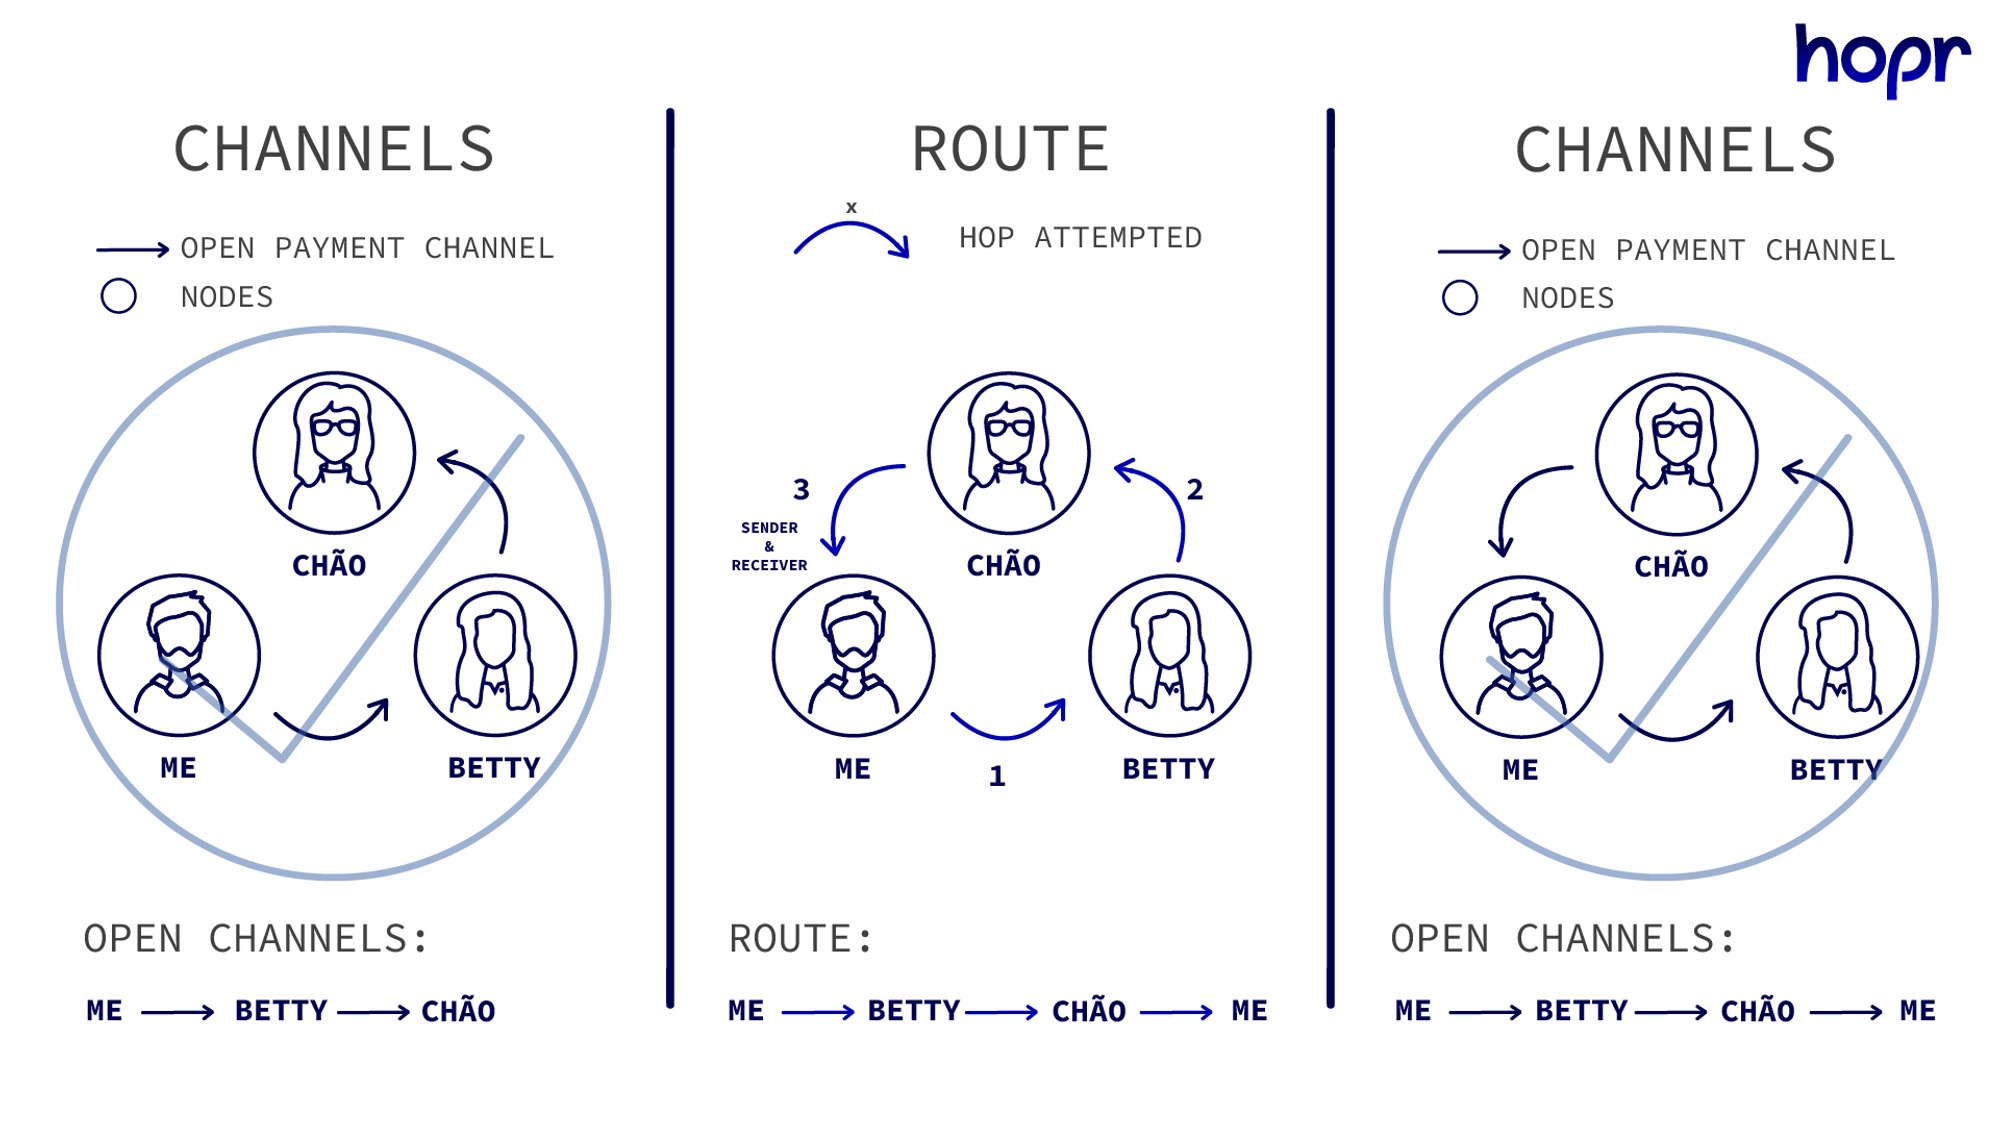
Send a 2-HOP message
Now let’s try and send a 2-HOP message. For this to work, every node in the path must have a channel open with the next node in the path, excluding the last channel to the receiver.
So a 2-HOP message to yourself through Betty and Chāo: me → Betty → Chāo → me would require channels to be open from me → Betty & Betty → Chāo (me → Betty → Chāo). The final channel from Chāo → me is not required as the last HOP of a relay is not incentivised. We assume that the reciever has an inherant desire to receive messages.
You can try and send a 2-HOP message by typing:
send Betty,Chāo,me Hi!
Note: make sure these aliases exist for you or replace Betty & Chāo with whatever aliases you are using (or just the HOPR addresses of the nodes you want to use)
If it fails to send, it is likely, that Betty does not have a channel open to Chāo (Betty → Chāo) since you should have a channel open to Betty (me → Betty) with sufficient funds staked. A successful message costs 0.01 HOPR tokens per HOP currently.
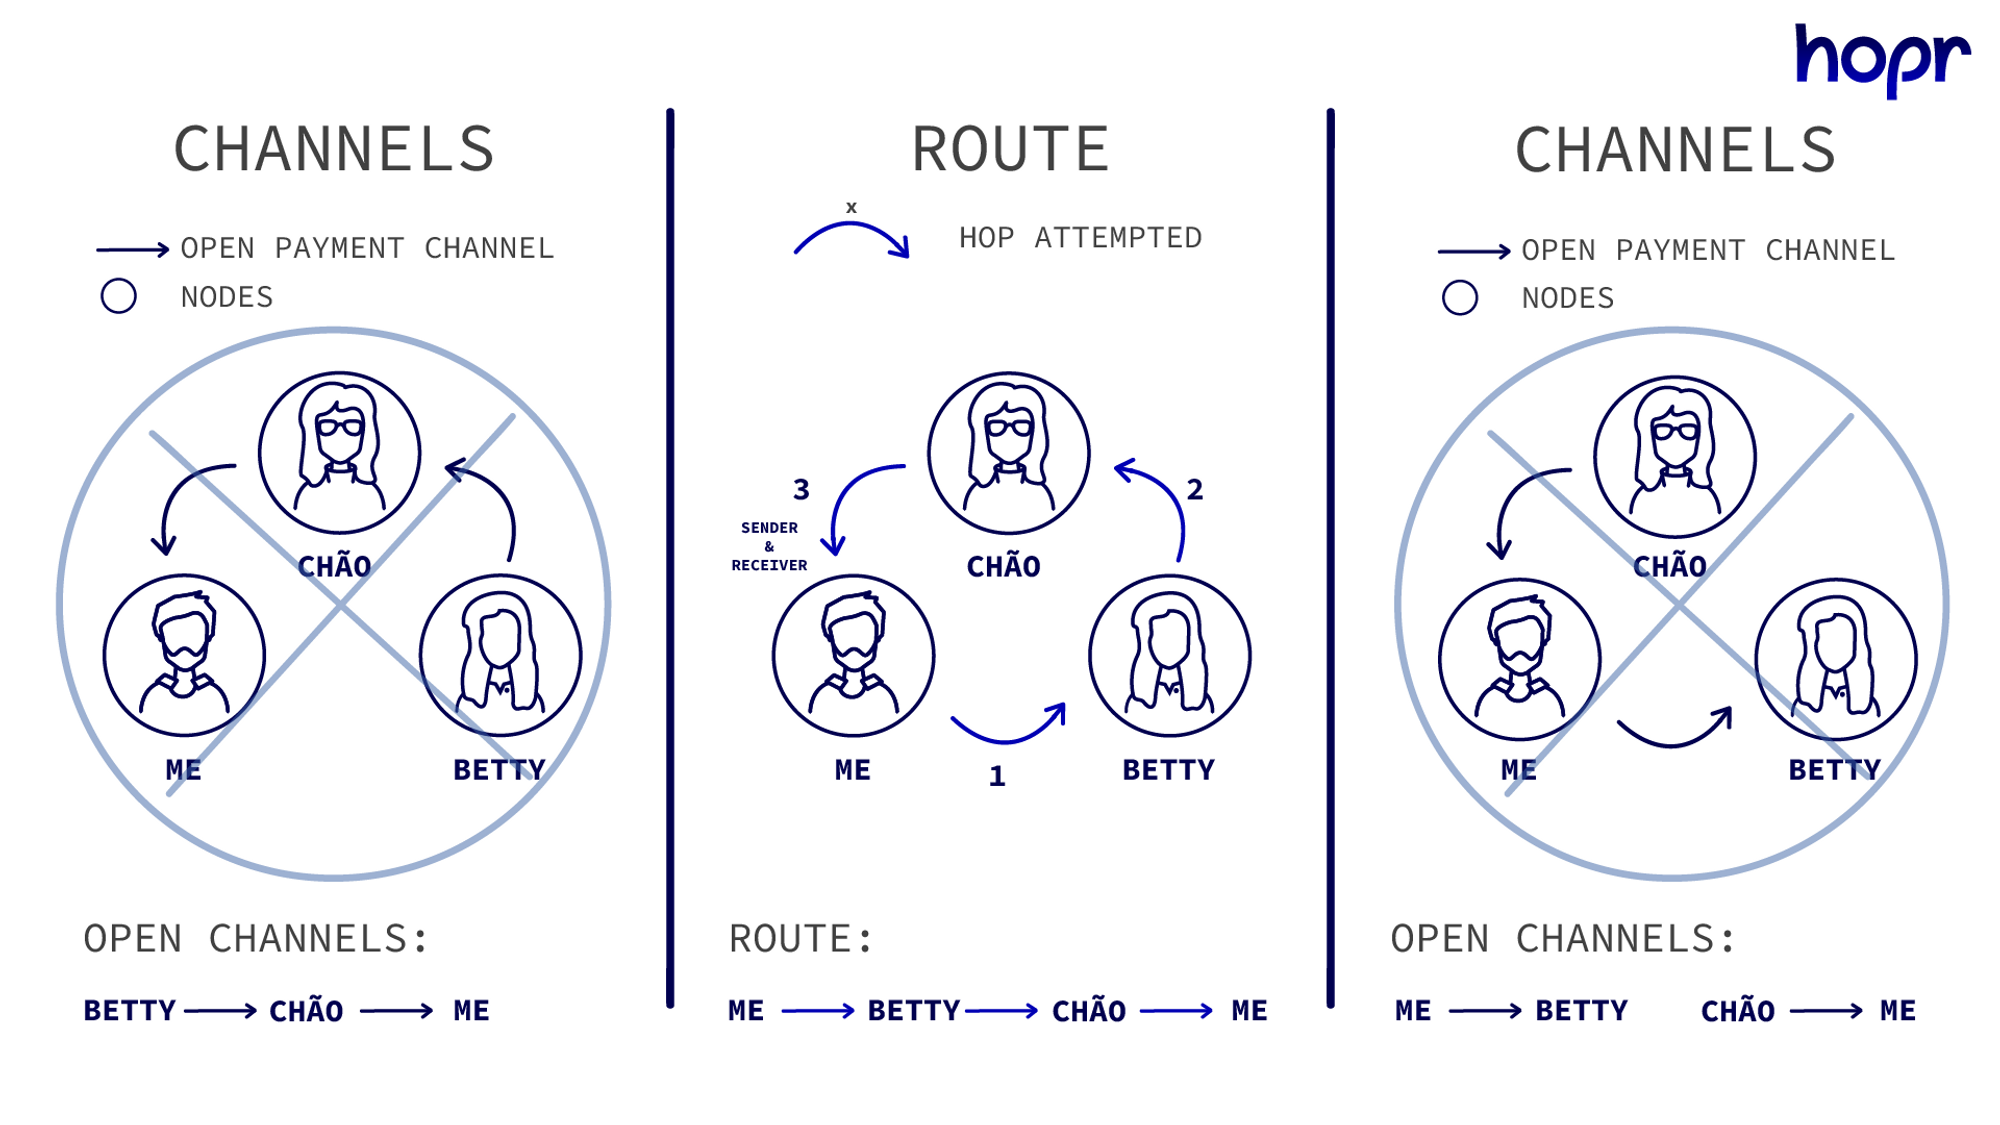
Path directionality
Even if the message succeeds, you should note that you won’t be able to make this 2-HOP message in the other direction as you don’t have an open channel with Chāo. And Chāo may not have an open channel with Betty.
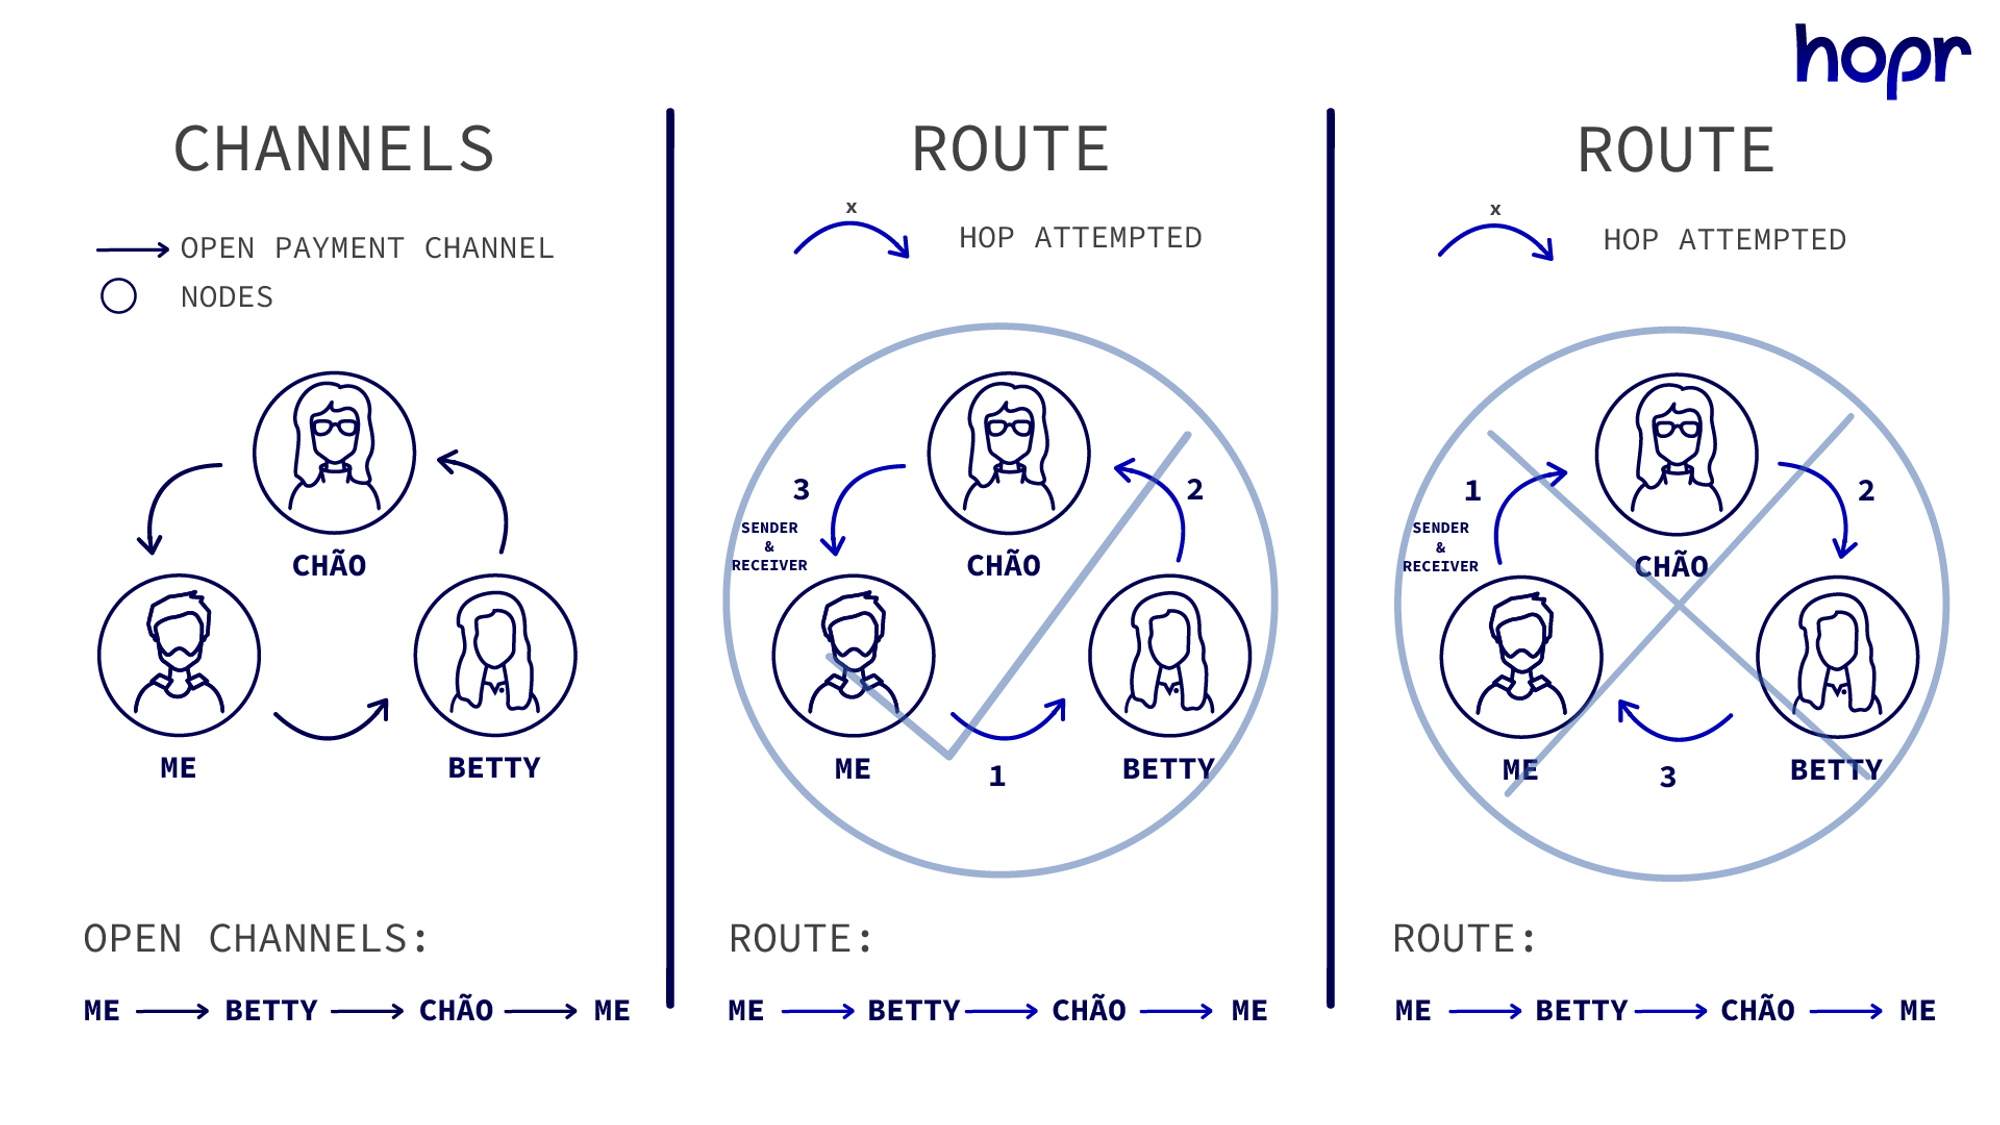
Here the first route is viable, whereas the second route will fail.
You want to connect to other well-connected nodes to increase your pathing options. But if you just want to experiment with different paths without the hassle, you can use Playground. It will let you control five fully interconnected nodes costlessly without any installations.
Note: If using Playground, you will need to use the close command to remove channels and recreate incomplete paths.
Path with consecutively repeating nodes
You can not have consecutively repeating nodes. For example, me → Betty → Betty → Zoë.
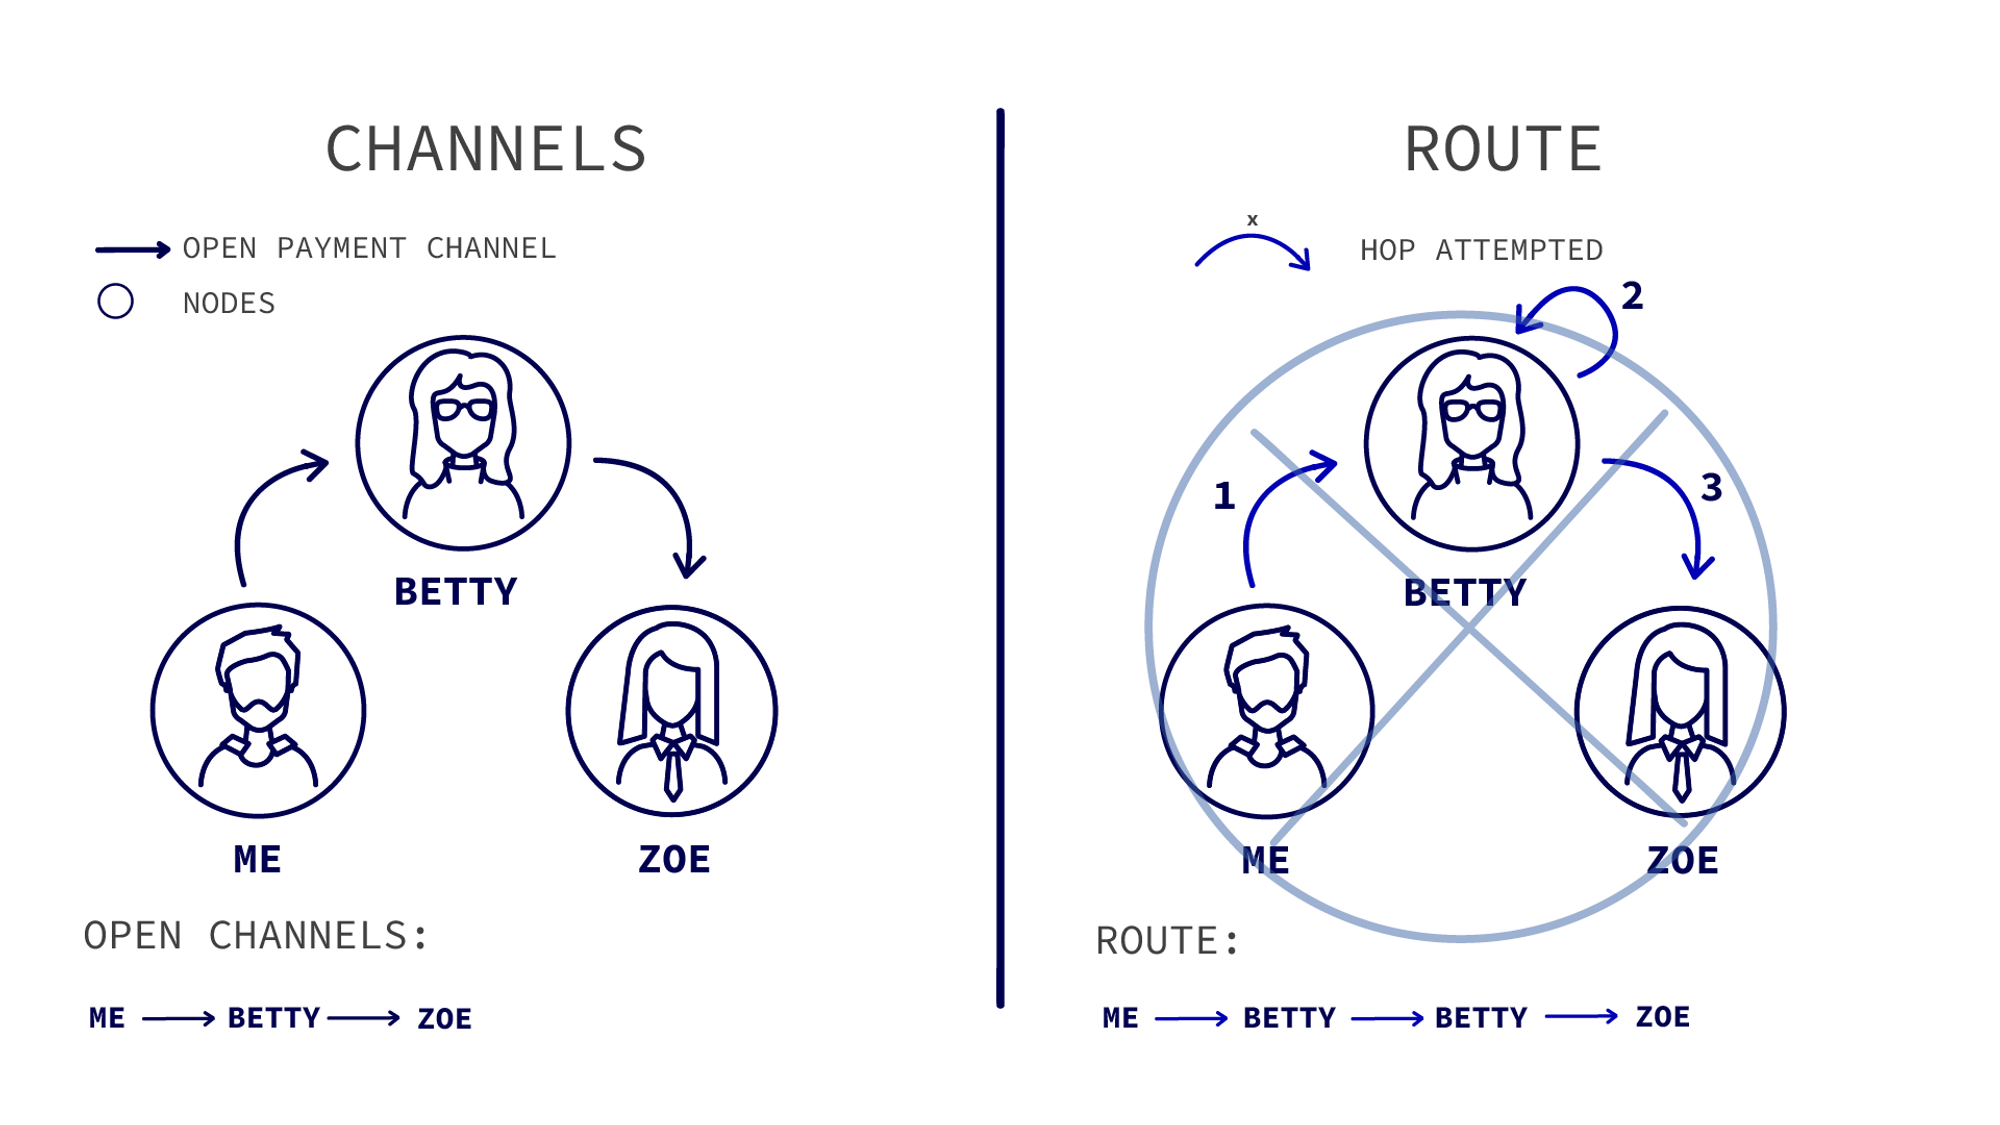
This is also why the first node specified on a path cannot be yourself, as you are also the sending node.
Try using the following route. It should fail:
send me,Betty Hi!
Automatic pathing
So far, we have used manually selected paths by entering the whole path into the command. Instead of this, we can instead let HOPR find a path for the relay by specifying just the receiver with no comma:
send Betty Hi!
Automatic pathing will only look for 3-HOP paths from you to the receiver. If none exist or you don’t have sufficient funds staked in the first channel of the relay, it will fail.
Failed to send message.
Note: Automatic pathing will discard any repeating nodes even if they are non-consecutive. With manual path selection, you can repeat nodes non-consecutively: me → Betty → Chāo → Betty → me
But this will also throw a warning as it is less than ideal for most relays.
The easiest way to increase your pathing options is to switch your strategy from passive to promiscuous.
Settings strategy
By default, your strategy is set to passive which means your node will not try to open or close channels automatically.
When you change the strategy to promiscuous, your node will try to open channels with a randomly selected group of nodes you have a healthy connection to. And at the same time, close channels with nodes that are low on balance or considered unhealthy.
You can change your strategy to promiscuous by entering:
settings strategy promiscuous
You can always switch it back to passive whenever you want:
settings strategy passive
Tickets
Although you spend HOPR tokens to relay data, you are actually paid in tickets. Some tickets contain a range of HOPR tokens, but most are useless. The point of this is that over a sizeable amount of tickets, the payment for your services will converge to the amount you would have received.
But with the added benefit of:
- massively reduced on-chain transactions (letting you keep more of the payment)
- And a decoupling of interactions on the HOPR network from on-chain data (increasing privacy)
Checking your tickets
You can check how many tickets you have earned by typing tickets:
tickets
Expected output:
Tickets:
- Pending:          0
- Unredeemed:       0
- Unredeemed Value: 0.00 txHOPR
- Redeemed:         0
- Redeemed Value:   0.00 txHOPR
- Losing Tickets:   0
- Win Proportion:   0%
- Neglected:        0
- Rejected:         0
- Rejected Value:   0.00 txHOPR
You should have earned tickets if your node was used as an intermediary to relay data. If you have earned none, try to set your strategy to promiscuous, so you are more likely to be used for automatic pathing.
Ticket redemption
Tickets are redeemed automatically, so the tickets which contain value will be converted to HOPR tokens and added to the balance of the node used for that relay. The rest are discarded with no trace left on the blockchain.
If a channel exists in both directions between consecutive nodes on the relay, the ticket is redeemed into the following nodes channel instead of its balance.
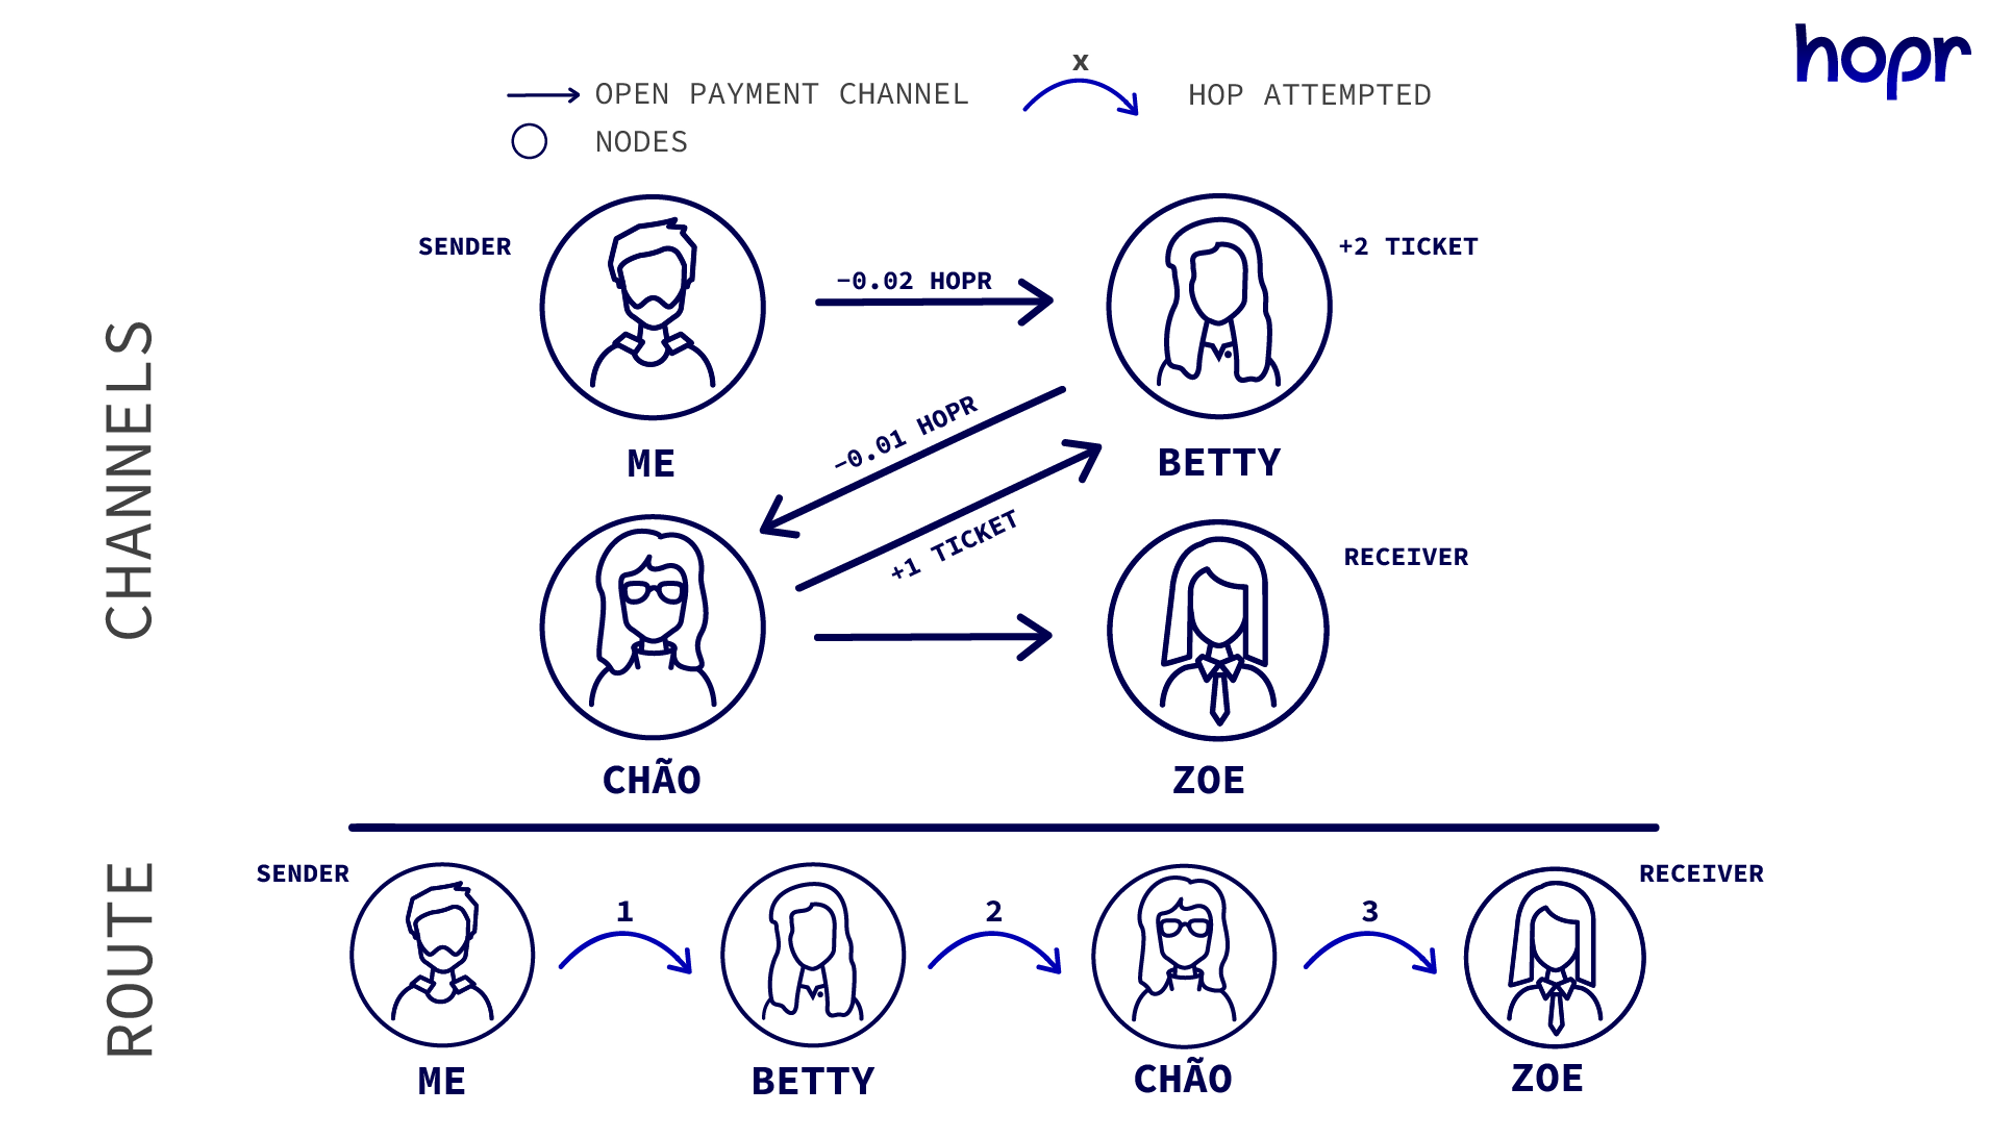
In the above example, you, as the sender, will create two tickets of value 0.02 HOPR to pay for the entire relay. Since no channel exists from Betty -> me, the tickets are redeemed into Betty's node. Betty now generates a ticket of value 0.01 HOPR to pay for the remaining relay, and since a channel does exist from Chāo -> Betty, the ticket is redeemed into this channel instead of Chāo's balance.
Chāo then sends the message to Zoë and does not generate a ticket for the last HOP of the relay.
By redeeming tickets into channels, nodes are keeping healthy connections funded. In the long run, this means your node will be more active on the network earning more HOPR!
When channels are closed, all staked tokens are added to your balance and from there can be withdrawn to an external wallet.
Withdrawing funds
You can withdraw funds from your balance using:
withdraw [amount] [NATIVE/HOPR] [address]
Amount – the number of tokens you want to withdraw
NATIVE/HOPR – which token you want to withdraw
Address – the wallet address you want to send your tokens to
Example sending native tokens –
withdraw 0.01 NATIVE 0xc8Aa5a085c23dfEa903312a73EfC30888bB61f0B
This will withdraw 0.01 xDAI from your balance and send it to 0xc8Aa5a085c23dfEa903312a73EfC30888bB61f0B
Example sending hopr tokens –
withdraw 0.01 HOPR 0xc8Aa5a085c23dfEa903312a73EfC30888bB61f0B
This will withdraw 0.01 wxHOPR or mHOPR from your balance and send it to 0xc8Aa5a085c23dfEa903312a73EfC30888bB61f0B
Please use your own ETH address to withdraw funds and not the example address
Importing wallet to MetaMask
If you have backed up your identity file, you can convert it to a .json file and import it as an account to your MetaMask to access your funds.
Note: If you are using macOS or Windows, then you should make sure you can see hidden files. Otherwise, the identity file will not be visible to you.
For Avado/Dappnode
(1) Locate the .hopr-identity file inside the db folder
(2) Rename the file to hopr-identity.json
For local or VPS users
(1) find the folder .hoprd-db-bogota on your machine or VPS
(2) locate the file .hopr-id-bogota
(3) Rename the file to hopr-id-bogota.json
Importing the JSON file
(1) Open Metamask and click on the accounts icon
(2) Go to import accounts
(3) Select JSON file on the dropdown list
(4) Browse through your files and select the renamed .json identity file.
(5) Click import, and you are all done!
You should now have your funds accessible in your new MetaMask account.
Types Of Nodes
NAT Nodes
If you create a node by default without setting up port forwarding, this is likely the node you are running. A NAT (Network Address Translation) node is a node that relies on the translation of IP addresses for it to receive traffic sent to the public IP addresses it and many other devices are connected to.
In this example, think of your router having a single public IP address, and many devices are connected to it. Your laptop, a separate PC, your node etc... All of which have their own internal IP address.
Traffic that is meant to be received by your node is sent to the public IP address and then has to be routed correctly to your node. The problem is your router can be pretty picky about how it routes the traffic it receives, creating problems when two NAT nodes try to communicate with each other. This is why the HOPR network runs several PRNs (Public Relay Nodes).
PRNs (Public Relay Nodes)
A NAT node has no trouble sending outgoing traffic but receiving incoming traffic through its public IP can be complicated. And two NAT nodes that both have trouble receiving traffic will not be able to communicate without an intermediary, which is where PRN nodes come in.
PRNS take the traffic NAT nodes send and help create a connection through which they can communicate with each other. PRNs are run exclusively by our core devs at the moment, and it is not recommended for community members to run such nodes as they are required to be run with high stability to ensure network health.
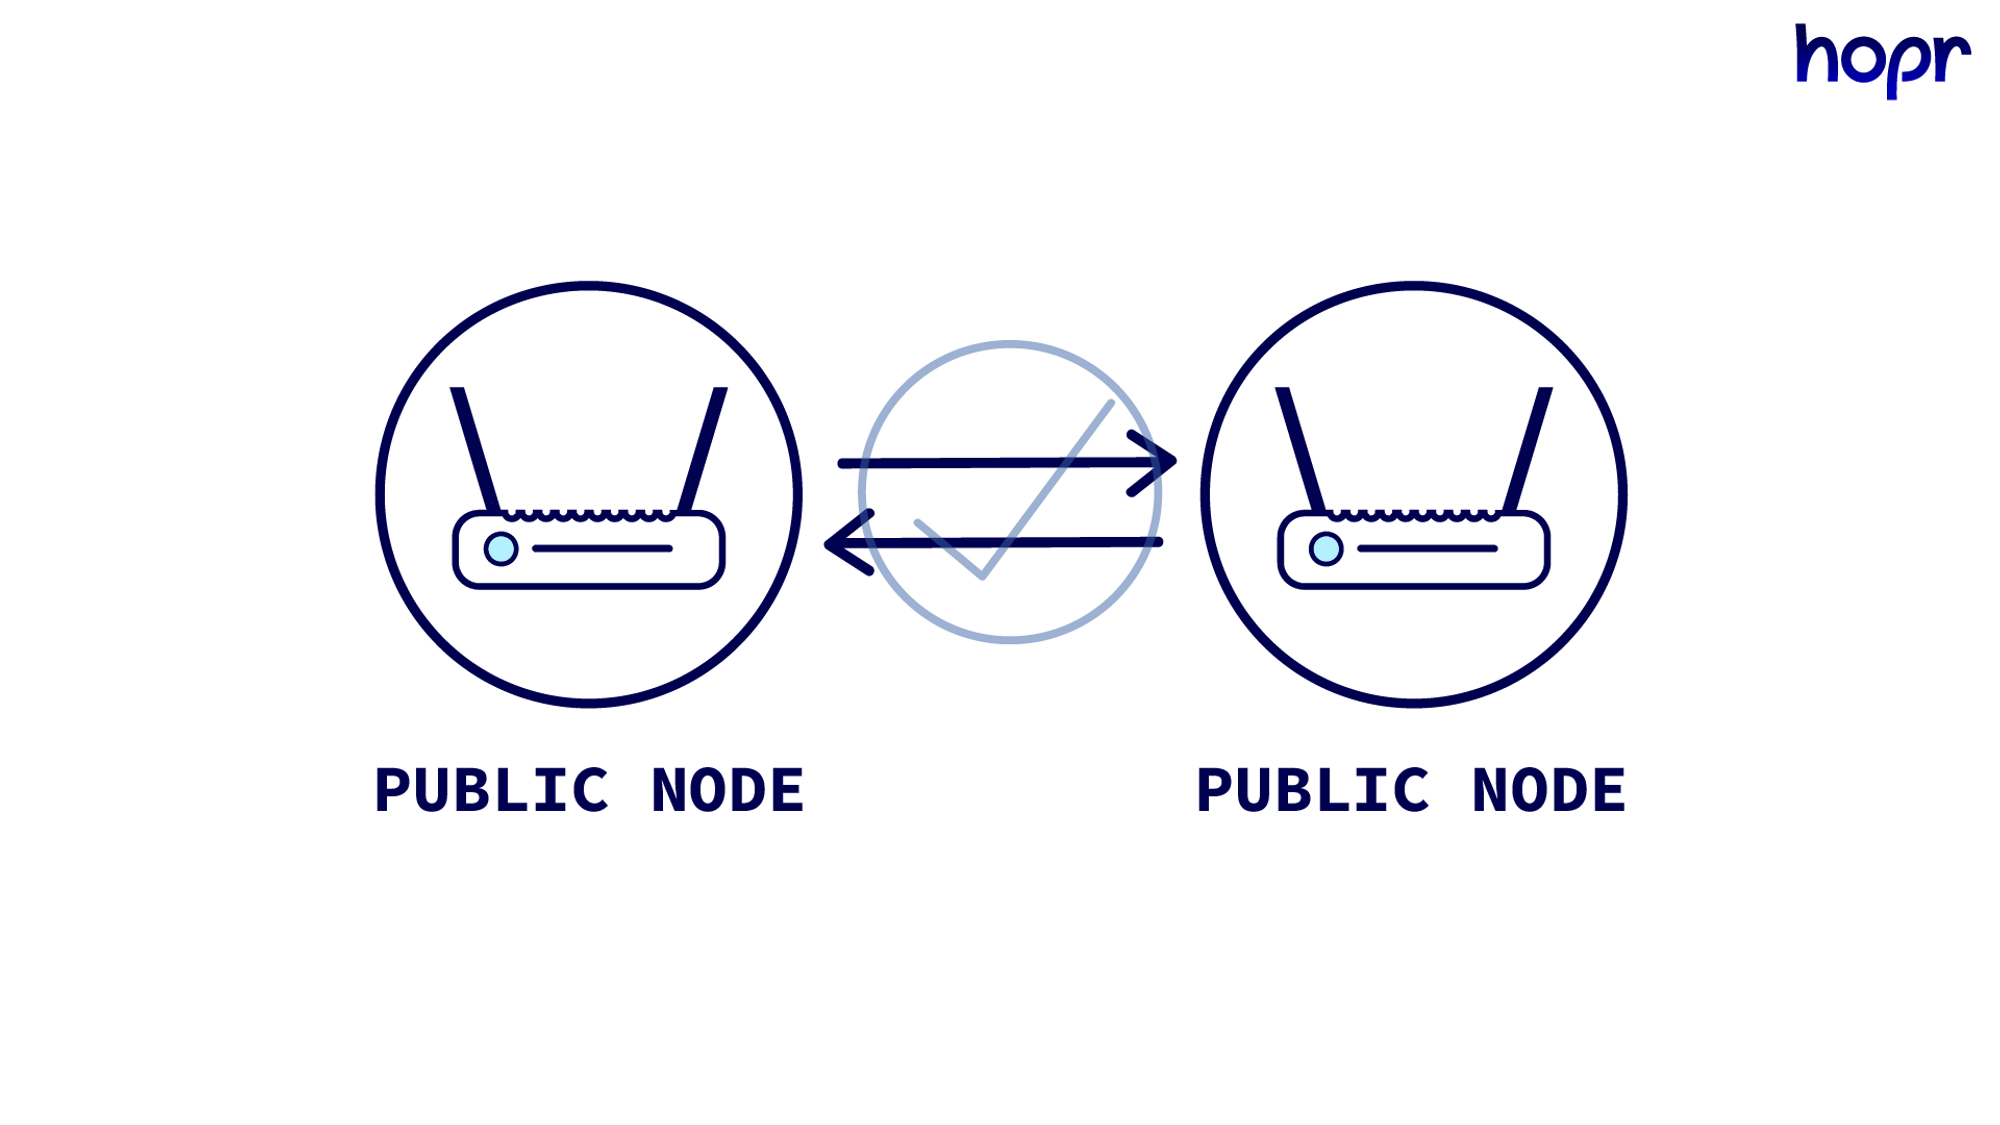
Public Nodes
If you set up port forwarding on your NAT node, you can make it a public node. The problem NAT nodes have is that routing incoming traffic sent to your public IP address to the internal IP address of your node can have many complications. But if you map a certain port of your public IP address to by default, send the traffic it receives to the same port of your node's internal IP address, the node essentially becomes "public". The public IP address and port number now become synonymous with the internal IP address and port number of your node.
This solves the problem two NAT nodes have when communicating with each other and allows nodes to communicate with each other without the need for a PRN.
How To Setup Port Forwarding For My Node
You will need to set up port forwarding on your node to participate in our next major release, as the initial release will only support public nodes. This tutorial will give the basic outline of how to set up port forwarding for your node, but it is important to note this will vary depending on your internet provider and router.
You will need the following to complete this tutorial:
- The internal IP address of your running HOPR node
- Direct admin access to your router
How To Find The Internal IP Address Of Your Node
If you are running a HOPR node on a MAC:
(1) Open your terminal window.
(2) Run the following command:
ifconfig | grep "inet " | grep -Fv 127.0.0.1 | awk '{print $2}'
(3) The output should show your node's internal IP address.
If you are running a HOPR node on a PC with WSL (Windows Subsystem for Linux):
(1) Open Windows PowerShell with administrator rights (In Windows, right-click on the PowerShell icon, then select "Run as Administrator" from the context menu).
(2) Run the following command:
wsl hostname -i
(3) The output should show your node's internal IP address.
If you are running a HOPR node on Linux OS:
(1) Open the terminal
(2) Run the following command:
hostname -I | cut -d' ' -f1
(3) The output should show your node's internal IP address.
If you are running a Dappnode/Avado
Important: If you are running your HOPR node on Avado, please migrate to Dappnode ASAP. The next release will not support Avado.
(1) Connect to your Dappnode dashboard
(2) On the top right corner, click on the rounded pixeled circle (4th from the right) and note the internal IP address.
Setting Up Port Forwarding
Port Forwarding on a VPS
On a VPS, you usually have a dedicated IP address. In this case, you will only need to open a port. To open the port, please follow these steps:
(1) Login to your VPS via ssh
(2) Execute the following command:
sudo iptables -I INPUT -p tcp -m tcp --dport 9091 -j ACCEPT && sudo iptables -I INPUT -p udp -m udp --dport 9091 -j ACCEPT && sudo iptables-save
Port forwarding for your Dappnode/Avado or Personal computer
To access your router admin, you will need to find your router's default gateway IP address. Please follow these steps:
(1) For Linux/macOS users, open the terminal.
(2) Execute the command: ip route show default | awk '/default/ {print $3}'. It will print out your router's gateway IP address. Commonly, the gateway IP addresses of your router are 192.168.1.1 or 192.168.0.1
(3) Enter the router's gateway IP address into the browser. This will load the login screen to your router, and usually, it should show the model of your router.

(4) Please access your router admin interface.
(5) Each router brand will have its own method of setting up port forwarding, but it usually should not be very difficult. Here is a list of instructions for the most popular router brands:
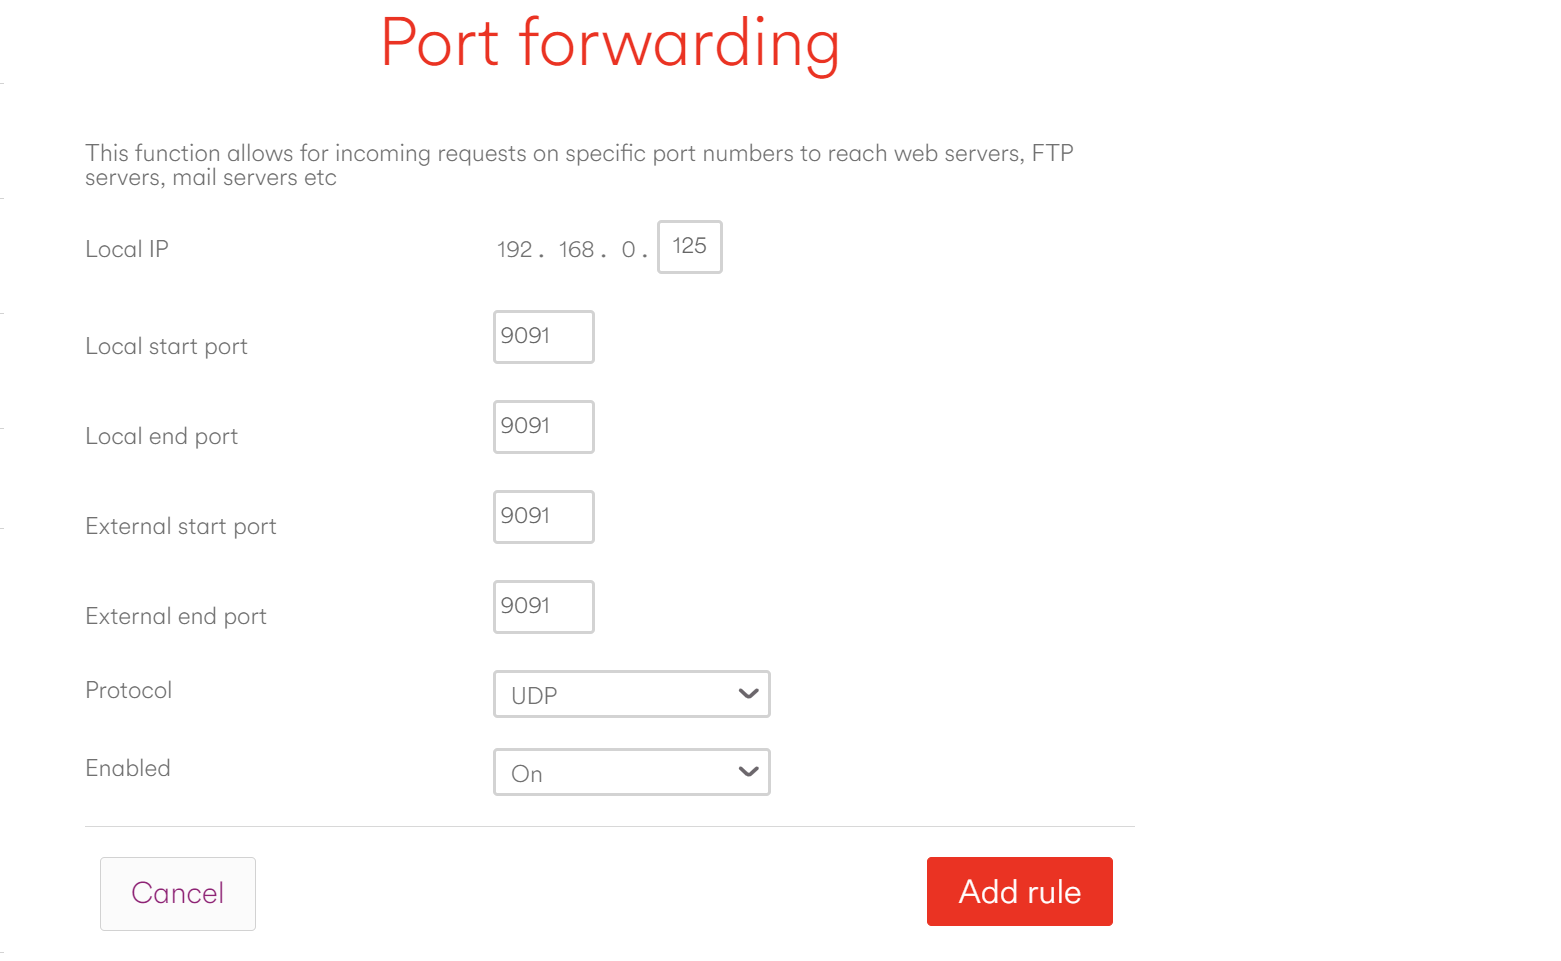
(6) Then setup port forwarding using the following settings:
-
Internal Ip address should be that of your HOPR node. If you need help finding this see the instructions here.
-
Protocol: You will need to setup port forwarding for both TCP & UDP
-
Set the local and end ports to
9091.
This basic guide should help you with port forwarding for our next release. If you need any assistance, please join the HOPR TG group: https://t.me/hoprnet, where Ambassadors & Moderators will help you out!
How To Test Port Forwarding Is Setup For My Node
To verify if you have correctly port forwarded the ports, follow these steps to check if the port to your HOPRd node is open from outside your network.
For a node on your home network (Dappnode, Dappnode(Avado device), PC, MAC)
First you need to make sure that device on which HOPRd is installed is exposing the 9091 port. To do that you need to:
(1) Find the internal IP address of the device where HOPRd is installed: https://docs.hoprnet.org/node/using-hopr-admin#how-to-find-the-internal-ip-address-of-your-node
depending on the OS, please do one of the following:
- Unix based system: nc -vz
<internal_IP_of_device>9091 - For Windows OS: telnet
<internal_IP_of_device>9091
Note: Successful port opening should yield a response similar to the following:
- For Unix users: "Connection to
<your_external_IP_address>port 9091 [tcp/xmltec-xmlmail] succeeded!" - For Windows users: Executing the command should result in an open empty window, indicating a successful port opening.
After a successful response from your internal IP address, now you will need to check your home network Public IP address in the same way:
(1) Find your home network public IP
Open Command prompt or terminal window and execute command: curl ifconfig.me. Under unix system it will simply output the IP address, under Windows OS, find IP address next to "Content".
Depending on the OS, please do one of the following:
- Unix based system: nc -vz
<home_network_public_ip>9091 - For Windows OS: telnet
<home_network_public_ip>9091
Note: Successful port opening should yield a response similar to the following:
- For Unix users: "Connection to
<your_external_IP_address>port 9091 [tcp/xmltec-xmlmail] succeeded!" - For Windows users: Executing the command should result in an open empty window, indicating a successful port opening.
For Nodes On VPS
From your home computer you will need to check if port 9091 is opened on a VPS where the HOPRd node is hosted.
Depending on the OS, please do one the following:
- Unix based system: nc -vz
<VPS_IP_address>9091 - For Windows OS: telnet
<VPS_IP_address>9091
Note: Successful port opening should yield a response similar to the following:
- For Unix users: "Connection to
<your_external_IP_address>port 9091 [tcp/xmltec-xmlmail] succeeded!" - For Windows users: Executing the command should result in an open empty window, indicating a successful port opening.
Note: For some windows users, telnet maybe not be available, you will need to enable it manually:
(1) Click on search bar and search for: Programs and features, click on Turn Windows features on or off
(2) Scroll to the bottom until you will see Telnet Client, mark check box and click ok. It will try to install telnet client.
(3) Restart your computer
Using Dynamic DNS (DDNS)
To run the HOPRd node, you need a static or public IP so other peers can reach you on the network. However, many ISPs only provide dynamic IPs. In this case, you can use Dynamic DNS (DDNS), which continually checks for IP changes and automatically updates the hostname with the latest IP. This means using a hostname instead of an IP address. Here's how to set it up:
Via Your Router
Most router brands support dynamic DNS. You can use the router brand's credentials or third-party services like No-IP.
Brands supporting Dynamic DNS:
After setting up DDNS, you'll have a hostname (e.g., hostname.hopto.org) to use with a port on the HOPR package instead of an IP address, like hostname.hopto.org:9091.
For more information, view the documentation here.
Via Client Installation
Use a Dynamic DNS service provider client to monitor IP changes and update your domain. We recommend No-IP. Install their client on your machine to monitor external IP changes and update the hostname.
(1) Download & install the client based on your OS: No-IP Download
(2) After setting up DDNS, create a hostname (e.g., hostname.hopto.org) to use with a port on the HOPR package, like hostname.hopto.org:9091.
For Dappnode
If you're running the HOPRd node on Dappnode, it supports DynDNS. Here's what to do:
(1) Connect to the Dappnode dashboard.
(2) Click the colorful icon in the top right corner and find "DAppNode Identity". Look for a DynDNS URL like hiuhu234hiu.dyndns.dappnode.io.
(3) Go to HOPR Package Configuration(http://my.dappnode/packages/my/hopr.public.dappnode.eth/config). Under "Host IP/Port mapping", replace the IP address with the DynDNS URL, e.g., hiuhu234hiu.dyndns.dappnode.io:9091.