Migrate Avado
Important: Any HOPR package found on the Avado store is outdated and will not give you access to the Dufour release. Please migrate your software to DappnodeOS.
Transitioning To Dappnode
Important: Before following this guide to install DappnodeOS on your Avado device, make sure to first backup any data if you are running a validator or any other dApp. The migration process will otherwise wipe all existing data.
Prerequisites
To complete the transition, you will need the following:
- An empty USB with at least 2 GB of space
- Physical access to your Avado device
How To Migrate Your Avado Node To A Dappnode
(1) Create a bootable USB from this ISO file.
We strongly recommend using Etcher to create a bootable USB, as it will ensure a smooth migration process.
Note: The following instructions show how to use Etcher to create a bootable USB. But you can use any tool for this.
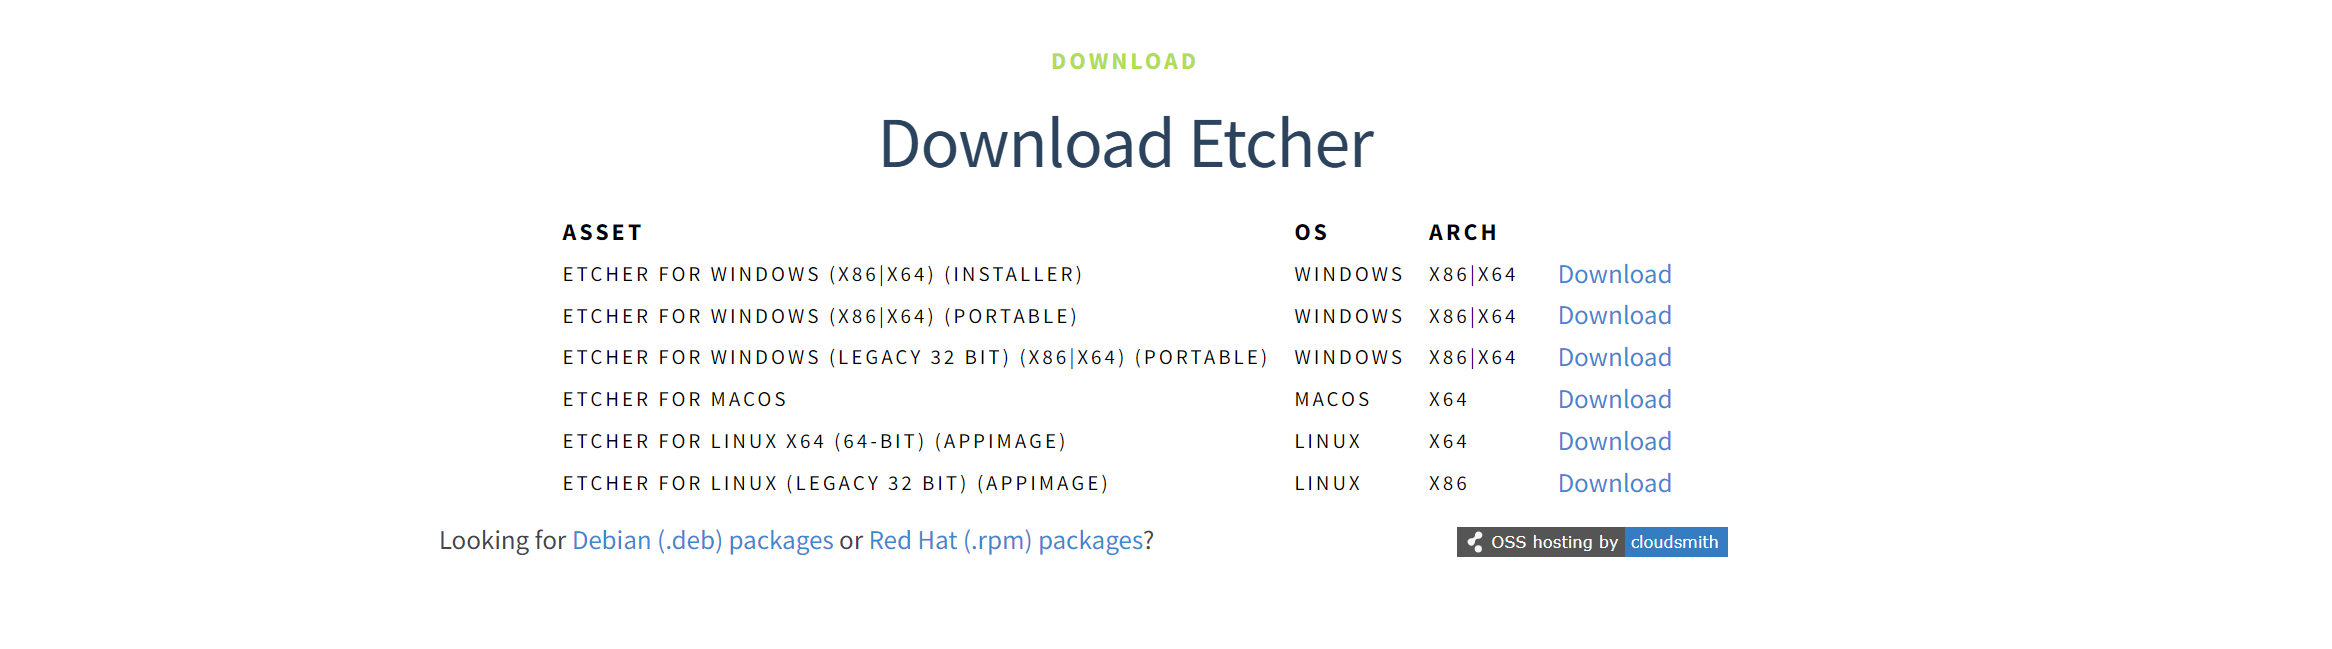
(2) Download Etcher; you can download it here.
(3) Plug your USB stick into your computer and open Etcher.
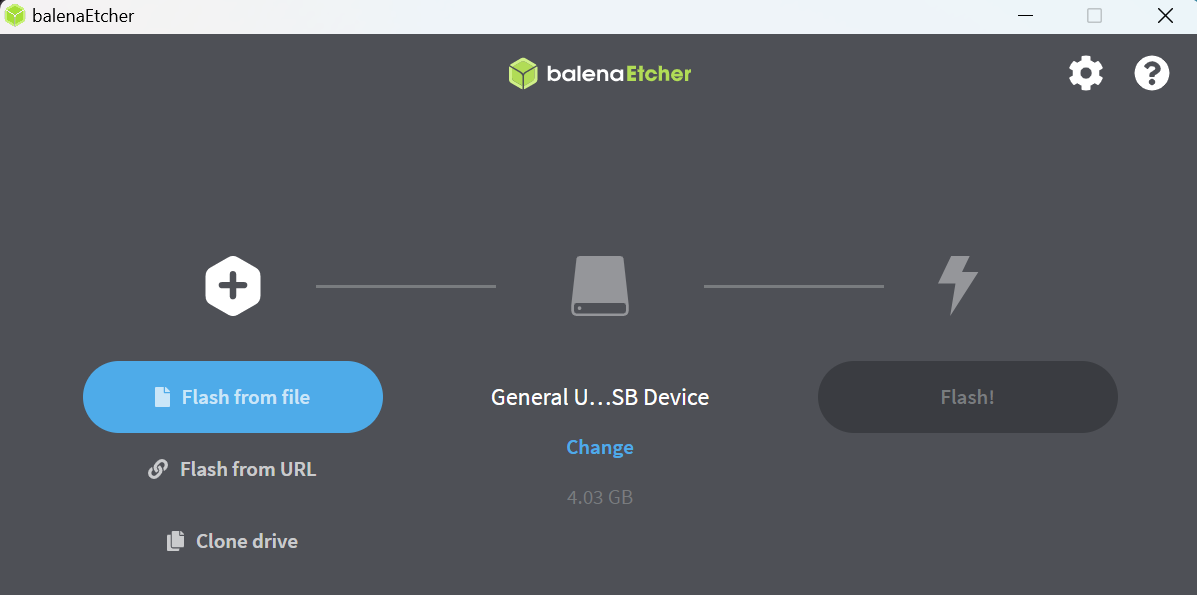
(4) Press the Flash from file button and select the Dappnode ISO file when prompted.
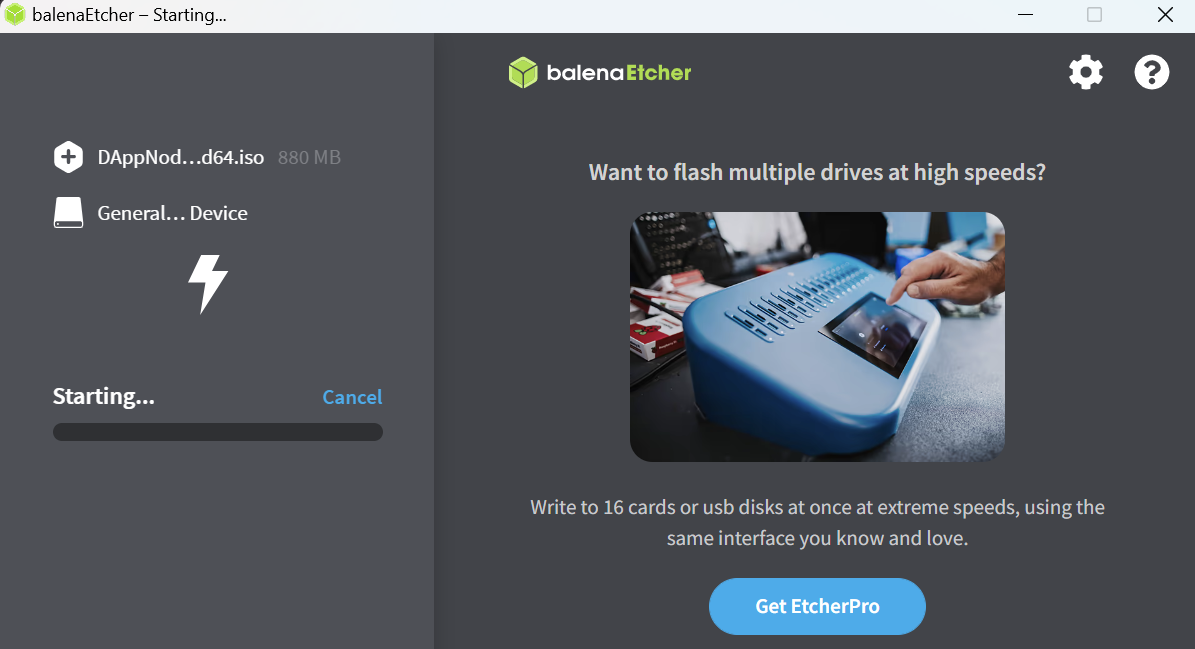
(5) Then press Flash! and wait for the download to complete.
(6) Once the download completes, you can remove the USB and use it to upgrade your Avado node's software.
(7) Turn off your Avado device by holding the power button at the front.
(8) Attach the bootable USB to any Avado USB port and connect an Ethernet cable to provide internet to the Avado device.
(9) With the USB attached, turn on the Avado device and wait 15 minutes.
(10) After 15 minutes, turn off the Avado device by holding the power button and waiting until the red light goes off.
(11) Now remove the USB, turn the Avado device back on, and wait 5 minutes.
(12) After 5 minutes have passed, check if DappNodeWifi has appeared on your computer's wifi list. If it has, try and log in with the Wifi password: dappnode

If you cannot find the Dappnode wifi follow these additional steps to complete the installation.
If you cannot find the Dappnode wifi and still see your Avado wifi follow these additional steps to complete the installation.
(13) Once connected to the Dappnode wifi, access the Dappnode Dashboard at: http://my.dappnode/, and you can follow the instructions here to set up your HOPR node.
Additional Steps To Troubleshoot Your Installation
These are additional steps to be followed in case you cannot find the Dappnode wifi after following the above instructions.
Note: If you can see the wifi network "DappNodeWifi" on your computer's list of available networks, you do not have to complete these additional steps.
To login to your new Dappnode, you will need either:
- An external monitor, external keyboard & HDMI cable.
- Or, the internal IP of your connected Avado/Dappnode.
If you have the internal IP address of your device you can login using SSH, otherwise you can use an external monitor and keyboard to interact with your Avado/Dappnode directly.
Login Using SSH
To complete the installation using SSH, you will need to make sure you know your device's internal IP address. You can follow these steps to find your internal IP address if you haven't already.
(1) Connect to your now converted dappnode by entering the following command into your terminal:
ssh dappnode@[INSERT_YourInternalIPAddress]
Note: replace [INSERT_YourInternalIPAddress] with your devices' internal IP address E.g. 192.xxx.x.xxx.
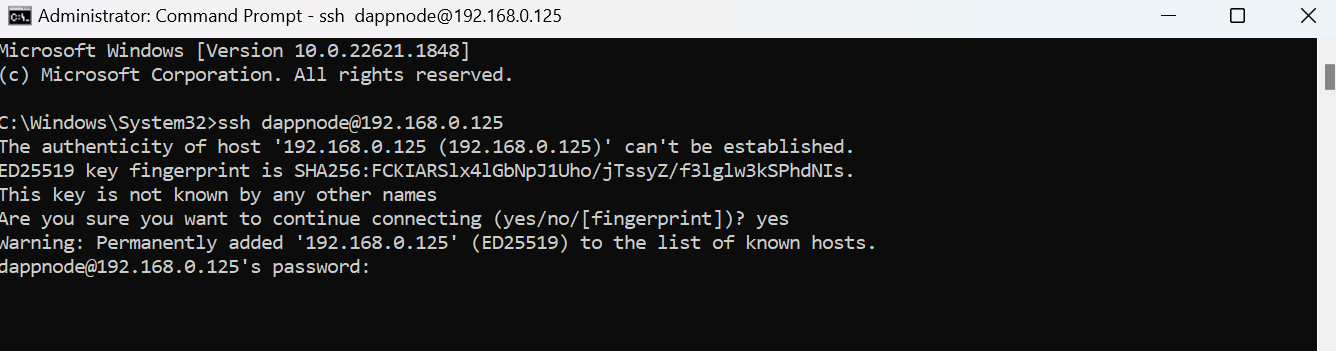
(2) You will then be asked to log in. Use the following default credentials to log in:
Username: dappnode
Password: dappnode.s0
(3) Once you've logged in, complete the installation through the terminal as documented here.
Login Using An External Monitor and Keyboard
You can log in to your node using an external monitor & keyboard.
(1) Plug in your monitor to your Avado/Dappnode using an HDMI cable.
(2) Plug in your external keyboard to your Avado/Dappnode device.
Your monitor should display a screen asking for your login details.
(3) Use the following default credentials to log in:
Username: dappnode
Password: dappnode.s0
(4) Once you've logged in, complete the installation through the terminal as documented here.
Complete Installation
These are additional steps to complete the installation of Dappnode software in case you cannot find the Dappnode wifi after following the above instructions.
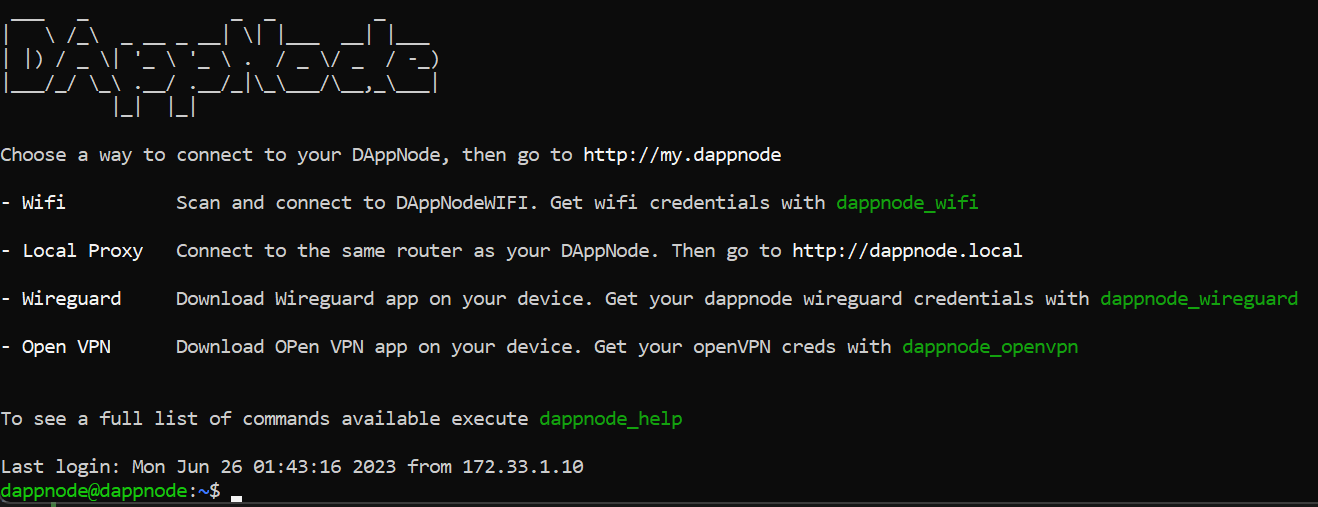
Follow these steps after having logged into your now semi-transitioned Avado device. You should see the following screen:
(1) Install the following package and enter the password dappnode.s0 if prompted.
sudo apt-get install -y kbd
(2) Install the prerequisites using the following command:
sudo wget -O - https://prerequisites.dappnode.io | sudo bash
(3) Install the dappnode package using the following command:
sudo wget -O - https://installer.dappnode.io | sudo bash
(4) Finally, run the command:
sudo reboot
(4) Wait a few minutes and check if DappNodeWifi has appeared in your computer's wifi list. Wifi password: dappnode
How To Find Your Device's Internal IP Address
To find your Device's internal IP address, you need to look through the connected devices in your browser's UI. Where this is located on your UI will depend on your internet provider, but the general format can be followed as is below.
(1) Find your Router's IP address. For Windows and macOS users, you can use this guide.
(2) Log in to your router's UI by entering your IP address into your browser. You will be greeted with a screen similar to the following (this will vary depending on your provider):

(3) Login to your browser's UI, and then locate the connected devices panel. Here you should find the device dappnode along with the IP address of the device.

How To Re-Install Dappnode
These are instructions to re-install Dappnode software on your Avado. This is only for troubleshooting a failed previous installation.
To do this, you will need:
- Physical access to your Avado device
- A micro screwdriver
- A bootable USB with Dappnode software
(1) Remove the power cable and any other cables from your Avado device.
(2) Remove the bottom of your Avado (you will need a micro screwdriver for this).
(3) Now detach the RAM module by gently pulling the two pins outwards. The module should pop upwards without any pressure. Remove the erected module, and you should see a circular battery underneath.
(4) Remove the battery and wait 10 minutes.
(5) Then add the battery and any other detached modules back to the device and screw back on the bottom.
(5) Re-attach the power supply and ethernet cable.
(6) Turn on the Avado device for 2 minutes, and then turn the device back off.
(7) Plug in the USB stick, and turn the device back on.
(8) Wait for 15 minutes, then turn off the device.
(9) Detach the USB and turn on your device.
(10) Wait for 5 minutes and check if DappNodeWifi has appeared in your computer's wifi list. Wifi password: dappnode
Additional Step If You Still See Your Avado Wifi After Migrating
If after having completed the migration steps you still see your Avado wifi instead of DappNodeWifi. Then, there is likely an issue with your USB's boot options.
To solve this issue with the instructions below, you will need access to the following:
- An external keyboard
- An external monitor
If you do not have an external monitor & keyboard Follow the instructions here instead.
(1) Turn off your Avado device.
(2) Attach the external keyboard using one of the USB ports on the Avado. And attach the external monitor to the Avado using an HDMI cable.
(3) With your external monitor & keyboard connected, plug in the bootable USB you created earlier.
(4) Now turn on the Avado, and start pressing the Esc key until you enter the BIOS. This should be visible on the monitor you have connected.
(5) Use the arrow keys to navigate to the Boot tab.
(6) Here, under Boot Option Priorities, select Boot Option # and then change it to your attached USB.
(7) Now, using your arrow keys, navigate to the Save & Exit tab and save your settings.
(8) Your device should now restart and begin booting from your attached USB. You can now resume the initial installation method but now starting directly from the 10th step.
Next Steps
Once you've migrated your Avado device to run Dappnode software, you should follow the instructions under our Dappnode section to set up and configure your node. You can view these instructions here.