Backup, Restore and Update Your Node
Backup your node identity
Please select a platform to backup your node identity:
- Docker
- Docker Compose
- Dappnode
The identity file is automatically created and stored on your machine.
-
Back Up Your Identity File
The identity file
.hopr-id-dufouris located at:/<computer username>/hoprd/ -
Write Down Your Database Password
The password is set using the
--passwordflag in the HOPRd Docker command.Default password:
open-sesame-iTwnsPNg0hpagP+o6T0KOwiH9RQ0 -
Store Your Backup Safely
Save both the
.hopr-id-dufourfile and your password in a secure location.
For Docker compose, the identity file is automatically created and stored on your machine.
-
Back Up Your Identity File
Back up the identity file
hopr.id, which you will find at the following path:/<computer username>/compose/hoprd/conf/ -
Note Down Your Database Password
In the
composefolder, open the secrets environment file.env-secretsand locate the database password stored under the variable:HOPRD_PASSWORD -
Store Your Backup Safely
Safely store both the
hopr.idfile and your database password in a secure location in case you need to restore your node in the future.
The identity file is automatically created and stored on the Dappnode machine.
-
Access the File Manager
Go to the HOPR package file manager page.
-
Download Your Identity File
In the Download file section, enter the following path and click Download:
/app/hoprd/conf/hopr.idimportantIf you're using a browser like Brave, the identity file may not download automatically. Click Keep in the browser's downloads section to confirm. Ensure the file is fully downloaded, or you risk losing your node identity.
-
Retrieve Your Database Password
Go to the HOPR package config page.
Under Identity file password, click the eye icon to unhide the database password and write it down.Default password:
"open-sesame-iTwnsPNg0hpagP+o6T0KOwiH9RQ0"(Including the double quotes)
-
Store Your Backup Safely
Store both the downloaded
hopr.idfile and your database password in a secure location for future recovery.
Restore your node identity
Please select platform to restore your node identity:
- Docker
- Docker Compose
- Dappnode
-
Ensure You Have a Backup
Before restoring your node identity, make sure you have already backed up your HOPR node identity.
You will need the identity file
.hopr-id-dufourand the corresponding database password. -
Restore the Identity File
Copy your backed-up
.hopr-id-dufourfile into the following folder:/hoprd/ -
Set the Password Flag
Update the
--passwordtag in your Docker command to match the database password used for your previous node. Default password:open-sesame-iTwnsPNg0hpagP+o6T0KOwiH9RQ0 -
Configure Your Docker Command
Configure the Docker command with the required information, just as you did when initially setting up a new node.
For more details, see this section.
-
Ensure You Have a Backup
Before restoring your node identity, make sure you have already backed up your HOPR node identity.
You will need the identity file
hopr.idand the corresponding database password. -
Stop the hoprd Services
Navigate to the
composefolder and stop thehoprdservices by running the following command:COMPOSE_PROFILES=hoprd docker compose down -
Restore the Identity File
Inside the
composefolder, copy yourhopr.idfile into:/hoprd/conf/ -
Restart the hoprd Services
Return to the main
composefolder and restart thehoprdservices by running:COMPOSE_PROFILES=hoprd docker compose up -d
-
Enable Viewing Hidden Files
-
For Windows:
Open the File Manager app, and underView → Show, ensure that hidden files is checked.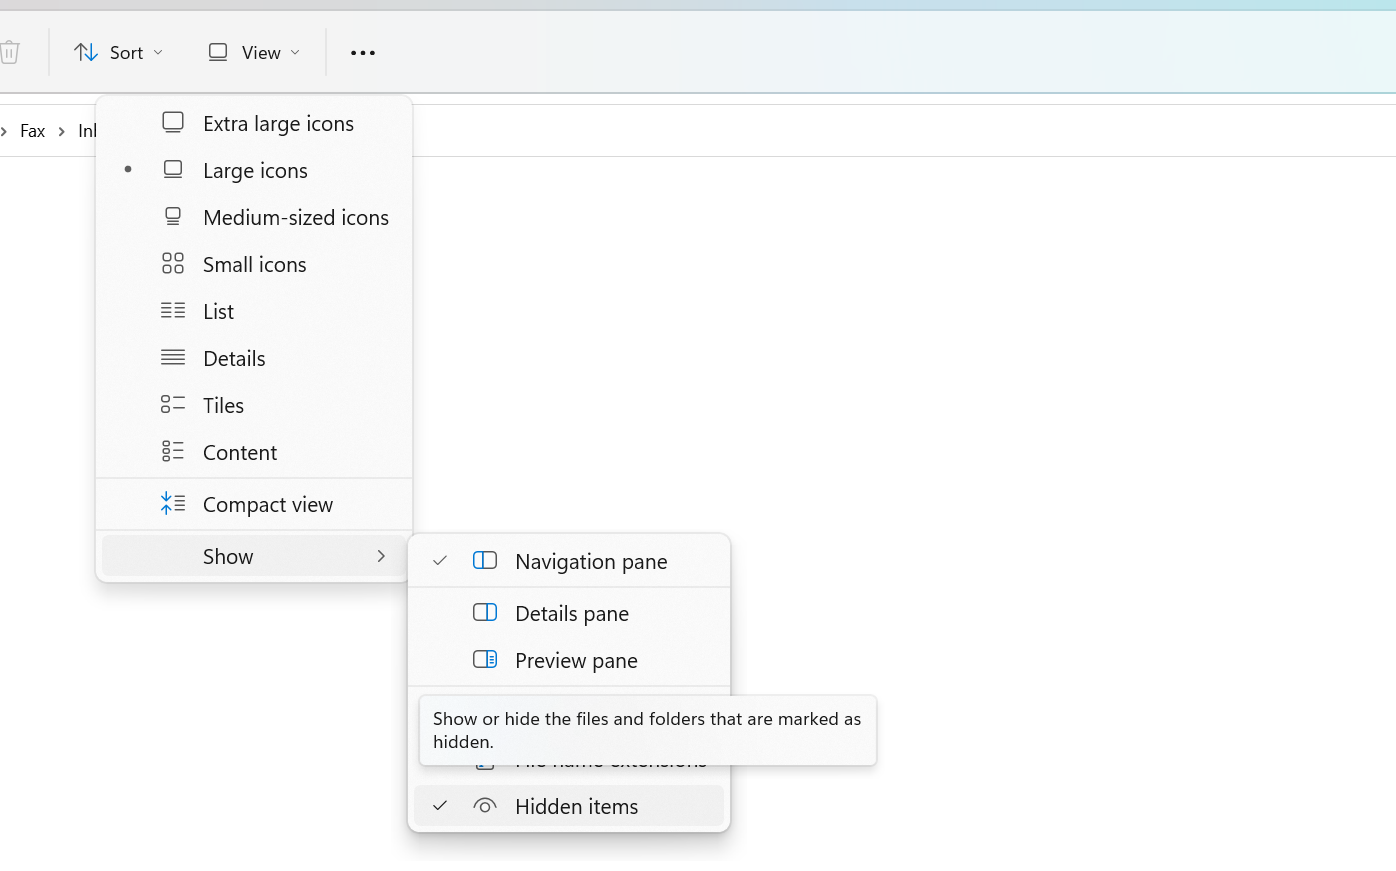
-
For Mac:
With the Finder app open, press the key combination:
Command + Shift + . (Dot)
You will need to repeat this whenever you upload the identity file.
-
-
Ensure You Have a Backup
Before restoring your node identity, make sure you have already backed up your HOPR node identity. You will need the identity file
hopr.idand the corresponding database password. -
Pause the HOPR Package
Go to the HOPR package info page and click the
Pauseicon to stop the HOPR package. -
Upload the Identity File
-
Go to the HOPR package file manager page.
-
Under the
Upload filesection, fill in the following:-
In the Choose file field, click
Browseand select thehopr.idfile. -
In the Defaults to $WORKDIR/ field, enter:
/app/hoprd/conf/
-
-
Click the
Uploadbutton to upload the identity file.
-
-
Restart the HOPR Package
Go to the HOPR package info page and click the
PlayorRestarticon to start the HOPR package.
Update your node
When migrating from v2.2.x to v3.0.0, there's no need to re-sync your node manually — the re-syncing process is automated. Simply follow the steps below.
Please select your platform to update your HOPRd node:
- Docker
- Docker Compose
- Dappnode
-
Redeem manually tickets and close incoming channels
infoBefore redeeming tickets, note that the
minimum_redeem_ticket_valueconfiguration setting determines the minimum channel balance. If the balance falls below this value, it represents the amount of HOPR tokens you’re willing to lose. You can always lower this amount before redeeming all tickets.-
Connect to your node via the
Admin UI, navigate to theTicketspage, and click the Redeem All Tickets icon. Wait until the unredeemed tickets value decreases and approaches 0. -
Navigate to the
CHANNELS: INpage and close all incoming channels by clicking the Close Incoming Channel button next to each channel.
-
-
Back Up Your Identity File
Follow the instructions in this guide.
-
Remove current running HOPRd container
-
Enter the following command in your terminal to check running docker containers:
docker psThis will show all running Docker containers. Look for the one labeled:
europe-west3-docker.pkg.dev/hoprassociation/docker-images/hoprd:stable -
Write down HOPRd node container ID:
Example:
8baa38408847
-
Remove the old container using (Replace
<Your_Container_ID>with writen down HOPRd node container ID):docker rm -f <Your_Container_ID>Example:
docker rm -f 8baa38408847
-
-
Remove Database Files
-
Navigate to your HOPRd node folder, which is named
.hoprd-db-dufourby default. -
Execute the following command to delete all database files:
rm -rf db && rm -f tbf
-
-
Update Your Configuration File
Ensure your configuration file is up to date. To replace your current configuration file with a new one, follow this guide.
-
Enable Fast Sync (Optional)
Fast Sync significantly accelerates node synchronization. This process can take anywhere from 10 to 20 minutes, depending on your hardware specifications. To enable fast sync, follow this guide.
-
Start Your Node
To start your node, use the command you previously executed or refer to the Docker command.
-
What's next?
After migrating from HOPRd v2 to HOPRd v3, verify that your migration was successful by following this guide.
-
Redeem manually tickets and close incoming channels
infoBefore redeeming tickets, note that the
minimum_redeem_ticket_valueconfiguration setting determines the minimum channel balance. If the balance falls below this value, it represents the amount of HOPR tokens you’re willing to lose. You can always lower this amount before redeeming all tickets.-
Connect to your node via the
Admin UI, navigate to theTicketspage, and click the Redeem All Tickets icon. Wait until the unredeemed tickets value decreases and approaches 0. -
Navigate to the
CHANNELS: INpage and close all incoming channels by clicking the Close Incoming Channel button next to each channel.
-
-
Back Up Your HOPRd node
-
Connect to your machine via ssh.
-
Backup whole HOPRd node
composefolder by executing this command:cp -r compose compose_backup
-
-
Stop hoprd Services
Navigate to the
composefolder and stop thehoprdservices by running:COMPOSE_PROFILES=hoprd docker compose down -
Update compose folder and complete configuration using previous version
The following command assumes your HOPRd node folder is named
compose. It downloads the latest compose folder, merges its files with your currentcomposefolder, and updates the new configuration file with required fields from the previous configuration file.Exit the
composefolder and execute the following command:wget https://github.com/hoprnet/hoprnet/archive/refs/heads/release/kaunas.zip && unzip kaunas.zip "hoprnet-release-kaunas/deploy/compose/*" -d extracted_files && rsync -a --remove-source-files extracted_files/hoprnet-release-kaunas/deploy/compose/ ./compose/ && rm -rf extracted_files/hoprnet-release-kaunas/deploy/compose && rm -rf kaunas.zip extracted_files && address=$(yq e '.hopr.host.address' compose/hoprd_data/hoprd.cfg.yaml | sed 's/!IPv4 //') && port=$(yq e '.hopr.host.port' compose/hoprd_data/hoprd.cfg.yaml) && safe_address=$(yq e '.hopr.safe_module.safe_address' compose/hoprd_data/hoprd.cfg.yaml) && module_address=$(yq e '.hopr.safe_module.module_address' compose/hoprd_data/hoprd.cfg.yaml) && yq e -i '.hopr.host.address = "!IPv4 '"$address"'"' compose/hoprd/conf/hoprd.cfg.yaml && yq e -i '.hopr.host.port = '"$port"'' compose/hoprd/conf/hoprd.cfg.yaml && yq e -i '.hopr.safe_module.safe_address = "'"$safe_address"'"' compose/hoprd/conf/hoprd.cfg.yaml && yq e -i '.hopr.safe_module.module_address = "'"$module_address"'"' compose/hoprd/conf/hoprd.cfg.yaml -
Enable automatic Fast Sync (Optional)
Fast Sync significantly speeds up node synchronization, taking 10–20 minutes depending on hardware. Due to the HOPRd v2 to v3 migration, Fast Sync requires the automatic method (see disclaimer in the guide below).
To enable automatic Fast Sync, follow this guide.
-
Start hoprd Services
Navigate to
composefolder and starthoprdservices to start re-syncing process:COMPOSE_PROFILES=hoprd docker compose up -d -
What's next?
After migrating from HOPRd v2 to HOPRd v3, verify that your migration was successful by following this guide.
Select based on your HOPR Package Update Status:
- HOPR Package Not Updated
- HOPR Package Auto-Updated
-
Redeem manually tickets and close incoming channels
infoBefore redeeming tickets, note that the
minimum_redeem_ticket_valueconfiguration setting determines the minimum channel balance. If the balance falls below this value, it represents the amount of HOPR tokens you’re willing to lose. You can always lower this amount before redeeming all tickets.-
Connect to your node via the
Admin UI, navigate to theTicketspage, and click the Redeem All Tickets icon. Wait until the unredeemed tickets value decreases and approaches 0. -
Navigate to the
CHANNELS: INpage and close all incoming channels by clicking the Close Incoming Channel button next to each channel.
-
-
Back Up Your Identity File
-
Go to the HOPR package file manager page.
-
In the
Download filesection, enter the following path and clickDownloadto retrieve the identity file:/app/hoprd-db/.hopr-identityimportantIf you're using a browser like Brave, the identity file may not download automatically. Click
Keepin the browser's downloads section to confirm. Ensure the file is fully downloaded, or you risk losing your node identity. -
Retrieve your database password by going to the HOPR package config page.
Under Identity file password, click the eye icon to unhide the database password and write it down.
Default password:
"open-sesame-iTwnsPNg0hpagP+o6T0KOwiH9RQ0"(Including the double quotes)
-
Store both the downloaded
hopr-identity.tarfile and your database password in a secure location for future recovery.
-
-
Open the Dappstore
Go to the Dappnode dappstore.
-
Find and Select the HOPR Package
Search for the HOPR package, access its details, and click
UPDATE. -
Submit the Update
During the update process, all data fields should be pre-filled. Click
Submitto complete the HOPRd node update process. -
Restore your node identity
-
Enable Viewing Hidden Files
-
For Windows:
Open the File Manager app, and underView → Show, ensure that hidden files is checked. -
For Mac:
With the Finder app open, press the key combination:
Command + Shift + . (Dot)
You will need to repeat this whenever you upload the identity file.
-
-
Unarchive and rename identity file
Unarchive the recently backed-up
hopr-identity.tarfile to extract the hidden.hopr-identityfile. Ensure your file explorer is set to display hidden files. Then, rename the.hopr-identityfile tohopr.id. -
Pause the HOPR Package
Go to the HOPR package info page and click the
Pauseicon to stop the HOPR package. -
Upload the Identity File
-
Go to the HOPR package file manager page.
-
Under the
Upload filesection, fill in the following:-
In the Choose file field, click
Browseand select thehopr.idfile. -
In the Defaults to $WORKDIR/ field, enter:
/app/hoprd/conf/
-
-
Click the
Uploadbutton to upload the identity file.
-
-
Change configuration file path
-
Go to the HOPR package config page, scroll to the bottom and click on
SHOW ADVANCED EDITOR. -
Next to
HOPRD_CONFIGURATION_FILE_PATHchange value to/app/hoprd/conf/hoprd.cfg.yamland clickUpdate.
-
-
Restart the HOPR Package
Go to the HOPR package info page and click the
PlayorRestarticon to start the HOPR package.
-
-
Enable automatic Fast Sync (Optional)
Fast Sync significantly speeds up node synchronization, taking 10–20 minutes depending on hardware. Due to the HOPRd v2 to v3 migration, Fast Sync requires the automatic method (see disclaimer in the guide below).
To enable automatic Fast Sync, follow this guide.
-
What's next?
After migrating from HOPRd v2 to HOPRd v3, verify that your migration was successful by following this guide.
-
Redeem manually tickets and close incoming channels
infoBefore redeeming tickets, note that the
minimum_redeem_ticket_valueconfiguration setting determines the minimum channel balance. If the balance falls below this value, it represents the amount of HOPR tokens you’re willing to lose. You can always lower this amount before redeeming all tickets.-
Connect to your node via the
Admin UI, navigate to theTicketspage, and click the Redeem All Tickets icon. Wait until the unredeemed tickets value decreases and approaches 0. -
Navigate to the
CHANNELS: INpage and close all incoming channels by clicking the Close Incoming Channel button next to each channel.
-
-
Back Up Your Identity File
-
Go to the HOPR package file manager page.
-
In the
Download filesection, enter the following path and clickDownloadto retrieve the identity file:/app/hoprd-db/.hopr-identityimportantIf you're using a browser like Brave, the identity file may not download automatically. Click
Keepin the browser's downloads section to confirm. Ensure the file is fully downloaded, or you risk losing your node identity. -
Retrieve your database password by going to the HOPR package config page.
Under Identity file password, click the eye icon to unhide the database password and write it down.
Default password:
"open-sesame-iTwnsPNg0hpagP+o6T0KOwiH9RQ0"(Including the double quotes)
-
Store both the downloaded
hopr-identity.tarfile and your database password in a secure location for future recovery.
-
-
Restore your node identity
-
Enable Viewing Hidden Files
-
For Windows:
Open the File Manager app, and underView → Show, ensure that hidden files is checked. -
For Mac:
With the Finder app open, press the key combination:
Command + Shift + . (Dot)
You will need to repeat this whenever you upload the identity file.
-
-
Unarchive and rename identity file
Unarchive the recently backed-up
hopr-identity.tarfile to extract the hidden.hopr-identityfile. Ensure your file explorer is set to display hidden files. Then, rename the.hopr-identityfile tohopr.id. -
Pause the HOPR Package
Go to the HOPR package info page and click the
Pauseicon to stop the HOPR package. -
Upload the Identity File
-
Go to the HOPR package file manager page.
-
Under the
Upload filesection, fill in the following:-
In the Choose file field, click
Browseand select thehopr.idfile. -
In the Defaults to $WORKDIR/ field, enter:
/app/hoprd/conf/
-
-
Click the
Uploadbutton to upload the identity file.
-
-
Change configuration file path
-
Go to the HOPR package config page, scroll to the bottom and click on
SHOW ADVANCED EDITOR. -
Next to
HOPRD_CONFIGURATION_FILE_PATHchange value to/app/hoprd/conf/hoprd.cfg.yamland clickUpdate.
-
-
Restart the HOPR Package
Go to the HOPR package info page and click the
PlayorRestarticon to start the HOPR package.
-
-
Enable automatic Fast Sync (Optional)
Fast Sync significantly speeds up node synchronization, taking 10–20 minutes depending on hardware. Due to the HOPRd v2 to v3 migration, Fast Sync requires the automatic method (see disclaimer in the guide below).
To enable automatic Fast Sync, follow this guide.
-
What's next?
After migrating from HOPRd v2 to HOPRd v3, verify that your migration was successful by following this guide.
Update your HOPR Admin UI
For Dappnode users, the HOPR Admin UI is bundled with the HOPR package and cannot be updated separately.
Please select your platform to update the HOPR Admin UI:
- Docker
- Docker Compose
-
List Running Docker Containers
Run the following command in your terminal:
docker psLook for the container using the image:
europe-west3-docker.pkg.dev/hoprassociation/docker-images/hopr-admin:stableNote the container ID listed in your terminal.

-
Remove the Admin UI Container
Replace
<Your_Container_ID>with your actual container ID:docker rm -f <Your_Container_ID>Example:
docker rm -f 0a74437b27f8 -
Reinstall the Latest Admin UI
Retrieve and run the latest Admin UI installation command in your terminal.
-
Navigate to Your Compose Directory
Locate and open the
composefolder (assuming you haven't renamed it). -
Stop the Admin UI Services
Use the following command:
COMPOSE_PROFILES=admin-ui docker compose down -
Restart the Admin UI Services
To restart and apply the update:
COMPOSE_PROFILES=admin-ui docker compose up -d