Fast Sync
What is Fast Sync?
Fast Sync, a feature introduced in HOPRd version 2.2.0, significantly accelerates node synchronization by leveraging HOPR logs database files. These files store logs from a previous synchronization performed via an RPC provider, allowing your node to read on-chain data with enhanced efficiency. With Fast Sync, you can complete synchronization in just 10 to 20 minutes, even without a local RPC provider. Please note that the exact duration may vary depending on your hardware specifications.
There are two methods for using Fast Sync:
-
Manual Fast Sync: This method requires you to use your own pre-synced database files to initiate the fast sync process. To use this, you must have already fully synced your node at least once.
-
Automatic Fast Sync: This method uses pre-synced database files provided by HOPR, which are automatically downloaded and used to proceed with the fast sync.
By implementing the Automatic Fast Sync method, you acknowledge and agree to trust the integrity and accuracy of the pre-synced database files provided by HOPR. You assume all responsibility for using these files with your node and do so at your own risk.
Please select method to implement Fast Sync feature:
- Manual Fast Sync
- Automatic Fast Sync
Preparing for Manual Fast Sync
-
First, you must upgrade your node to the latest version. To update your node, follow this guide.
-
You must fully synchronize your node from scratch. Once your node is fully synchronized, check if it is performing normally by following this guide.
-
Make a backup of your fully synchronized node, select your platform:
- Docker
- Docker Compose
- Dappnode
Find the database log files hopr_logs.db, hopr_logs.db-shm, and hopr_logs.db-wal at the path /<computer username>/.hoprd-db-dufour/. Store these files for future use in a Fast Sync.
Find the database log files hopr_logs.db, hopr_logs.db-shm, and hopr_logs.db-wal at the path /<computer username>/compose/hoprd_data/hoprd/db/. Store these files for future use in a Fast Sync.
-
Go to the HOPR package backup page.
-
Click the Backup now button to download a backup of your HOPR node.
Important: If you are using a browser like Brave, the backup file may not download automatically. You will need to click Keep in your browser’s downloads section. -
Unarchive the downloaded backup file and navigate to the path /hopr.public.dappnode.eth_backup/db/db/ to find the database log files: hopr_logs.db, hopr_logs.db-shm, and hopr_logs.db-wal. Store these files for future use in a Fast Sync.
Enabling Fast Sync on your node
Please select platform to configure Fast Sync feature:
- Docker
- Docker Compose
- Dappnode
-
Locate the database log files that you previously gathered from this guide.
-
Ensure that you have stopped the HOPRd node Docker container. You can find more details here.
-
On your machine, navigate to the .hoprd-db-dufour folder. Inside, locate the db folder and delete all files in it.
-
Locate the previously backed-up files: hopr_logs.db, hopr_logs.db-shm, and hopr_logs.db-wal. Copy all three files into the destination db folder.
-
Configure your node by creating and applying a configuration file. Follow this guide.
-
Update your configuration file, inside configuration file locate the chain section and add the following settings below, aligned with the other configurations:
keep_logs: trueandfast_sync: true. Save the changes to the configuration file. -
Start your HOPRd node. More details can be found here.
-
Locate the database log files that you previously gathered from this guide.
-
Ensure that you have stopped the HOPRd node. You can find more details here.
-
On your machine, navigate to the compose folder. Navigate to hoprd_data find configuration file hoprd.cfg.yaml inside it locate the chain section and add the following settings below, aligned with the other configurations:
keep_logs: trueandfast_sync: true. Save the changes to the configuration file. -
Locate the db folder by following the path /hoprd/db/.
-
Locate the previously backed-up files: hopr_logs.db, hopr_logs.db-shm, and hopr_logs.db-wal. Copy all three files into the destination db folder.
-
Start your HOPRd node. More details can be found here.
-
Locate the database log files that you previously gathered from this guide.
-
Connect to your DAppNode dashboard.
-
Before proceeding with Fast sync process, ensure you back up your node:
-
Go to the HOPR package Backup page.
-
Click Backup now and download the archived file hopr.public.dappnode.eth_backup.tar.xz to your computer. Make an additional copy and store it securely on your computer.
-
-
Create a temporary folder, copy the archived file hopr.public.dappnode.eth_backup.tar.xz into the folder, and use an archiving tool to extract it.
-
Locate configuration file config and make changes:
- Find network_options.quality_bad_threshold and ensure it is set to a value of
0.1. - Find network_options.quality_offline_threshold and ensure it is set to a value of
0.0. - Locate the chain section and add the following settings below, aligned with the other configurations:
keep_logs: trueandfast_sync: true.
Save the changes to the configuration file.
- Find network_options.quality_bad_threshold and ensure it is set to a value of
-
In your temporary folder, navigate to the db folder, then enter the second db folder. Delete the old hopr_logs.db, hopr_logs.db-shm, hopr_logs.db-wal files.
Locate the previously backed-up files: hopr_logs.db, hopr_logs.db-shm, and hopr_logs.db-wal. Copy all three files into the destination db folder.
-
Archive files back (Follow strict guide)
-
Open your Terminal (macOS/Linux) or Command Prompt (Windows), and navigate to the temporary folder where you extracted the files (db, config, identity).
-
Execute the following command to re-archive the files into a new archive named hopr.public.dappnode.eth_backup_resync.tar.xz with the changes:
tar -cJf hopr.public.dappnode.eth_backup_resync.tar.xz db config identity
-
-
Remove the volume for the HOPR package: Go to the Info tab. Under the All volumes section, locate the volume size and click the trash can icon to remove the package volume. This will delete the package storage, including all databases.
-
Restore the modified backup file: Go to the Backup tab, click Restore, and select the modified archive hopr.public.dappnode.eth_backup_resync.tar.xz. On the Restoring backup popup, click Restore. Once you receive the notification message "Restored backup for HOPR", the process has been completed successfully.
-
Verify the restore process: Go to the Logs tab. In the logs, you should see syncing process lines, indicating the restore was successful and the re-sync process is underway. Wait for the node to fully sync to 100%.
Enabling Fast Sync on your node
Please select platform to configure Fast Sync feature:
- Docker
- Docker Compose
- Dappnode
-
Ensure that you have stopped the HOPRd node. You can find more details here.
-
Update your configuration file, inside configuration file locate the chain section and add the following settings below, aligned with the other configurations:
enable_logs_snapshot: trueandlogs_snapshot_url: "https://logs-snapshots.hoprnet.org/dufour-v3.0-latest.tar.xz". Save the changes to the configuration file. -
In your docker run command add additional variable:
-e HOPRD_ENABLE_LOGS_SNAPSHOT=1Example of how it should look in the docker run command:
-e DEBUG="hopr*" -e HOPRD_ENABLE_LOGS_SNAPSHOT=1 -e RUST_LOG=info -
Start your HOPRd node. More details can be found here.
-
Ensure that you have stopped the HOPRd node. You can find more details here.
-
On your machine, navigate to the compose folder. Navigate to hoprd_data find configuration file hoprd.cfg.yaml inside it locate the chain section and add the following settings below, aligned with the other configurations:
enable_logs_snapshot: trueandlogs_snapshot_url: "https://logs-snapshots.hoprnet.org/dufour-v3.0-latest.tar.xz". Save the changes to the configuration file. -
Navigate back to compose folder, find
.envfile and add additional variable bellow section #### HOPRD Configuration ####:HOPRD_ENABLE_LOGS_SNAPSHOT=1 -
Start your HOPRd node. More details can be found here.
-
Backup your node
Before proceeding with Fast sync process, ensure you back up your node:
-
Connect to your DAppNode dashboard.
-
Go to the HOPR package Backup page.
-
Click Backup now and download the archived file hopr.public.dappnode.eth_backup.tar.xz to your computer. Make an additional copy and store it securely on your computer.
-
-
Adjust Your Configuration File
- Download the example file specifically for the Dappnode: hoprd.cfg.yaml
- Inside configuration file locate the chain section and add the following settings below, aligned with the other configurations:
enable_logs_snapshot: trueandlogs_snapshot_url: "https://logs-snapshots.hoprnet.org/dufour-v3.0-latest.tar.xz". Save the changes to the configuration file.
-
Upload Configuration File
-
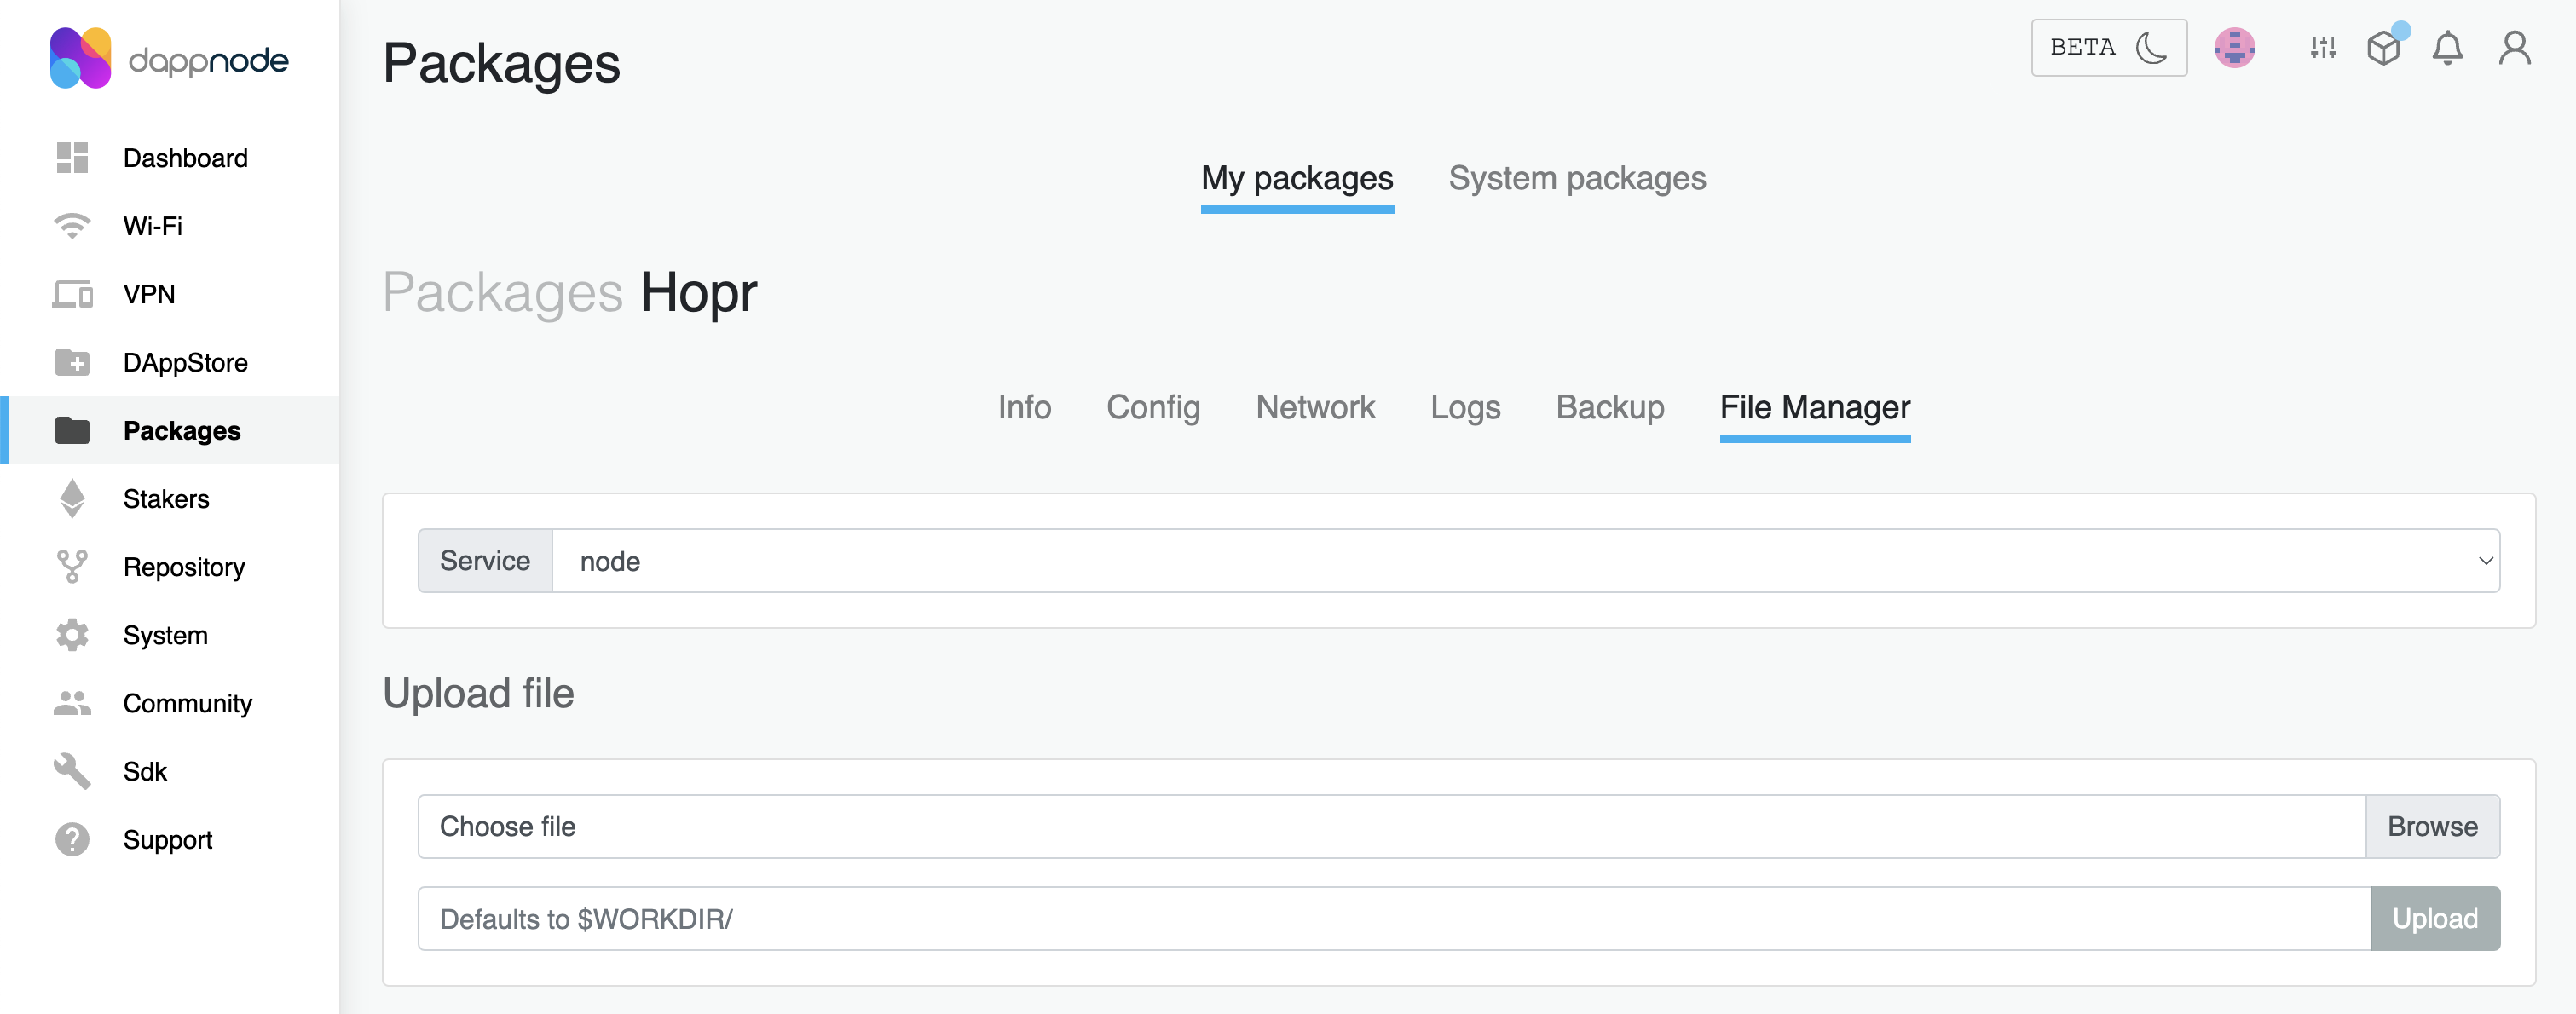
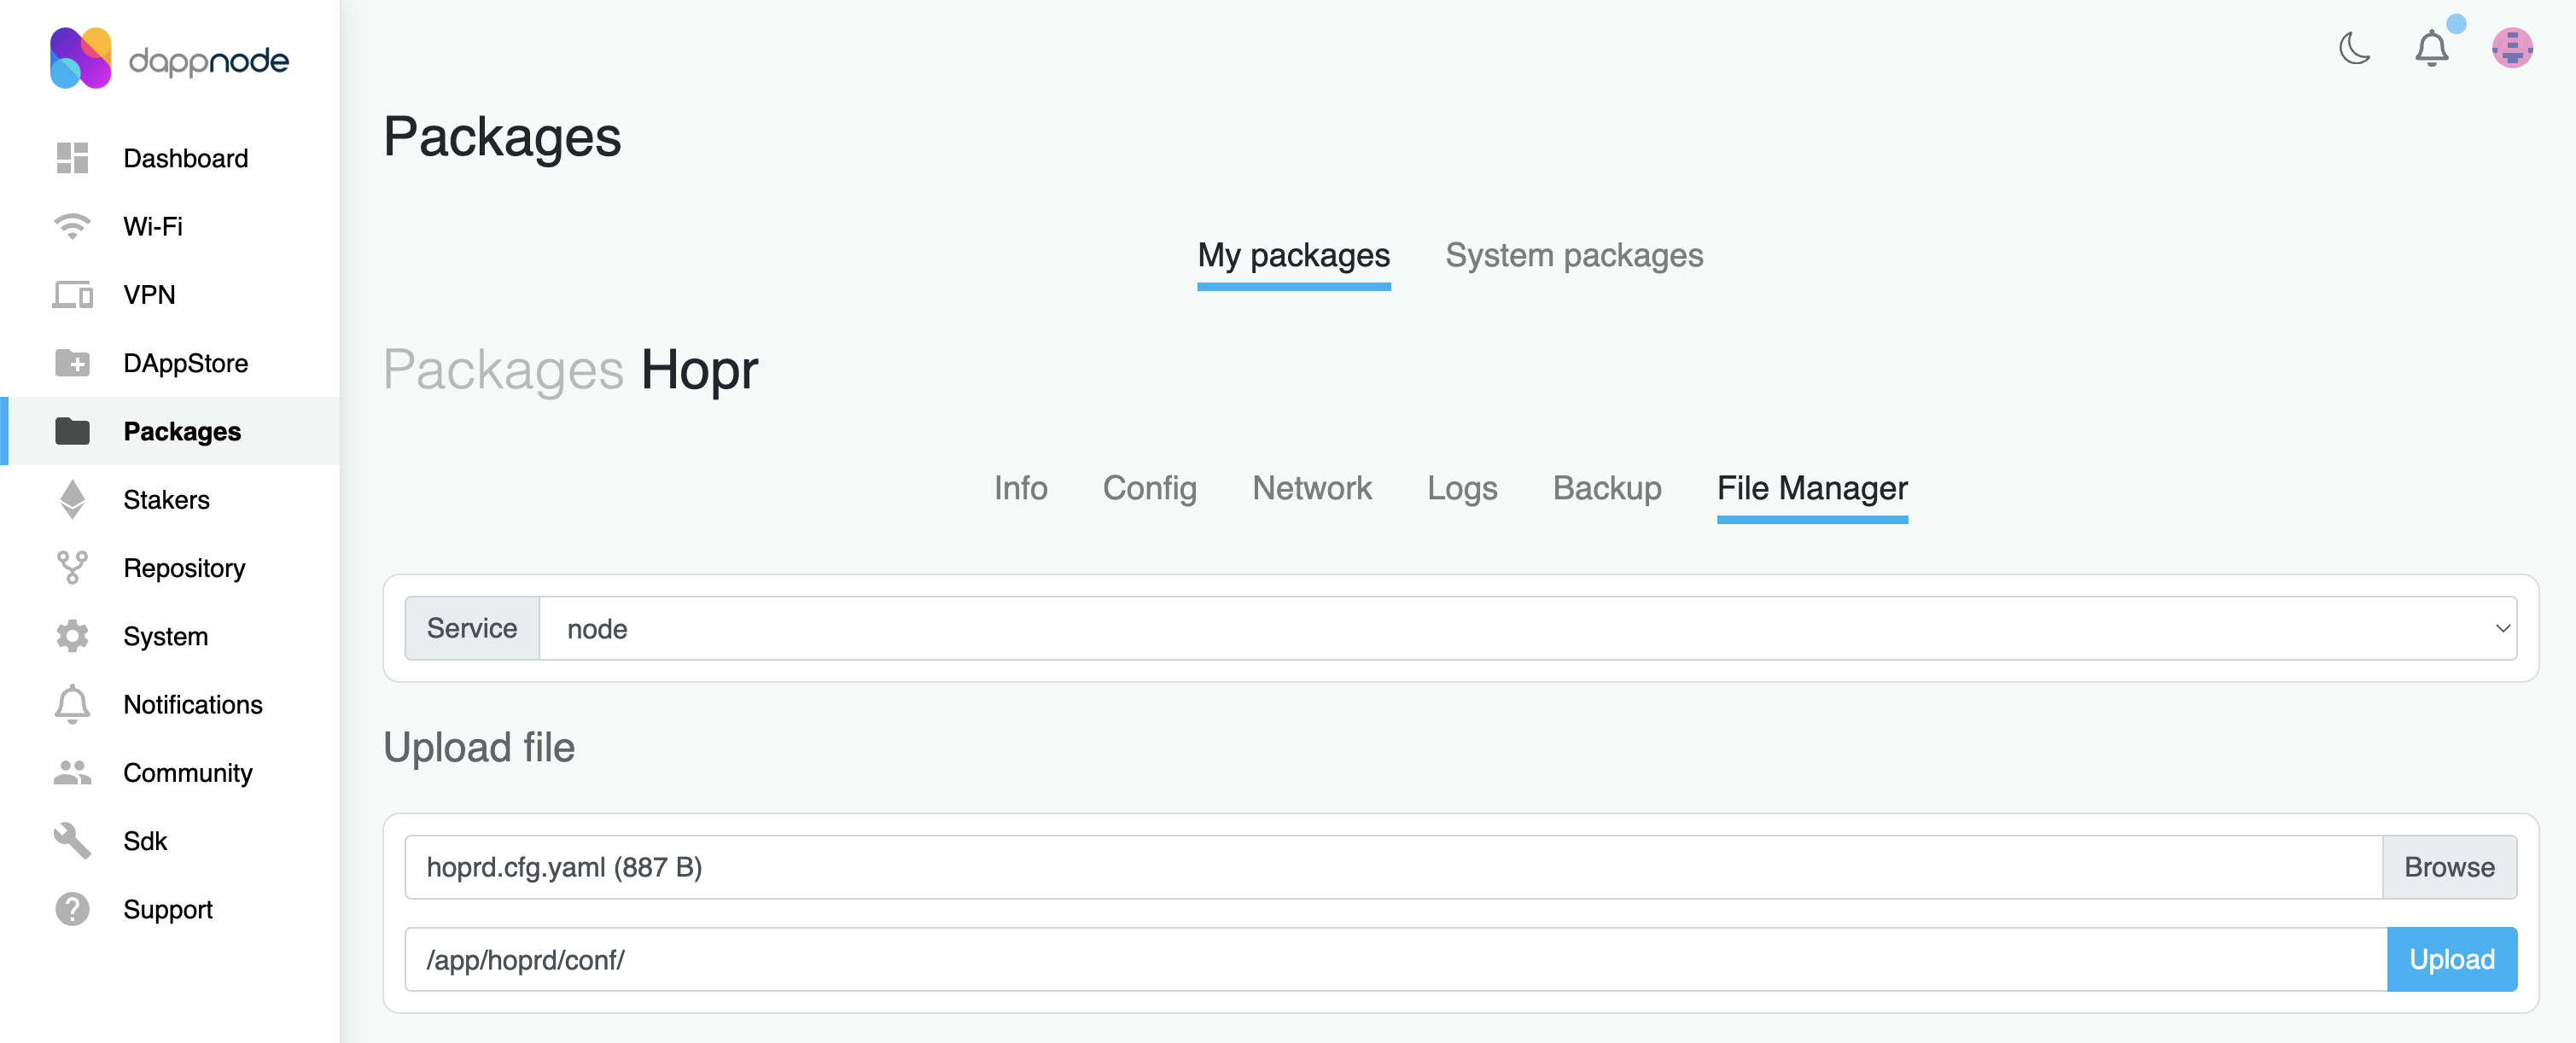
After adjusting the configuration file, connect to your Dappnode dashboard, locate the HOPR package, and navigate to the File Manager tab.

-
In the Upload file section, click the Browse button next to the Choose file field, then select your newly created configuration file. Ensure that the configuration file is named hoprd.cfg.yaml.
-
In the text field under the Upload file section, enter the path
/app/hoprd/conf/.
-
Click the Upload button and wait for the upload to finish.
-
-
Update Package configuration
-
Go to the HOPR package config page, scroll to the bottom and click on
SHOW ADVANCED EDITOR. -
Next to
ADDITIONAL_CMDLINE_ARGSchange value to--enableLogsSnapshotand clickUpdate.
-
-
Restart HOPRd package
-
Go to the Info page within your HOPR package, and click the Restart button to restart your node.
-
Wait for about 5 minutes, then connect to your node via the HOPR Admin UI. Navigate to the CONFIGURATION page to verify that the strategy settings have been updated. If the changes aren't visible, try performing a hard refresh of the HOPR Admin UI page.
-