Interact with Your Node
This guide will walk you through all the key functionalities of the HOPR node using the HOPR Admin UI. You’ll learn how to monitor your node's performance, send direct or hop messages, open and close outgoing payment channels, and much more.
Before proceeding, ensure your HOPR node is set up. If you haven’t done so yet, start with the setup guide here.
Connect to your node and check its health
-
Connect to your node via the HOPR Admin UI.
-
Check if your node is performing normally by following this guideline.
Ping connected peers and set alias
-
Navigate to the PEERS page, where you can see a list of peers (nodes) known to your node. Select a random peer where the connection quality under the Quality column is greater than 50%. Click the PING node icon. If the ping is successful, you will see a response time in milliseconds. If the ping fails, you'll see the message: "Ping of <PeerID> failed", where
<PeerID>represents the selected node's peer ID.If the ping is unsuccessful, try pinging 5-10 other nodes. If you're unable to successfully ping any node, your node may have connectivity issues, and it's recommended to reach out to the Ambassadors on Telegram or Discord for support.
-
Once you’ve successfully pinged a node, you can assign it an alias (i.e., a custom name). On the same PEERS page, locate the successfully pinged node and click the ADD new alias icon. In the popup window, enter the desired name in the Alias field (e.g., Betty) and click Add.
You can view all assigned aliases on the ALIASES page.
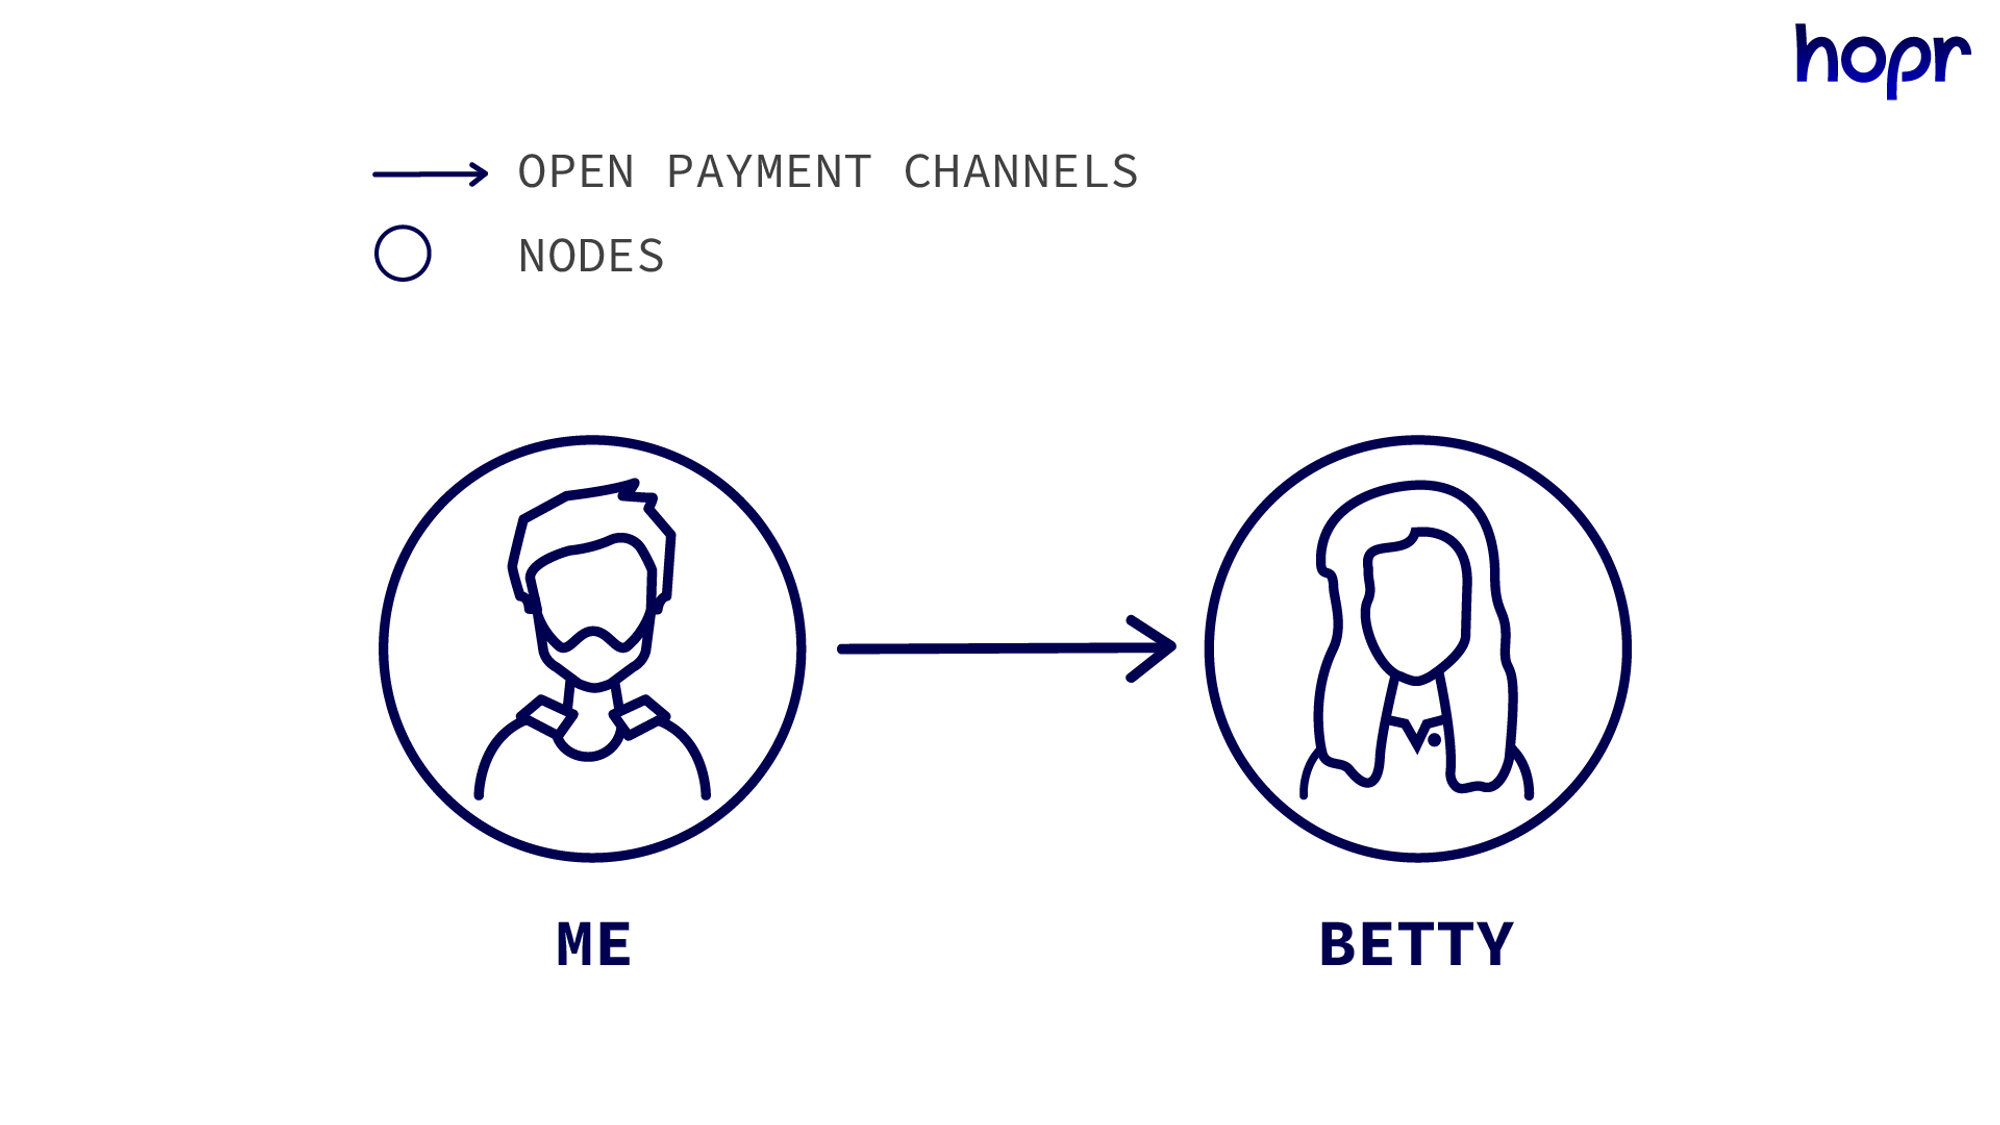
Open a payment channel with a peer named Betty
Payment channels are funded edges between two nodes. They are a link between two nodes with some HOPR tokens staked in them to pay the nodes that relay data for the sender.
-
There are two ways to open a payment channel with a peer named Betty:
- On the PEERS page, next to the selected peer, click OPEN outgoing channel. In the popup window, enter the amount of wxHOPR you would like to allocate for the payment channel (e.g.,
1) and click Open Channel. - Alternatively, navigate to the CHANNELS: OUT page. At the top, click OPEN outgoing channel, enter the peer's node address (starting with 0x) and the amount of wxHOPR you wish to allocate (e.g.,
1), then click Open Channel.
- On the PEERS page, next to the selected peer, click OPEN outgoing channel. In the popup window, enter the amount of wxHOPR you would like to allocate for the payment channel (e.g.,
-
In a few minutes, this will open a channel from you to Betty with 1 wxHOPR staked in it and you will receive a message about the channel has been successfully opened. You can use these tokens to pay Betty and all other nodes in any relay you use, where Betty is the first intermediary node. All your active outgoing channels can be viewed on the CHANNELS: OUT page.
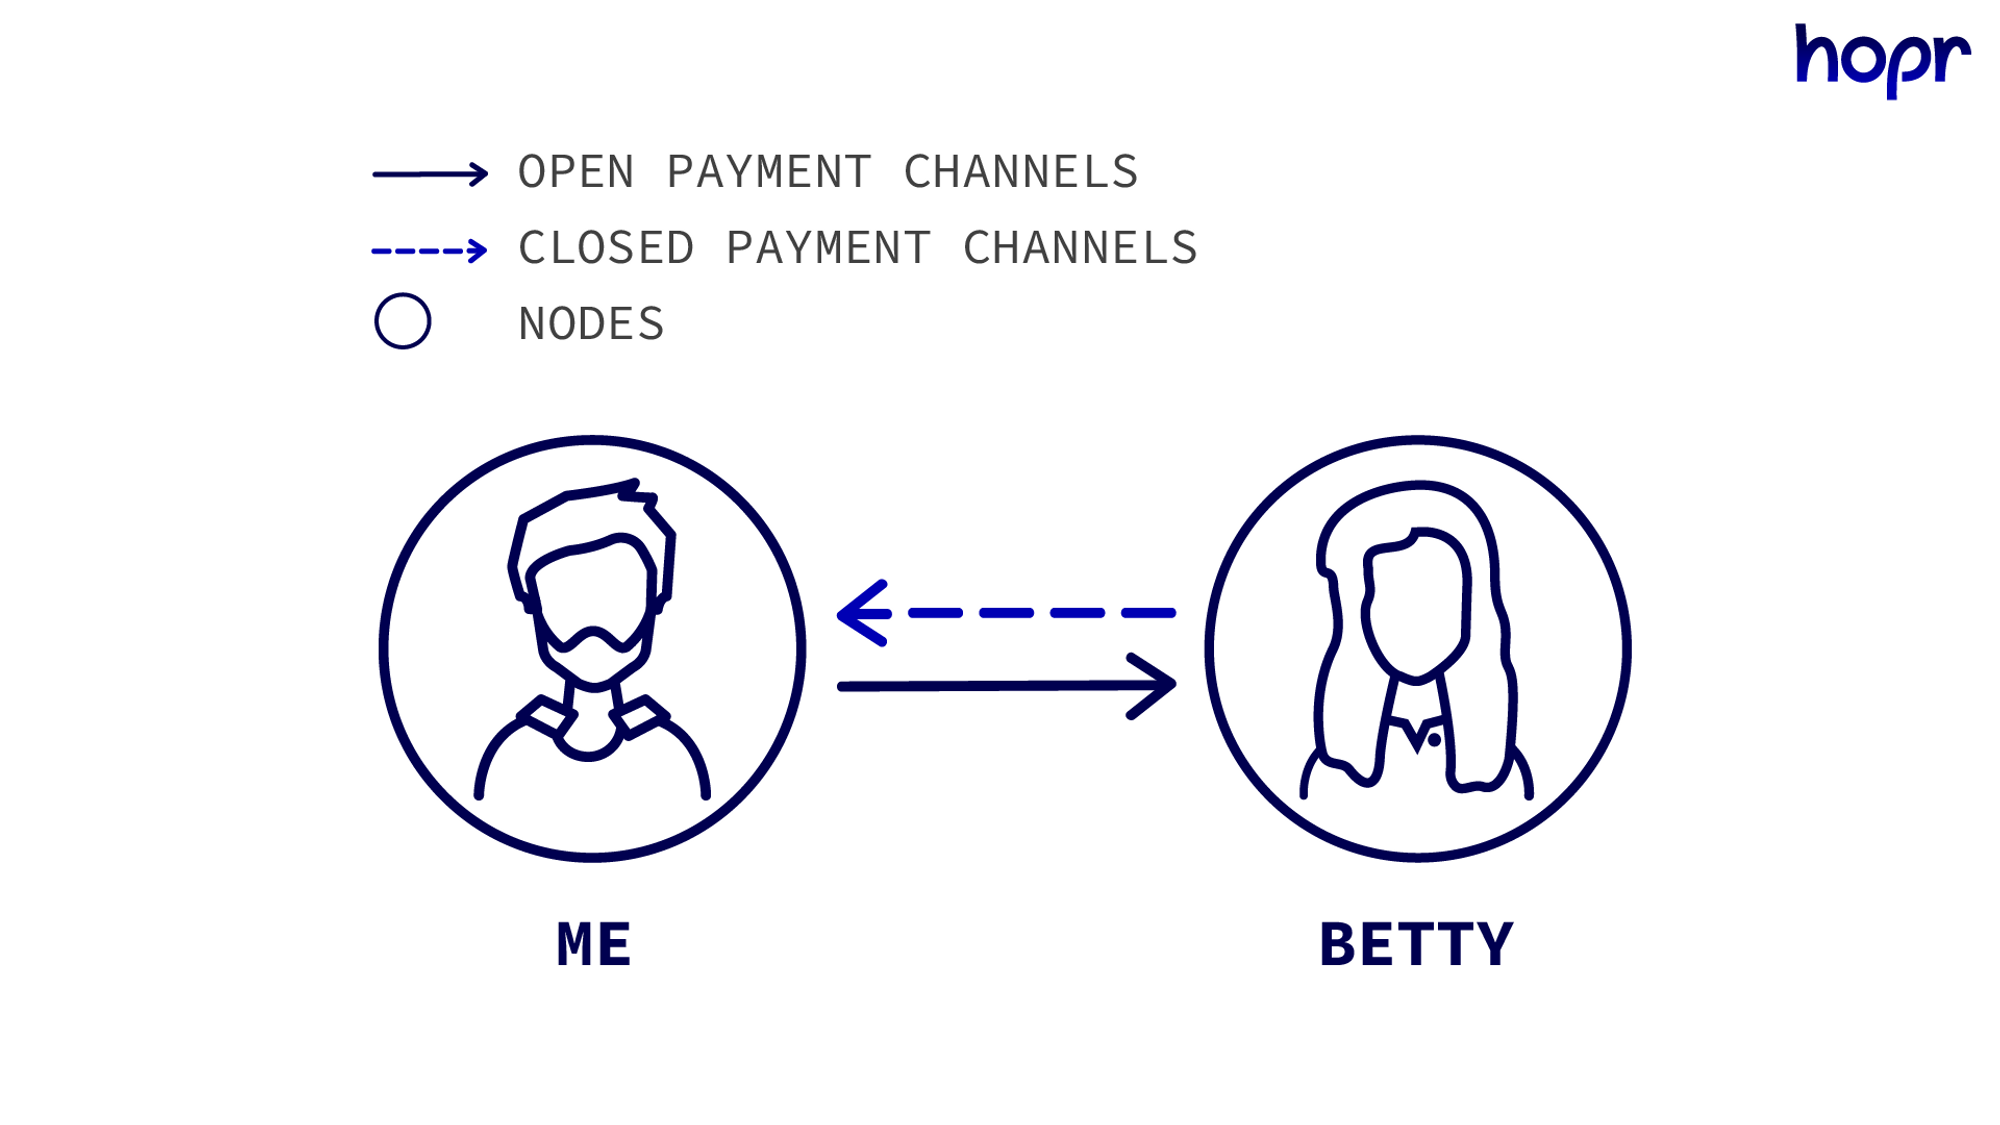
noteChannels are unidirectional, opening this channel does not mean that a channel from Betty to your node exists. Only one channel can exist in a single direction between two nodes.
Sending Messages
There are two methods for sending messages: direct messaging and HOP messaging, which involve using other peers as relays.
-
Direct Messages: Sending a direct message to a peer does not require an open payment channel with that peer. This means the message is sent directly, without being relayed through the mixnet, and therefore, it is neither private nor secure.
-
HOP Messages: Sending HOP messages means the data "hops" from one peer to another before reaching its destination, a process called relaying. This is where HOPR gets its name. Essentially, the message is passed from one intermediary (or relay) to the next. You can read more about this process in anonymous routing.
You can use up to three intermediary nodes, with a maximum of three hops, allowing you to send 1-hop, 2-hop, or 3-hop messages.
The longer the hop path, the more information must be stored in the packet headers, which can make them distinguishable from standard relays. This difference in the packet header can cause a metadata leak, which HOPR aims to minimize. To address this, 1-hop and 2-hop paths use padded headers to maintain privacy consistency, though they are not as mixed or private as a 3-hop path. However, for the purposes of this walkthrough, 1-hop or 2-hop messages are sufficient.
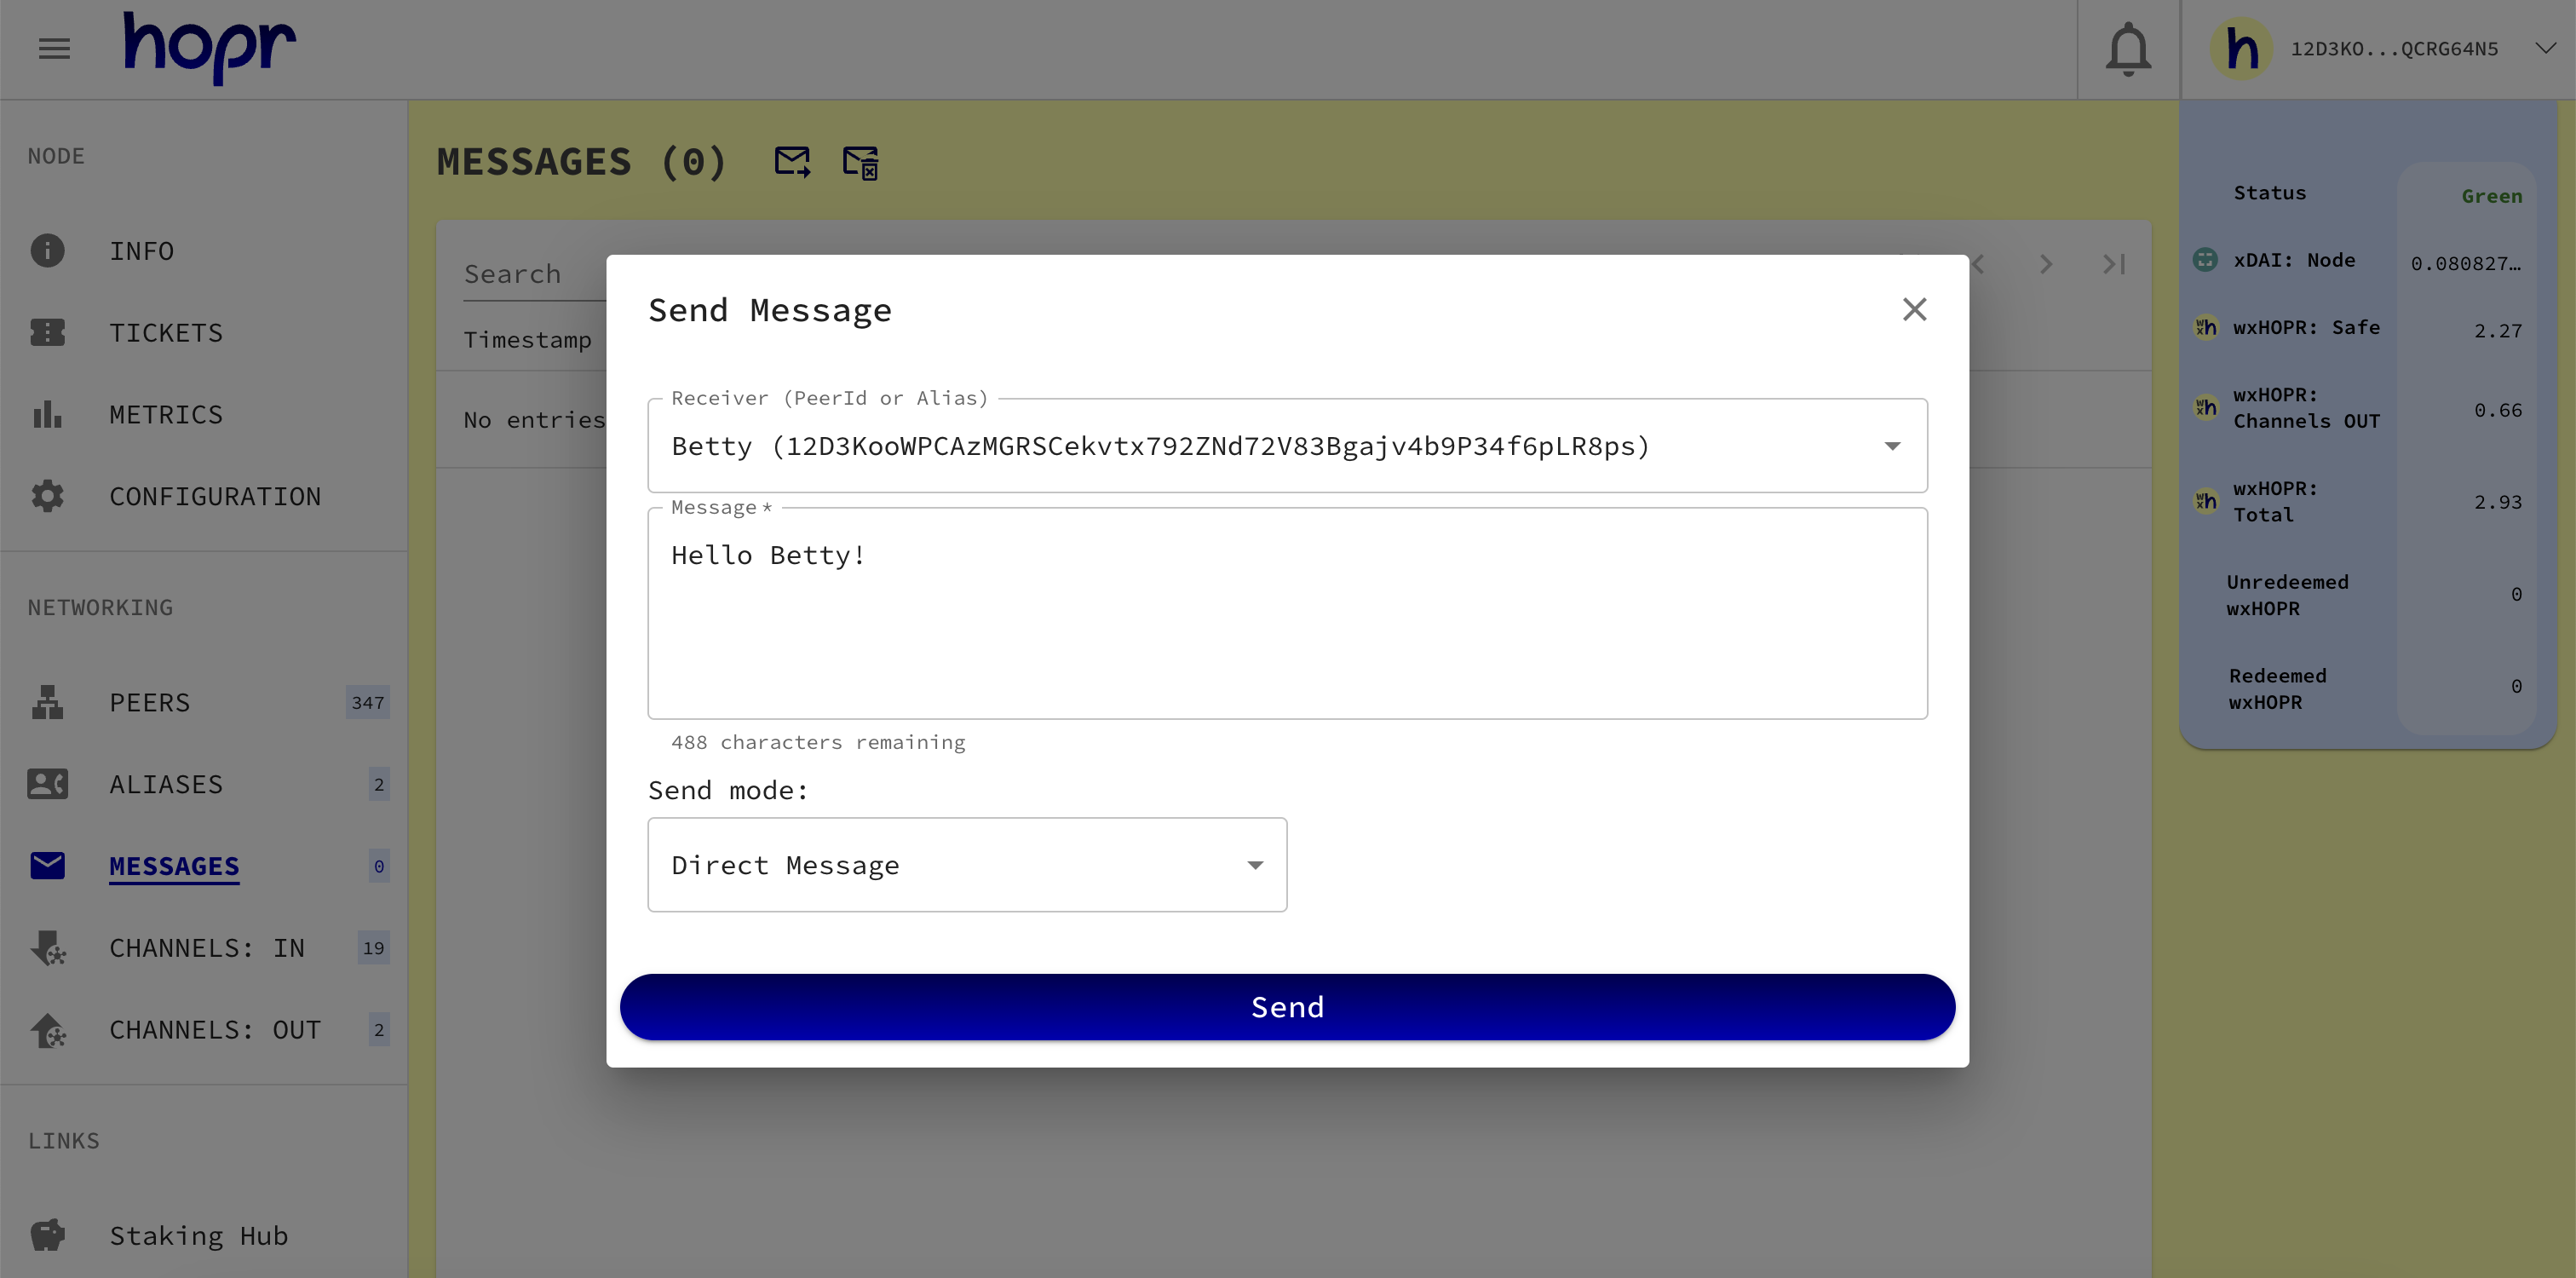
Sending a direct message to Betty
Let's start by sending a direct (0-HOP) message to Betty's node:
-
Go to the MESSAGES page, and at the top, click SEND message icon. In the popup, fill in the following:
- In the Receiver field, enter either
Bettyor Betty's Peer ID. - In the Message field, type the message you want to send to Betty.
- In the Send mode field, leave the default option Direct Message selected.
- In the Receiver field, enter either
-
Click Send. The Betty's node should now receive your message.
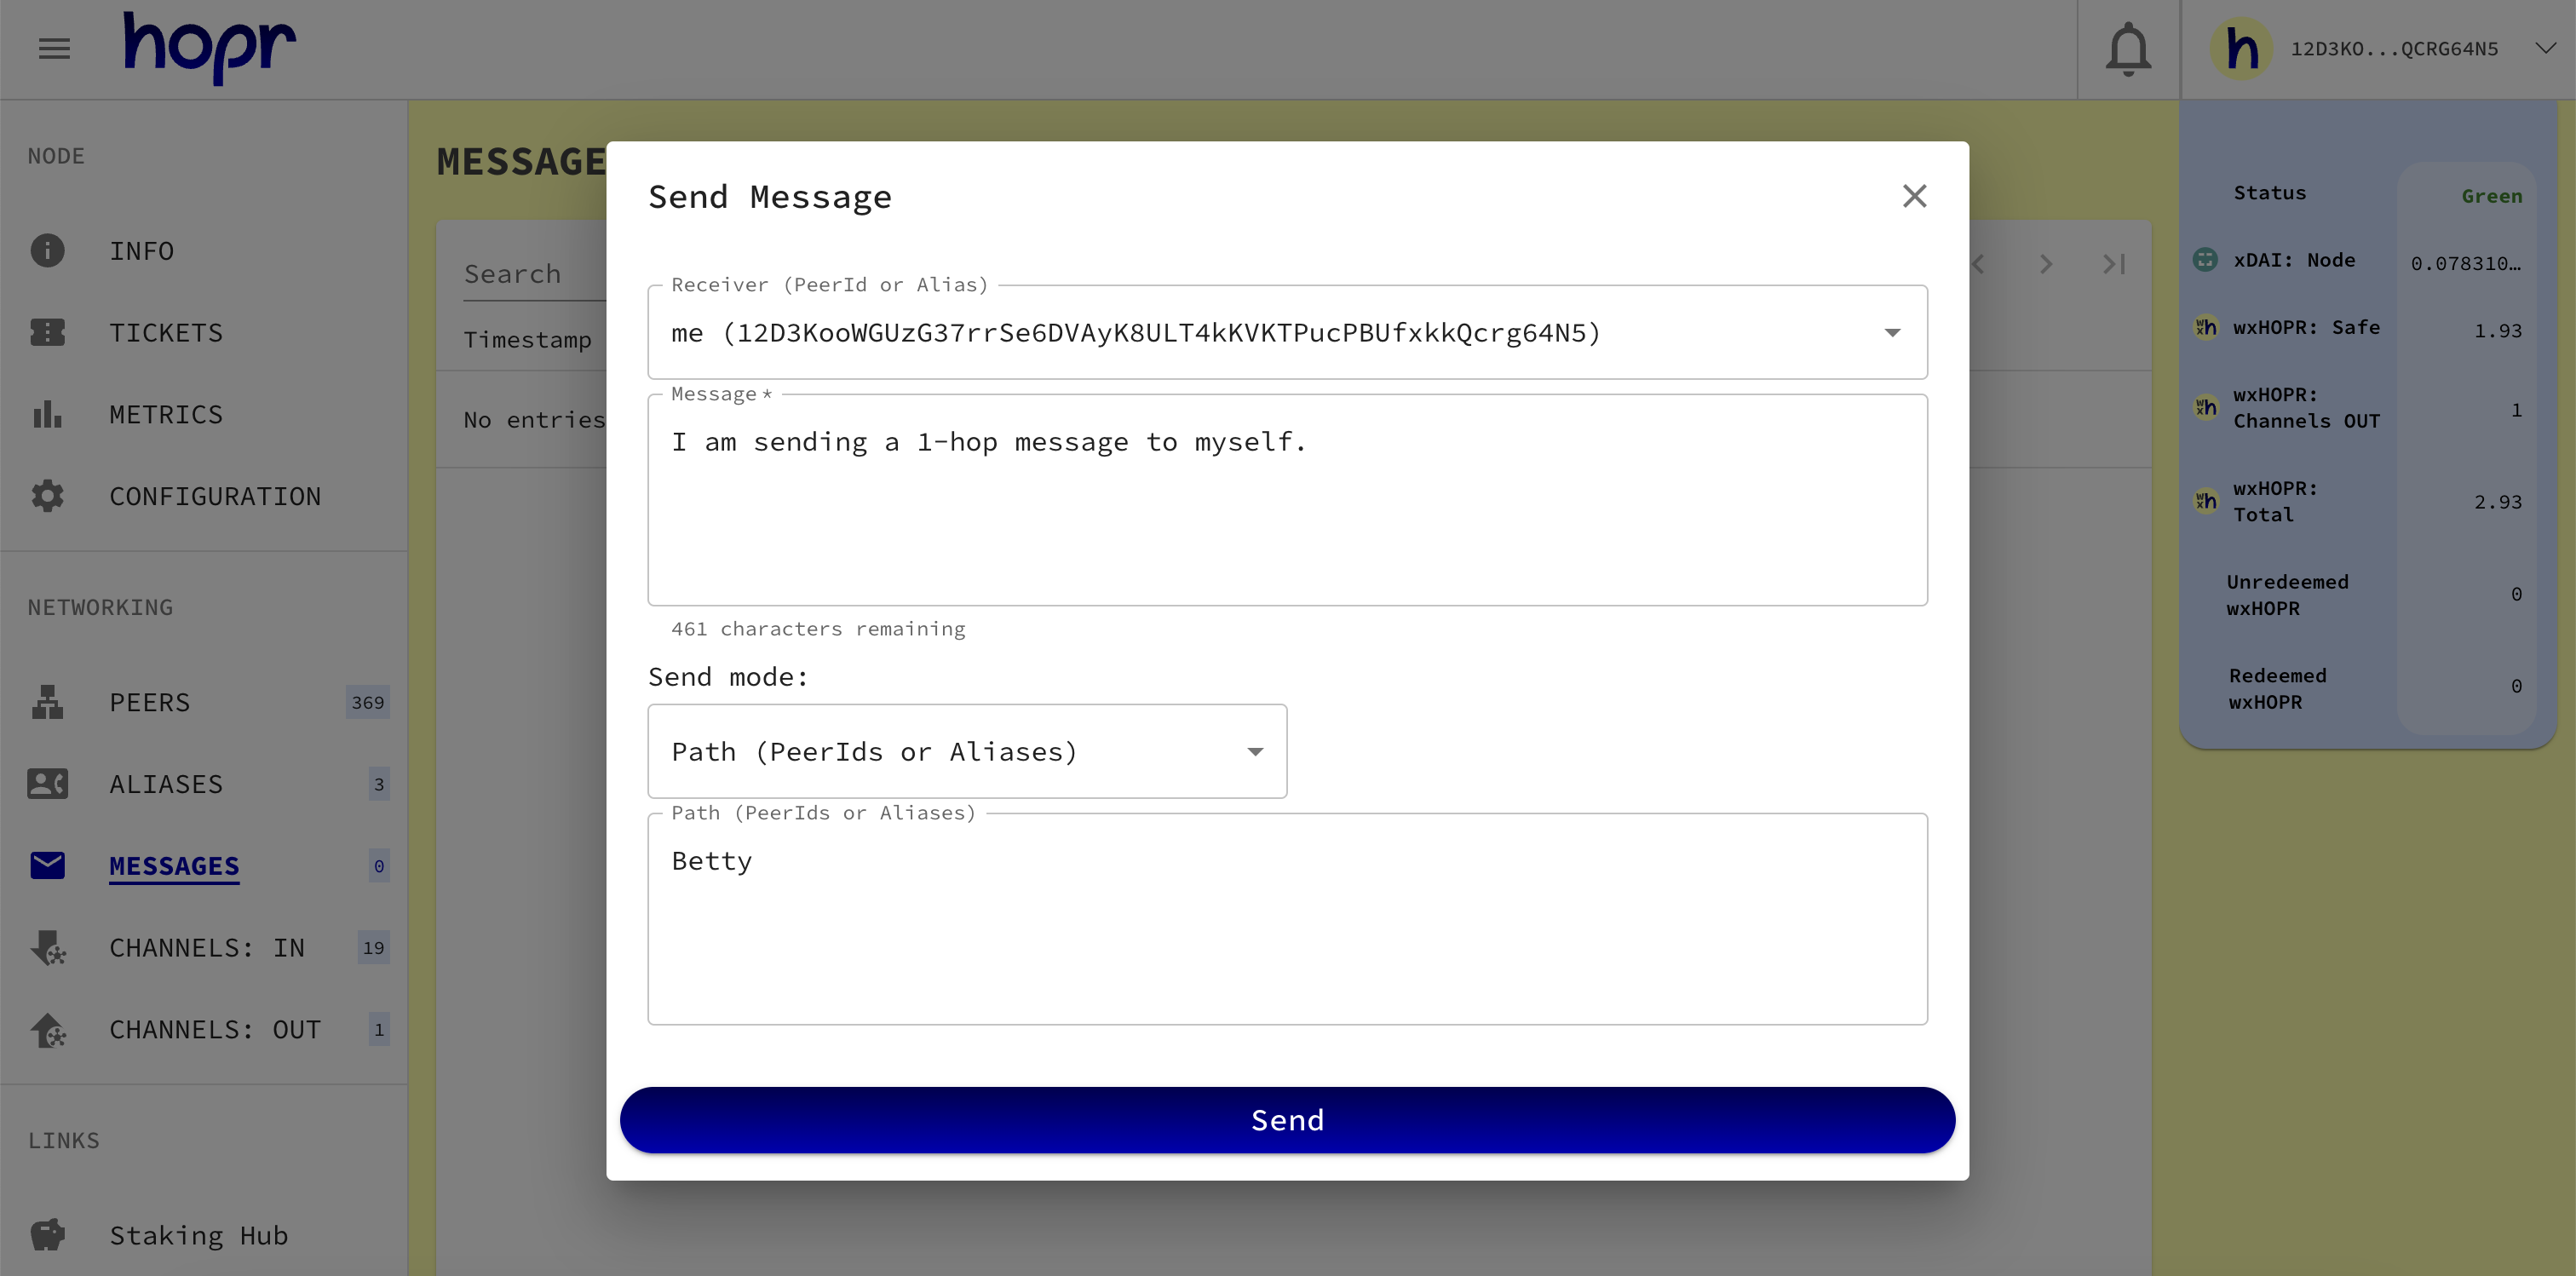
Sending a 1-HOP message via Betty's node
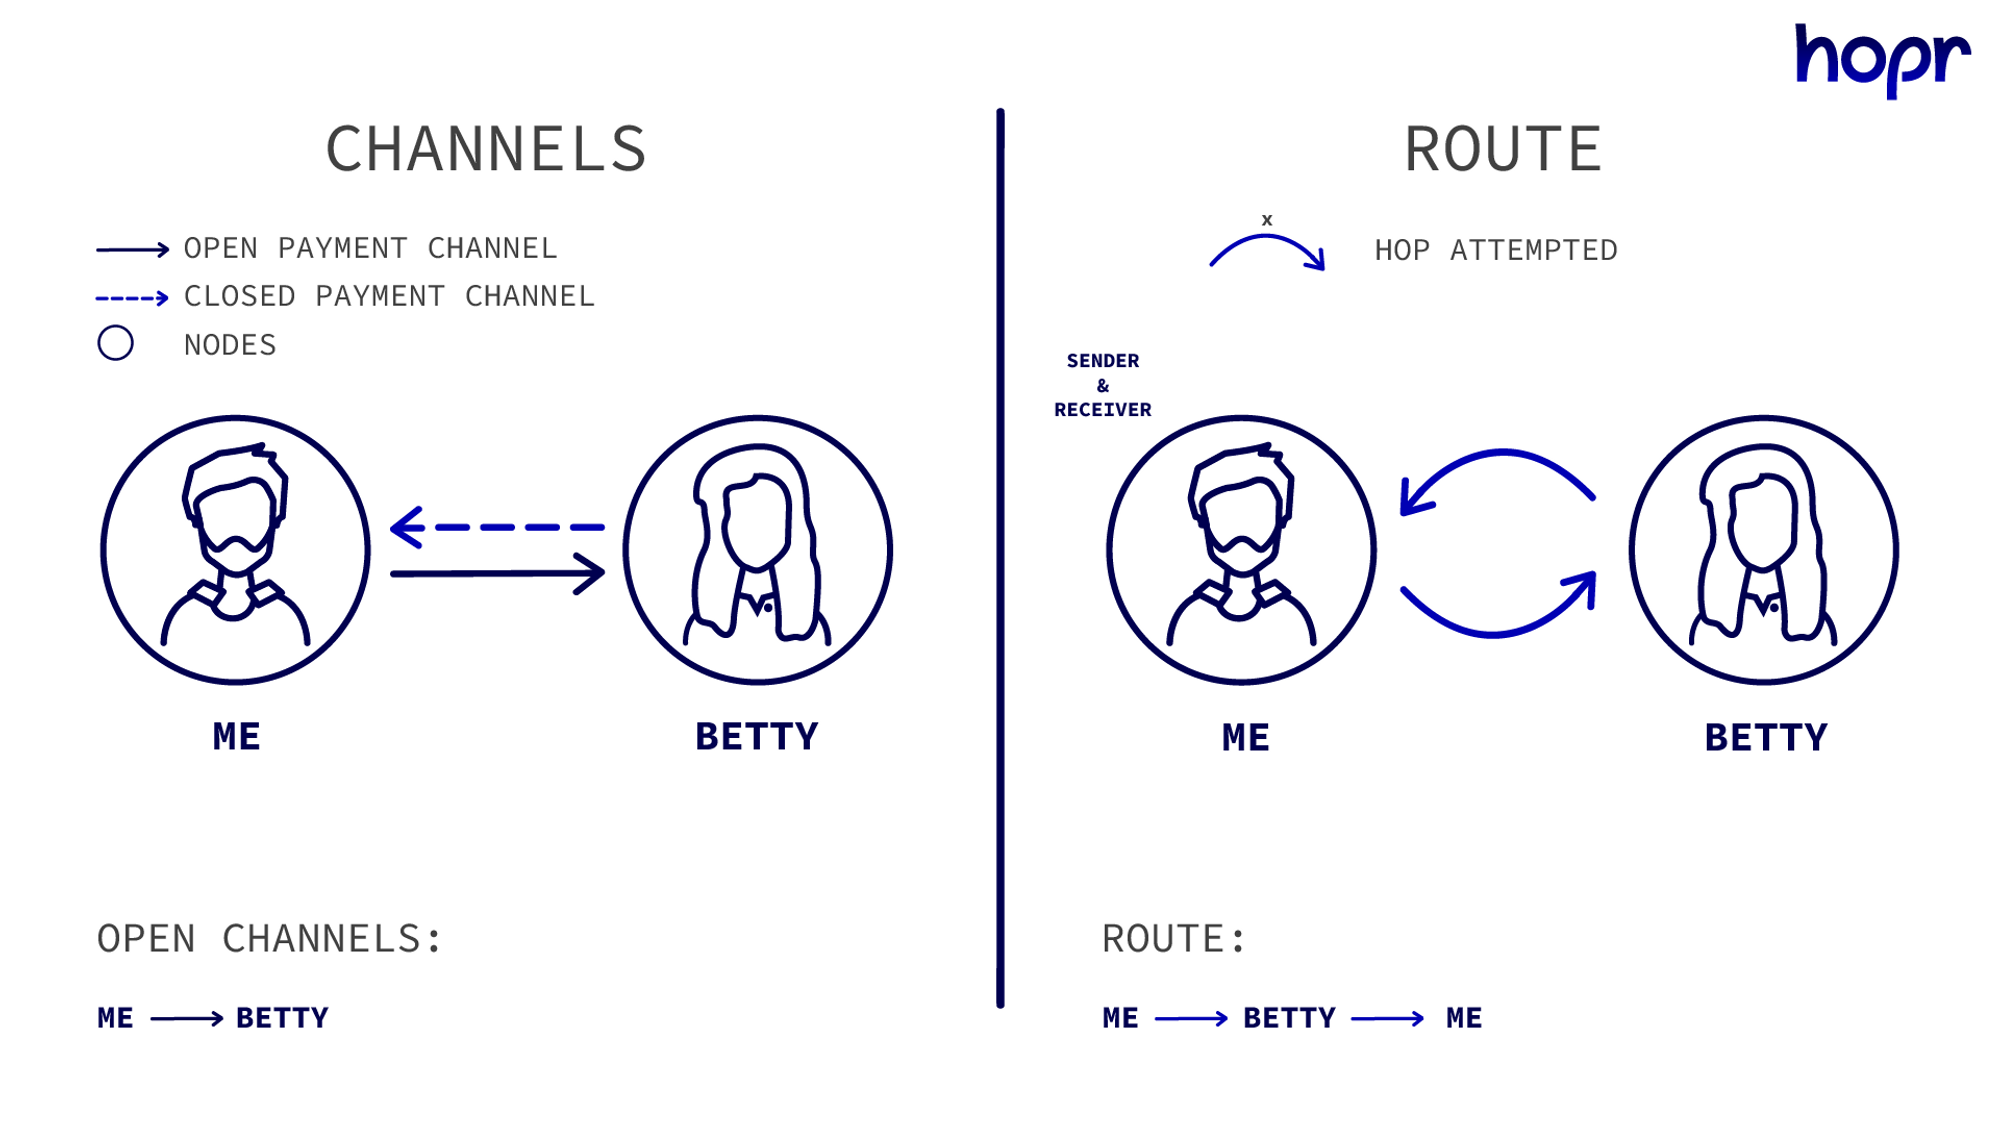
Sending a direct (0-HOP) message, as we did earlier, does not provide privacy or encryption because it does not use intermediate nodes to relay data. Now, let's secure the message by sending it through the mixnet using a 1-HOP relay. Since you already have an open payment channel with Betty, we will use her node as an intermediary to send the message back to yourself, ensuring the message is private and secure.
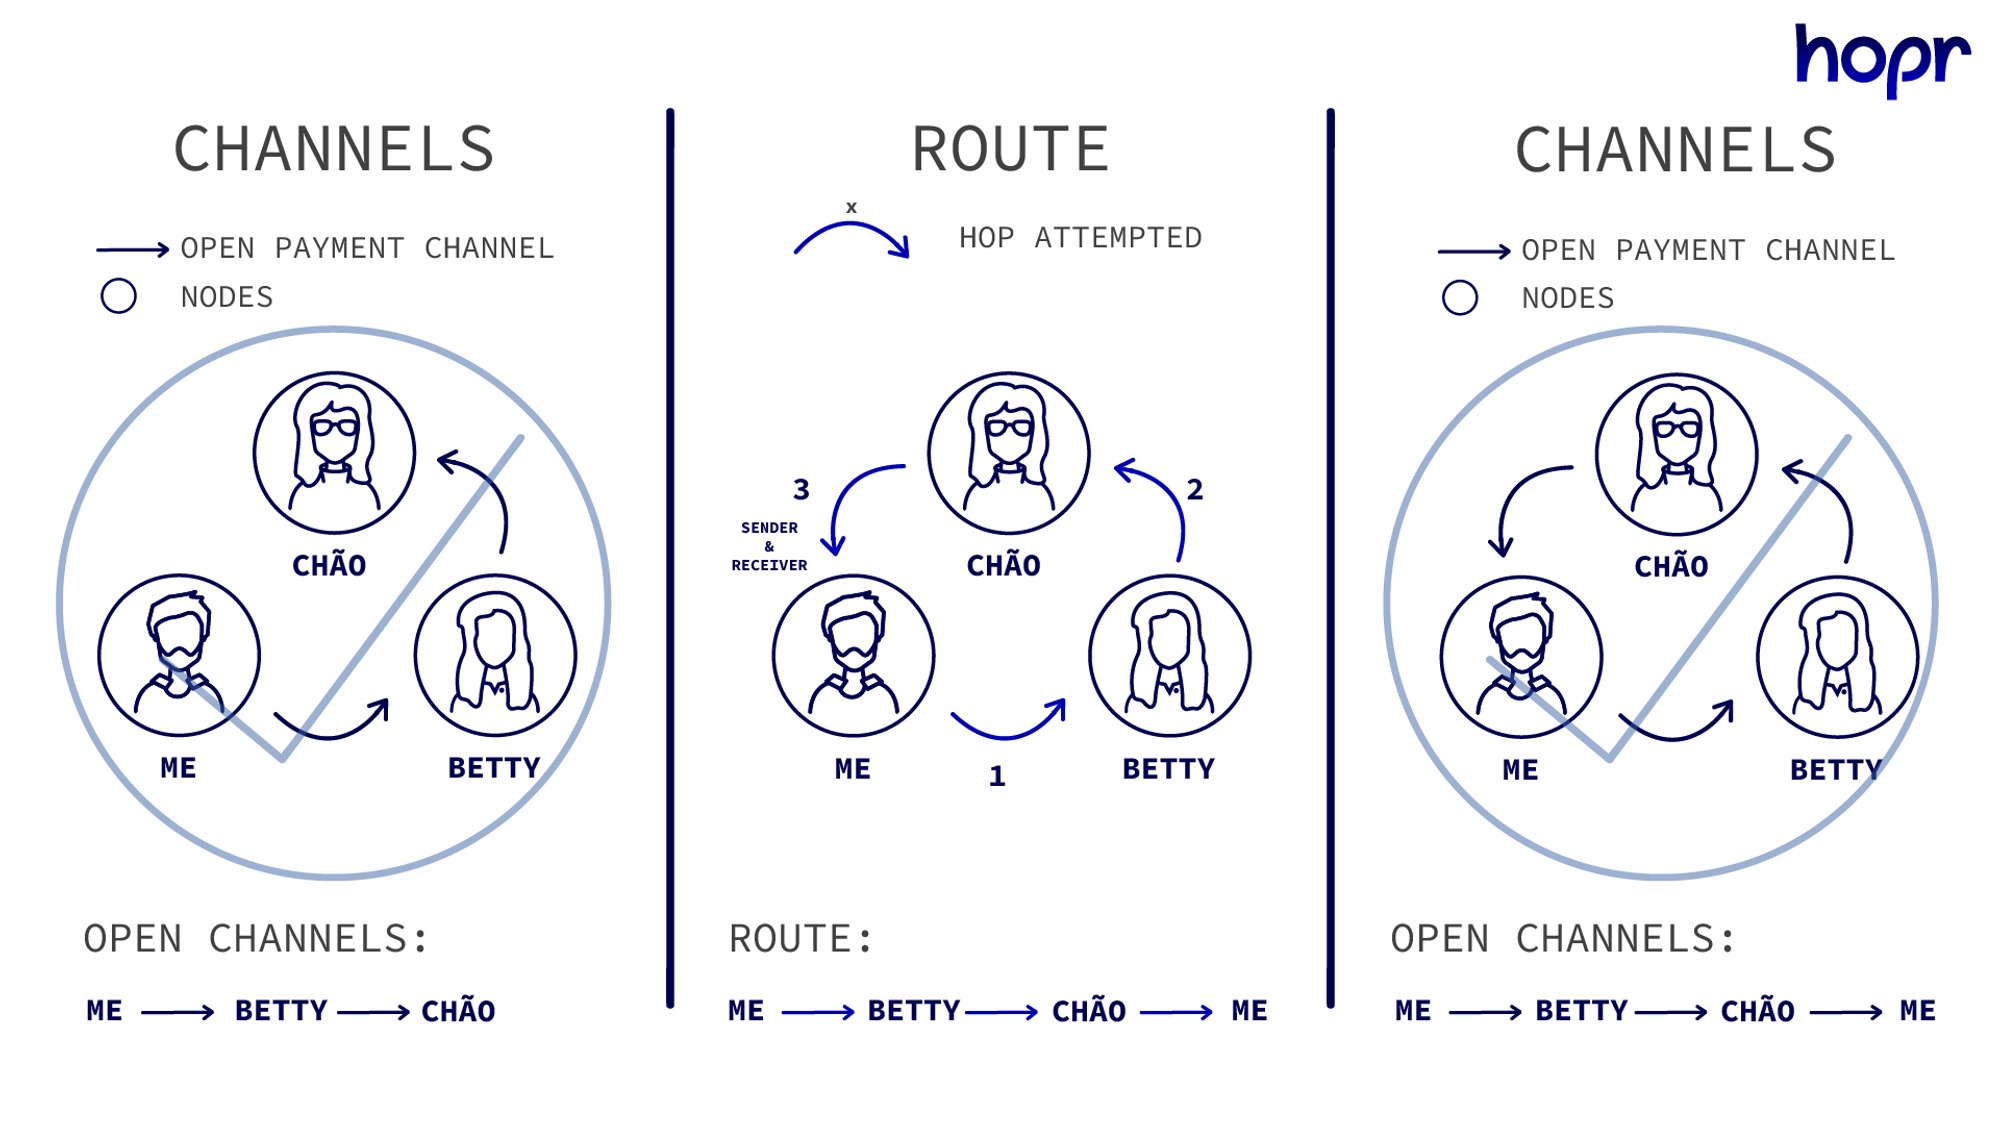
Below is an illustration showing that in order to relay a message through Betty’s node, you must have an open payment channel with her node, enabling the message to be routed back to yourself.
- Go to the MESSAGES page and click the SEND message icon at the top. In the popup, complete the following:
- In the Receiver field, search for your own node by typing
me, then select your node from the search results. - In the Message field, enter the message you'd like to send to yourself.
- In the Send mode field, select Path (Peer IDs or Aliases). A new field will appear. Since we are relaying the message via Betty’s node, enter either the alias
Bettyor Betty’s Peer ID.
- Click Send. You should now receive the message, relayed through Betty’s node. You can view all received messages on the MESSAGES page.
Sending a 2-HOP message via Betty's and Chao's nodes
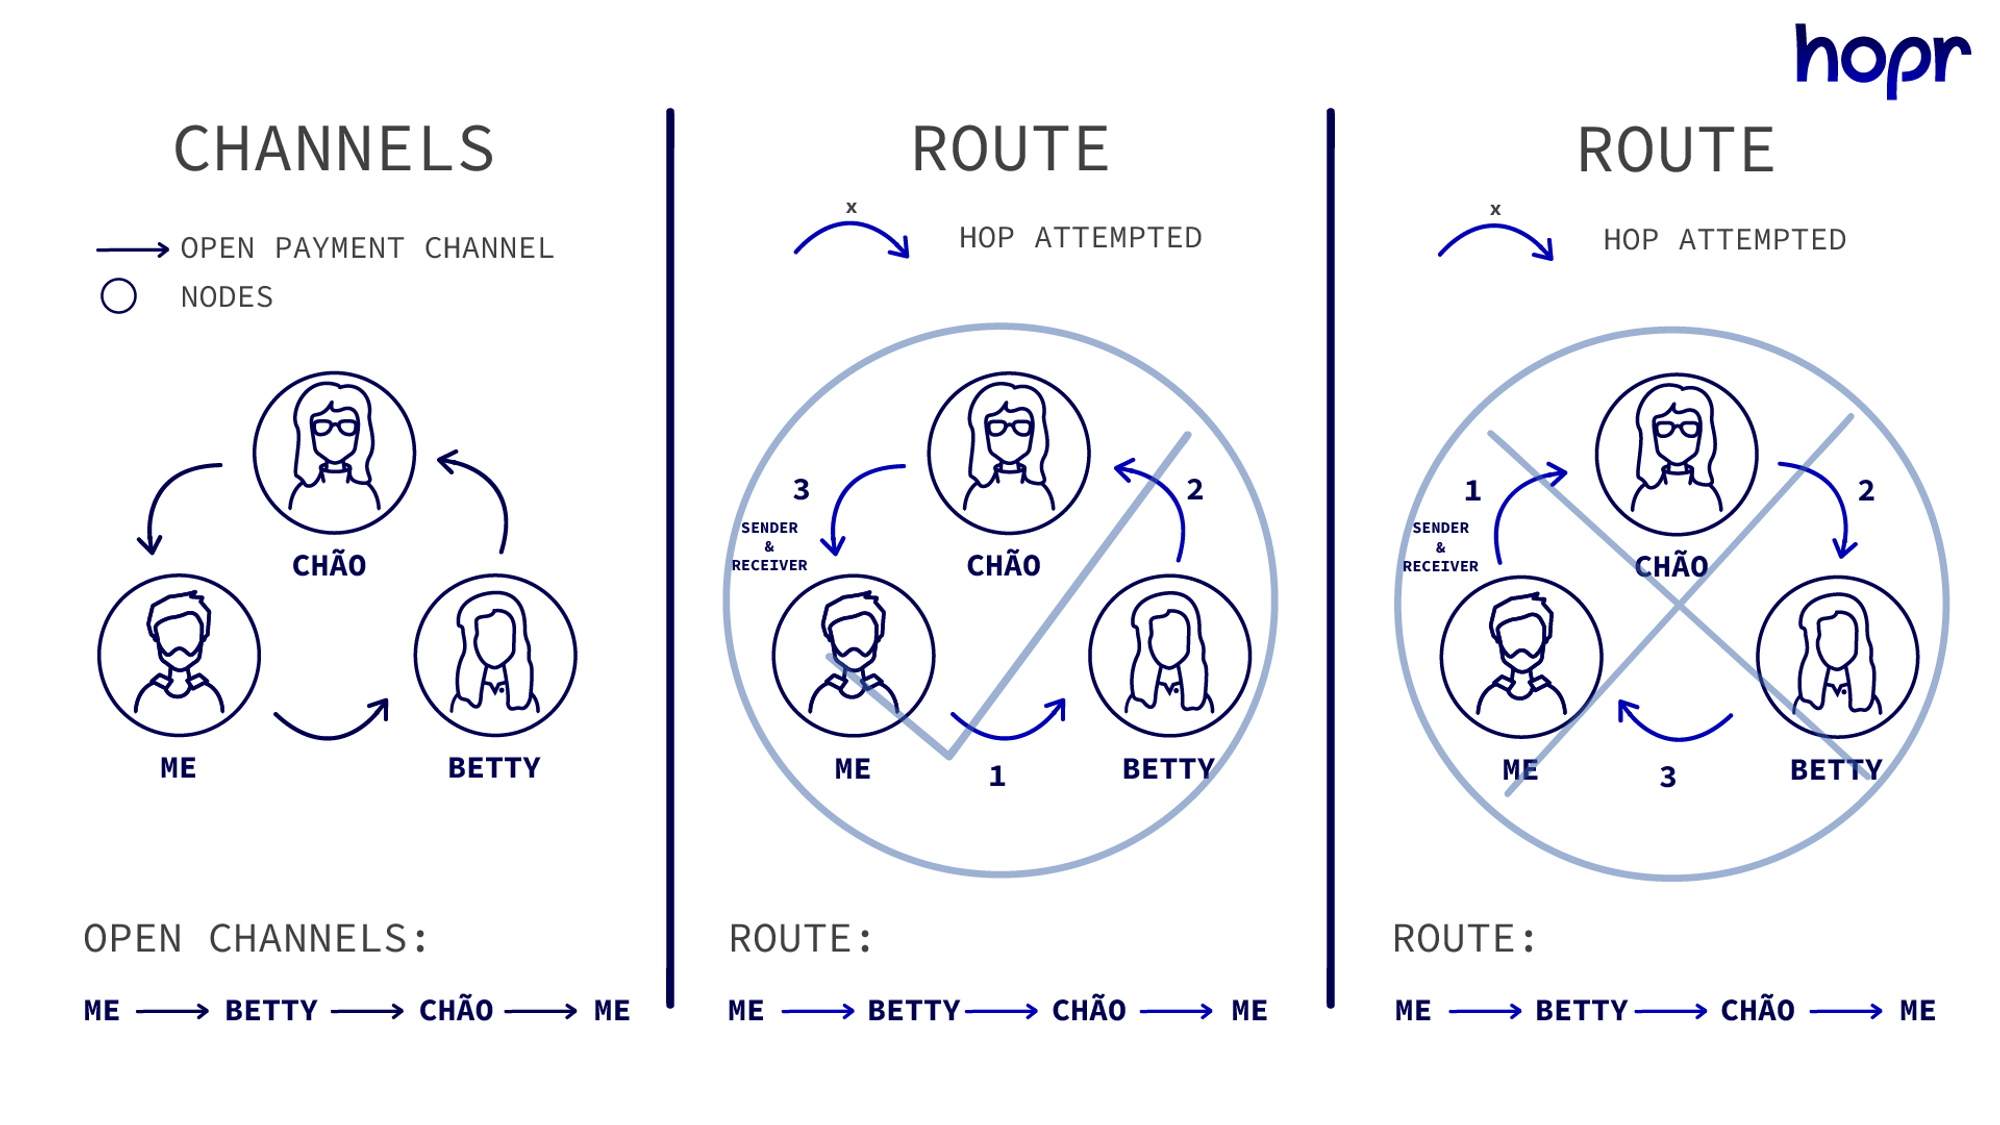
Now, let’s try to send a 2-HOP message. For this to work, every node in the path must have a channel open with the next node in the path, excluding the last channel to the receiver.
This means that to send 2-HOP message to yourself through Betty and Chao: me → Betty → Chao → me would require channels to be open from me → Betty and from Betty → Chao. The final channel from Chao → me is not required as the last HOP of a relay is not incentivised. We assume that the receiver has an inherent desire to receive messages.
-
To send a 2-HOP message, we need to ensure that Betty has an open payment channel with Chao. In this guide, we assume that Betty has already established a payment channel with Chao.
-
Navigate to the MESSAGES page and click the SEND message icon at the top. In the popup, complete the following:
- In the Receiver field, search for your own node by typing
me, then select your node from the search results. - In the Message field, enter the message you'd like to send to yourself.
- In the Send mode field, select Path (Peer IDs or Aliases). A new field will appear. Since we are relaying the message through both Betty’s and Chao's nodes, ensure the message follows the path me → Betty → Chao → me (the order is determined by the sequence of open channels). In the first row, enter the alias
Betty, and in the second row, enterChao. Make sure each alias is separated by a comma.

- Click Send. The message should now be relayed through Betty's and Chao's nodes, and you should receive it on your node. All messages can be viewed on the MESSAGES page.
Sending 3-HOP message using automatic route
So far, we have used manually selected paths by entering the entire path. Instead of this, we can let HOPR find a path for the relay by specifying just the receiver. Automatic pathing will only look for 3-HOP paths (three intermediate nodes) from you to the receiver. If none exist or you don’t have sufficient funds staked in the first channel of the relay, the message will fail.
- Go to the MESSAGES page and click the SEND message icon at the top. In the popup, complete the following:
- In the Receiver field, search for your own node by typing
me, then select your node from the search results. - In the Message field, enter the message you'd like to send to yourself.
- In the Send mode field, select Automatic Path.
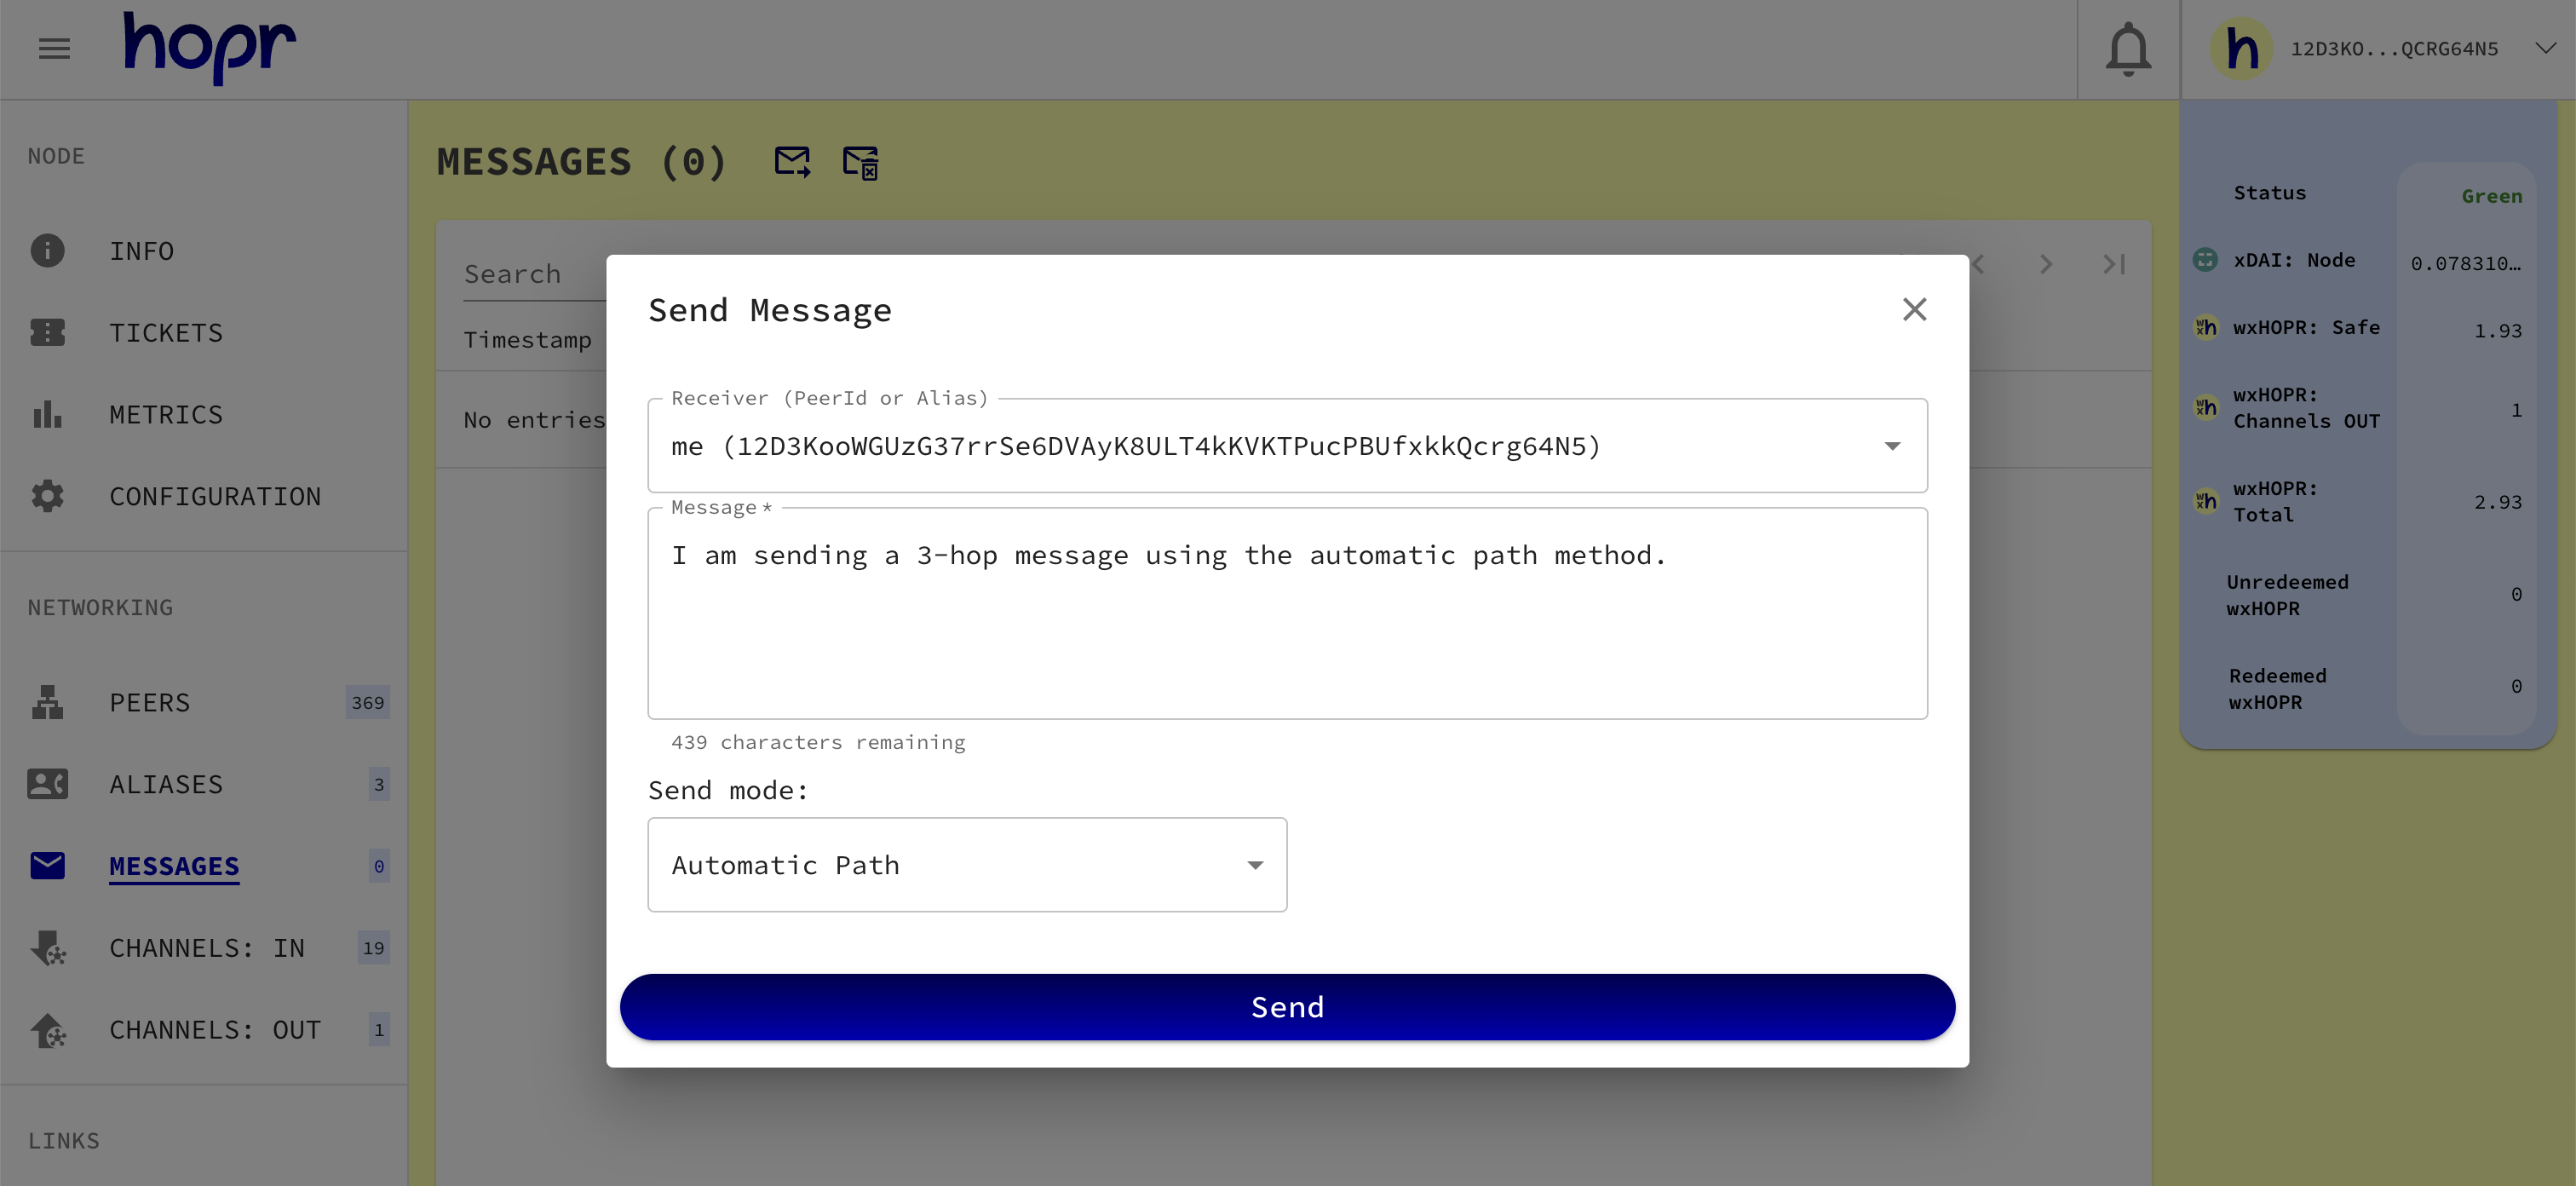
- Click Send. You should now receive the message, relayed through an automatically found path via three intermediate nodes. You can view all received messages on the MESSAGES page.
List of scenarios when node relaying might fail
Relaying a message via a node without an open payment channel to that node
We will attempt to send a 1-HOP message via a peer with whom we don't have an open payment channel. In this guide, we assume your node does not have an open payment channel with Chao's node.
-
Make sure you don't have an open payment channel with Chao's node. If you do, follow this guide on how to close it.
-
Go to the MESSAGES page and click the SEND message icon at the top. In the popup, complete the following:
- In the Receiver field, search for your own node by typing
me, then select your node from the search results. - In the Message field, enter the message you'd like to send to yourself.
- In the Send mode field, select Path (Peer IDs or Aliases). A new field will appear. Since we are relaying the message via Chao’s node, enter either the alias
Chaoor Chaos’s Peer ID.
When attempting to send a 1-HOP message via Chao, you will encounter an error indicating that no payment channel exists between your node and Chao's node.
Error example:
Sending message failed failed.
UNKNOWN_FAILURE.
Path error: missing channel between 0xc5d14c38ca45d61c73ecde2bd39ed162fe3f7711 and 0xb874626ff6717c37c925a90052cf7963c5405aeb
Relaying a message through a path without an open payment channel between one of the intermediate nodes
The message will fail to relay if a payment channel does not exist between any of the intermediate nodes. You’ll receive an error indicating that there is no payment channel between Betty and Chao. (Note: This guide assumes you already have an open payment channel with Betty, with sufficient funds staked, such as 1 wxHOPR).
Error example:
Sending message failed.
UNKNOWN_FAILURE.
Path error: missing channel between 0x8edfb7afbc1c6e6105dff643b91d5f070fa4740c and 0xb874626ff6717c37c925a90052cf7963c5405aeb
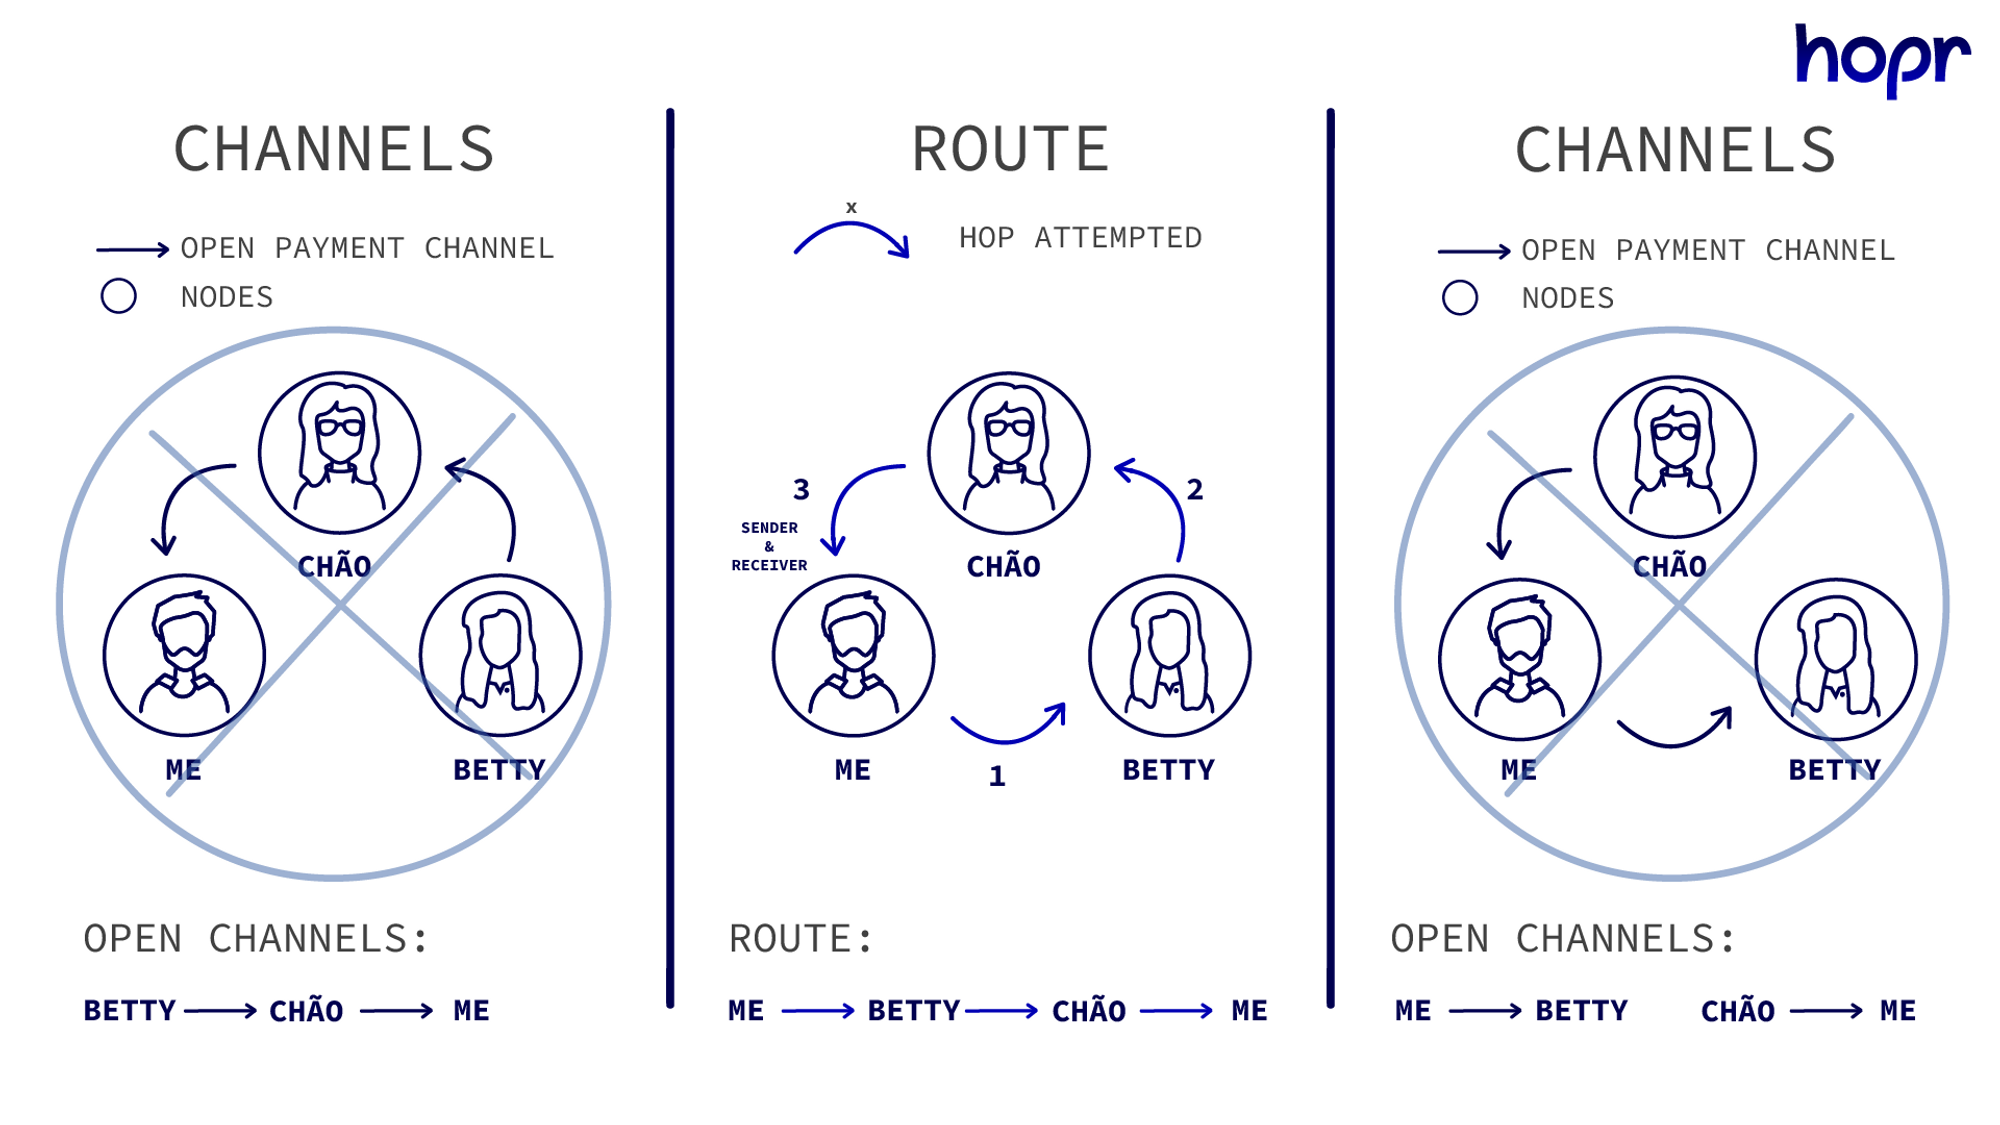
Message relaying only works in the direction of the established path
Messages can only be relayed in the direction of the established path. In this case, you won’t be able to send a 2-HOP message in the other direction because you don’t have an open channel with Chao. Additionally Chao may not have an open channel with Betty.
In this case, the first route is viable, whereas the second route will fail.
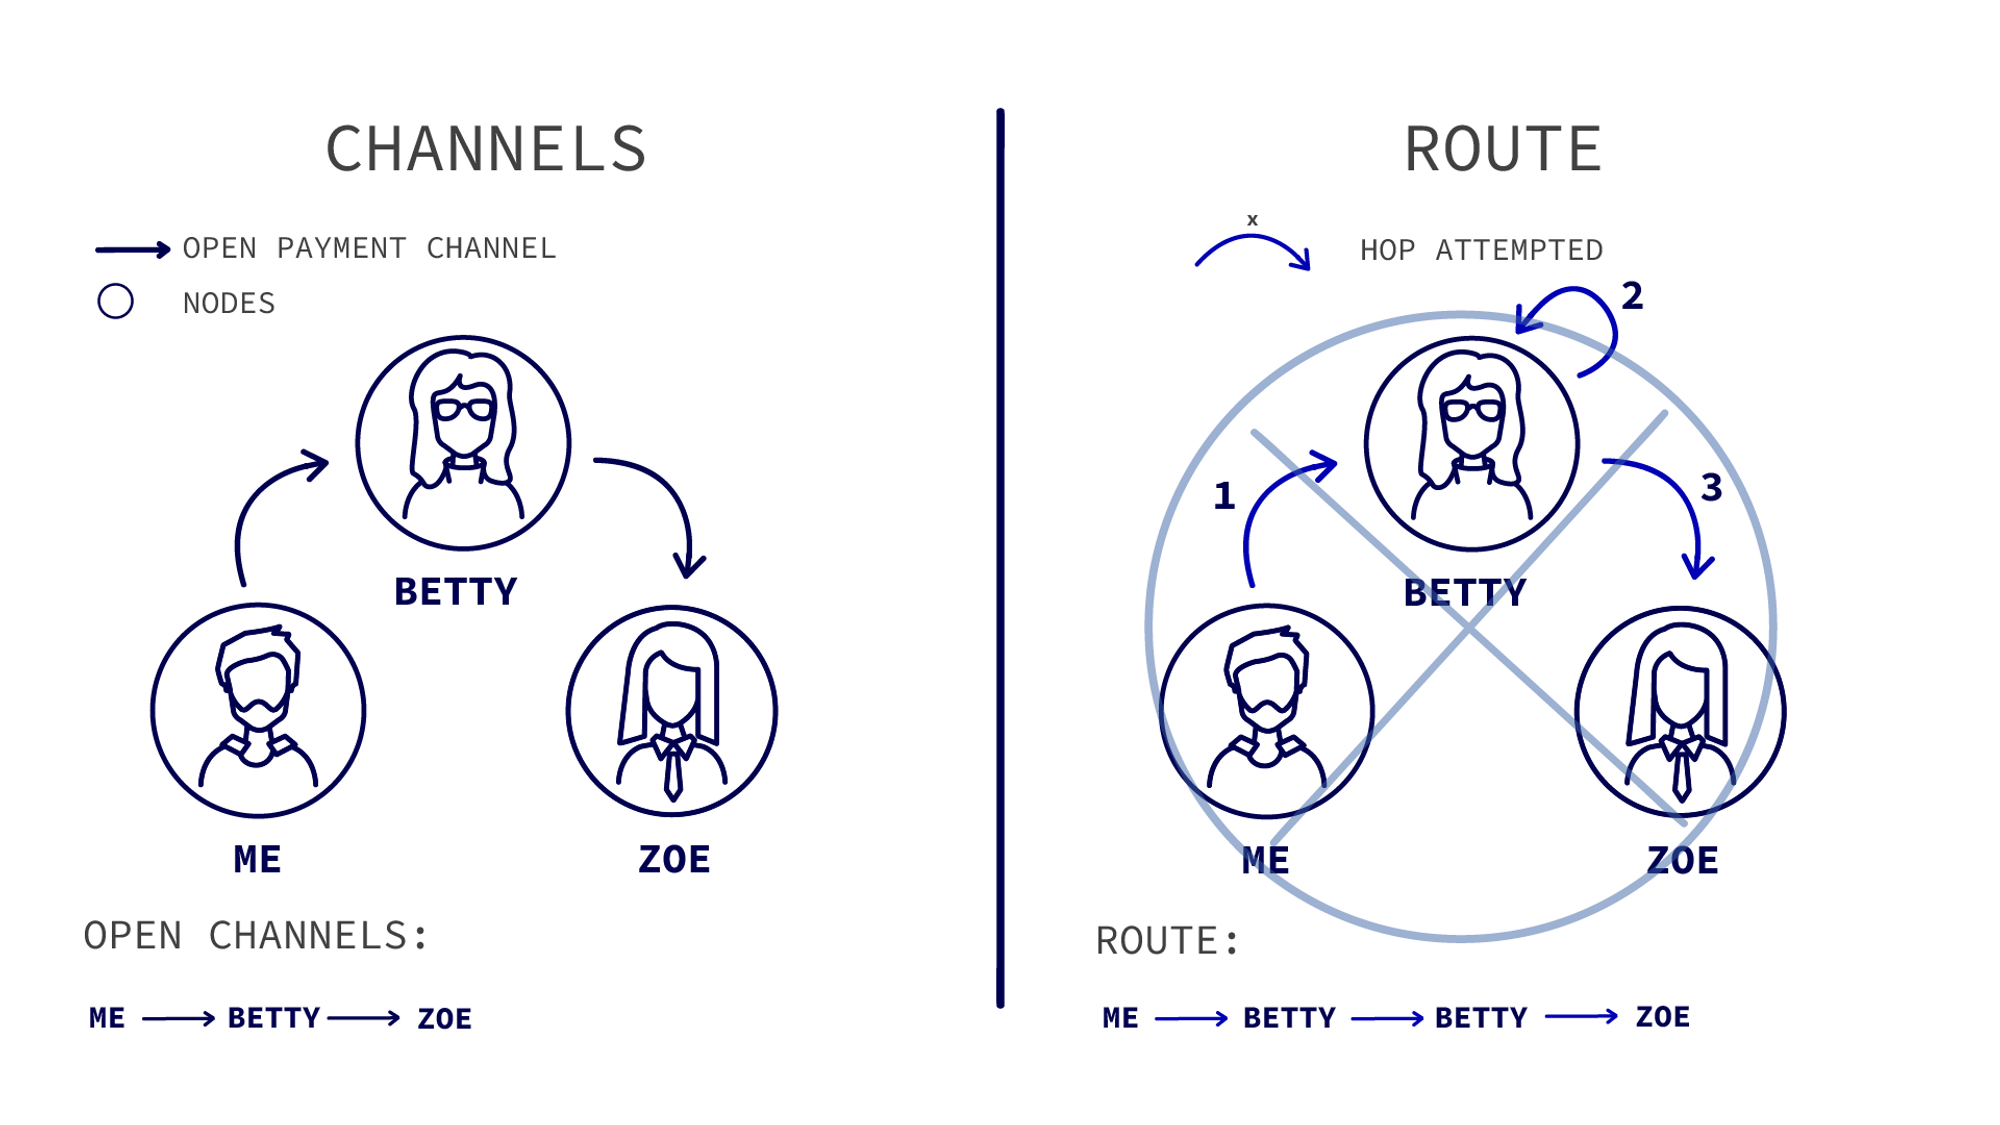
Message relaying fails when the path includes consecutively repeated nodes
In the established path, you cannot have consecutively repeating nodes. For example: me → Betty → Betty → Zoe.
Close outgoing or incoming channels
In this section, we will learn how to close outgoing and incoming channels.
Close outgoing channel with Chao's node
To close a payment channel, two actions are required: the first step is to initiate the channel closure, and the second is to finalize it after the grace period has ended.
-
Go to the CHANNELS: OUT page, locate Chao's node, and click the CLOSE outgoing channel icon on the right side of the same row to initiate the closure. You should receive a message stating, Channel to <Node address> is pending closure," where <Node address> refers to Chao's node address.
-
After receiving the message indicating the closure is pending, wait for the 5-minute grace period. The grace period allows the counterparty node time to redeem tickets.
-
Once the 5-minute grace period has passed, you will need to manually click the CLOSE outgoing channel icon again to finalize the closure. By default, the finalization must be triggered manually. Learn how to set up node strategies, which allow you to automate the payment channel finalization process.
Close incoming channel
If your node is eligible for rewards from the Cover Traffic Nodes, you should have 5 incoming channels, most likely from Cover Traffic. In this guide, we will familiarize you with closing an incoming payment channel. Once closed, a new channel will automatically open during the next rewards distribution, as the Cover Traffic Node will re-establish a payment channel with your node.
Before proceeding, note that if you close an incoming payment channel with unredeemed wxHOPR tokens, any unredeemed tickets will become neglected and cannot be redeemed.
-
Navigate to the CHANNELS: IN page, select the payment channel with either 0 or the lowest amount of unredeemed wxHOPR (as shown under the Unredeemed column), and click the CLOSE incoming channel icon on the right side of the same row to close the channel.
-
Wait up to a minute, and the payment channel will be automatically removed.
Tickets
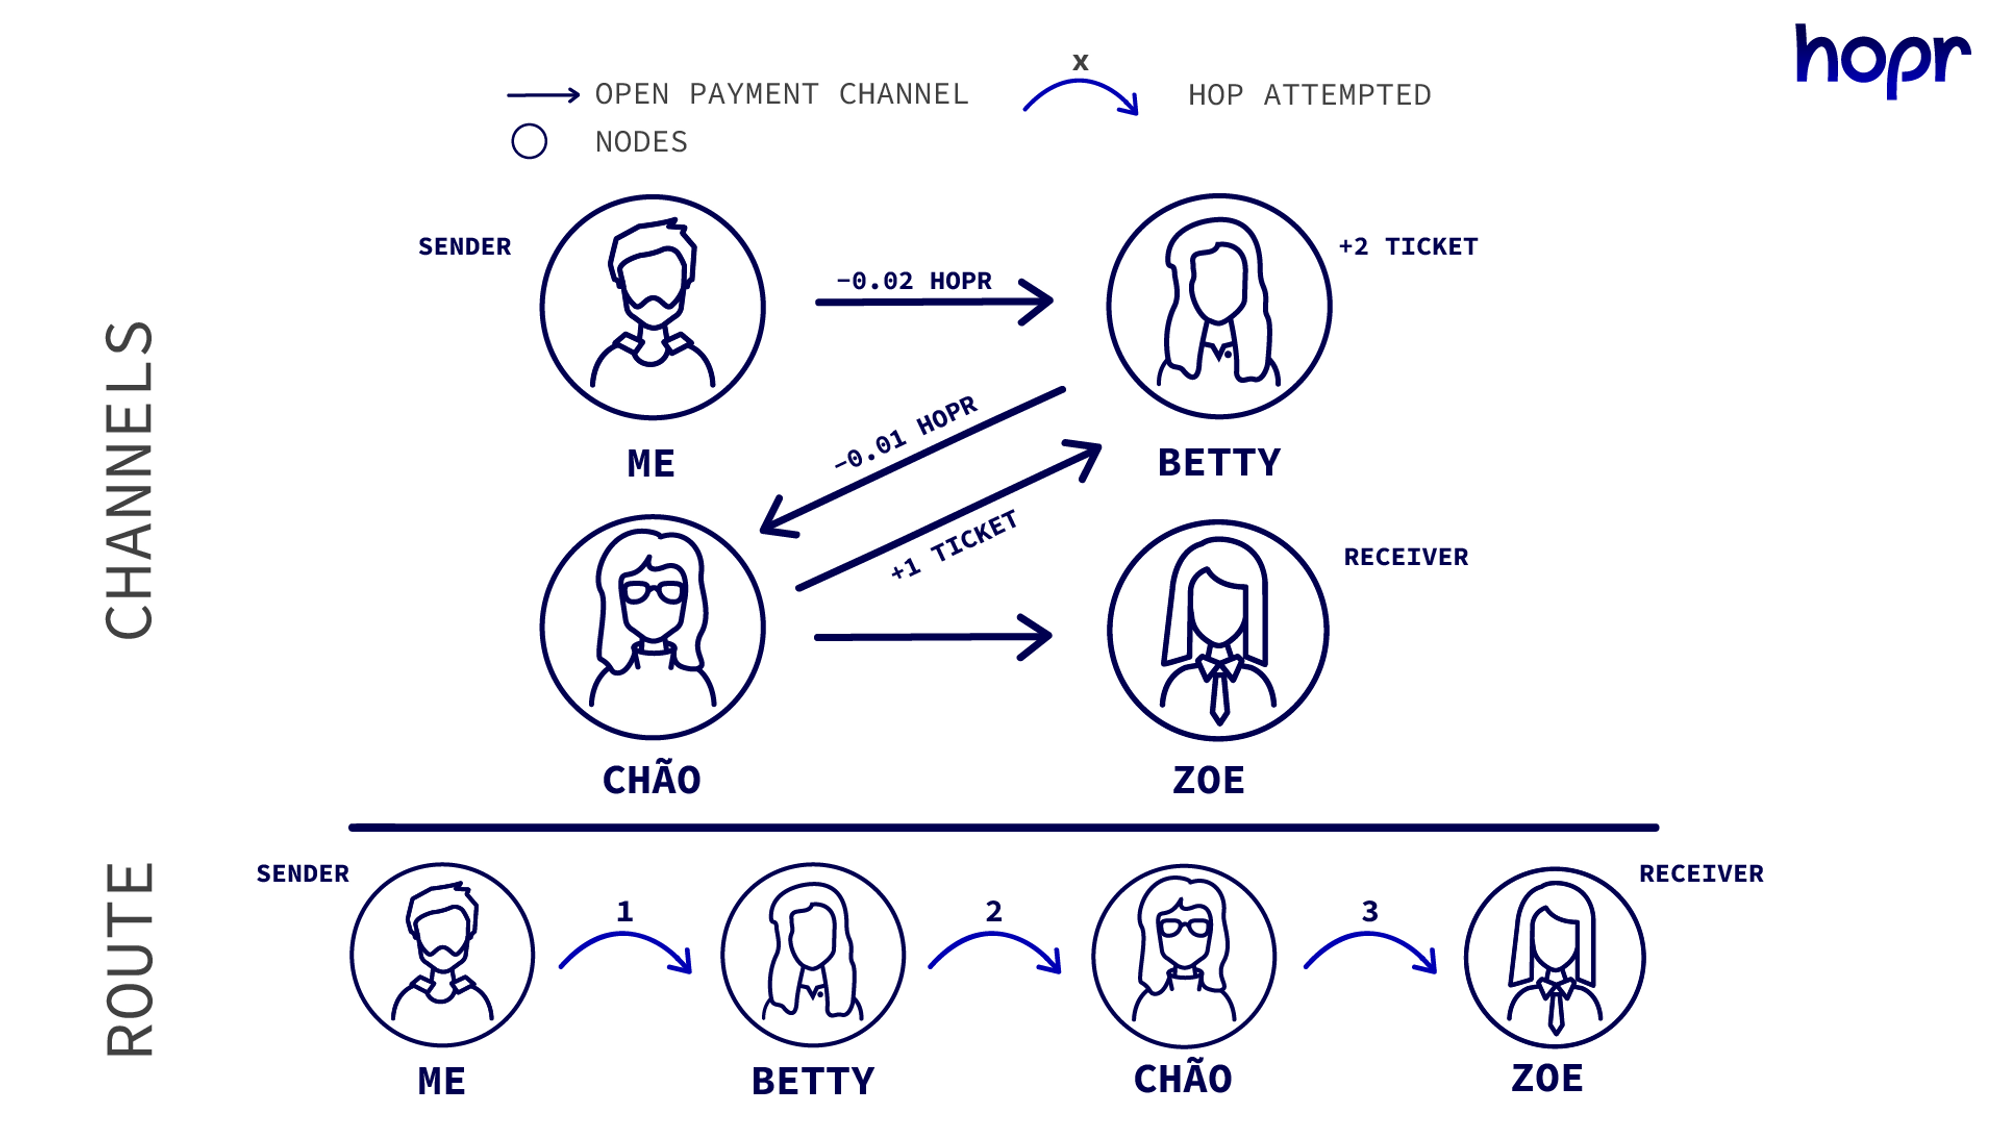
Although you spend wxHOPR tokens to relay data, you are actually paid in tickets. For example, Cover Traffic rewards are received in tickets, which are redeemed into wxHOPR based on your node strategies settings. If a channel exists in both directions between consecutive nodes on the relay, the ticket is redeemed into the following nodes channel instead of its balance.
-
In the above example, you, as the sender, will create two tickets of value 0.02 wxHOPR to pay for the entire relay.
-
Since no channel exists from Betty → me, the tickets are redeemed into Betty's node. Betty now generates a ticket of value 0.01 wxHOPR to pay for the remaining relay, and since a channel does exist from Chao → Betty, the ticket is redeemed into this channel instead of Chao's balance.
-
Chao then sends the message to Zoe and does not generate a ticket for the last HOP of the relay.
By redeeming tickets into channels, nodes are keeping healthy connections funded. In the long run, this means your node will be more active on the network earning more wxHOPR!
When channels are closed, all staked tokens are added to your balance and from there can be withdrawn to an external wallet.
How to check tickets on your node
Navigate to the TICKETS page, where you will see ticket statistics:
-
Unredeemed value: Unredeemed tickets mean your node received tickets for relaying data via your node, but they have not yet been redeemed into wxHOPR tokens.
-
Neglected Value: This refers to the value of tickets that may be neglected during payment channel closure because a single ticket's value was lower than the minimum threshold required for redemption.
-
Rejected Value: Rejected tickets may occur when they fail network validation and are deemed suspicious. This issue typically happens when your node is not properly synchronized, often due to RPC provider issues.
-
Redeemed value: Unredeemed tickets that have been aggregated and redeemed into wxHOPR. After the redemption process, wxHOPR tokens are sent directly to your HOPR Safe wallet.