HOPR Admin UI
The HOPR Admin UI provides a graphical interface that you can use to interact with your node and diagnose any potential issues. HOPR Admin UI is provided with the Dappnode HOPR package by default, so no separate action is needed, but for Docker users, you will need to run an extra command to install HOPR Admin UI before you can access it.
Installing HOPR Admin UI
Open your terminal and paste the following Docker command to start HOPR Admin UI:
docker run -d --pull=always -p 4677:4677 --name hopr-admin europe-west3-docker.pkg.dev/hoprassociation/docker-images/hopr-admin:stable
That's it! HOPR Admin UI should be running, and you can now access it through your browser.
Access the HOPR Admin UI
Please choose a platform:
- Docker
- Dappnode
Assuming you used the default port number, you should be able to access the HOPR Admin UI at http://localhost:4677. Replace localhost with your server IP address if you are using a VPS.
Example:
http://127.0.0.1:4677
The HOPR Admin UI already comes with the HOPR package on Dappnode:
-
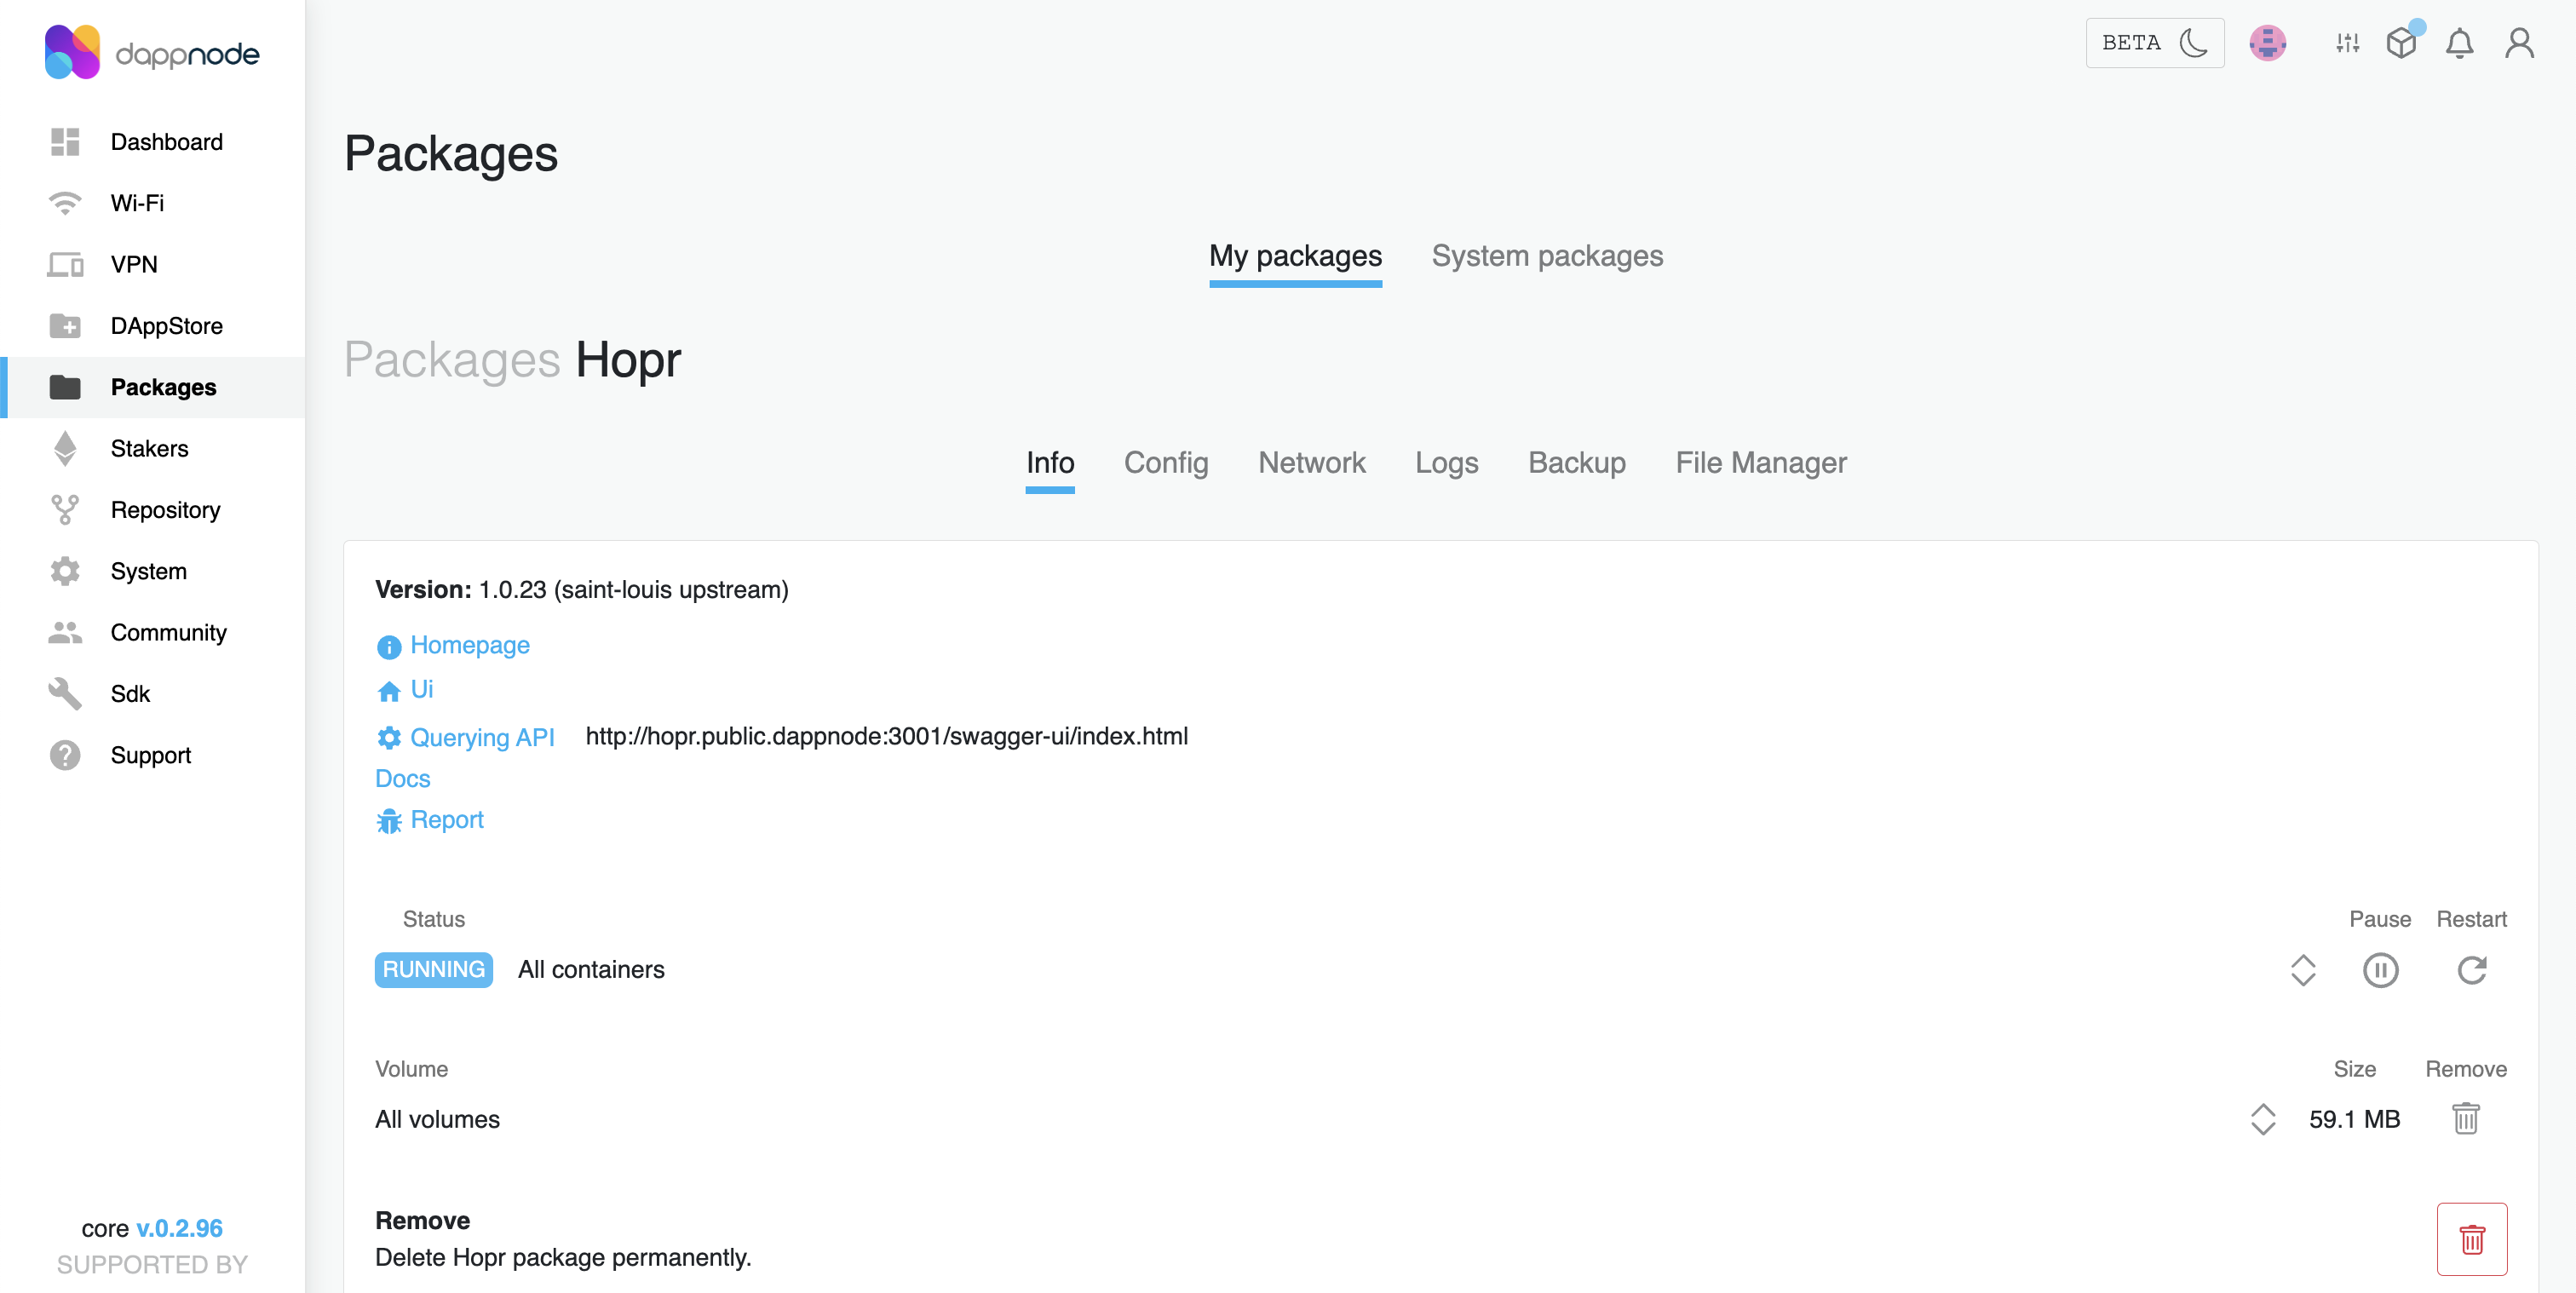
Go to Packages and click on HOPR.
-
Once inside, click Ui to open the HOPR Admin UI.
-
Connect your node as suggested here.
Connecting Your Node
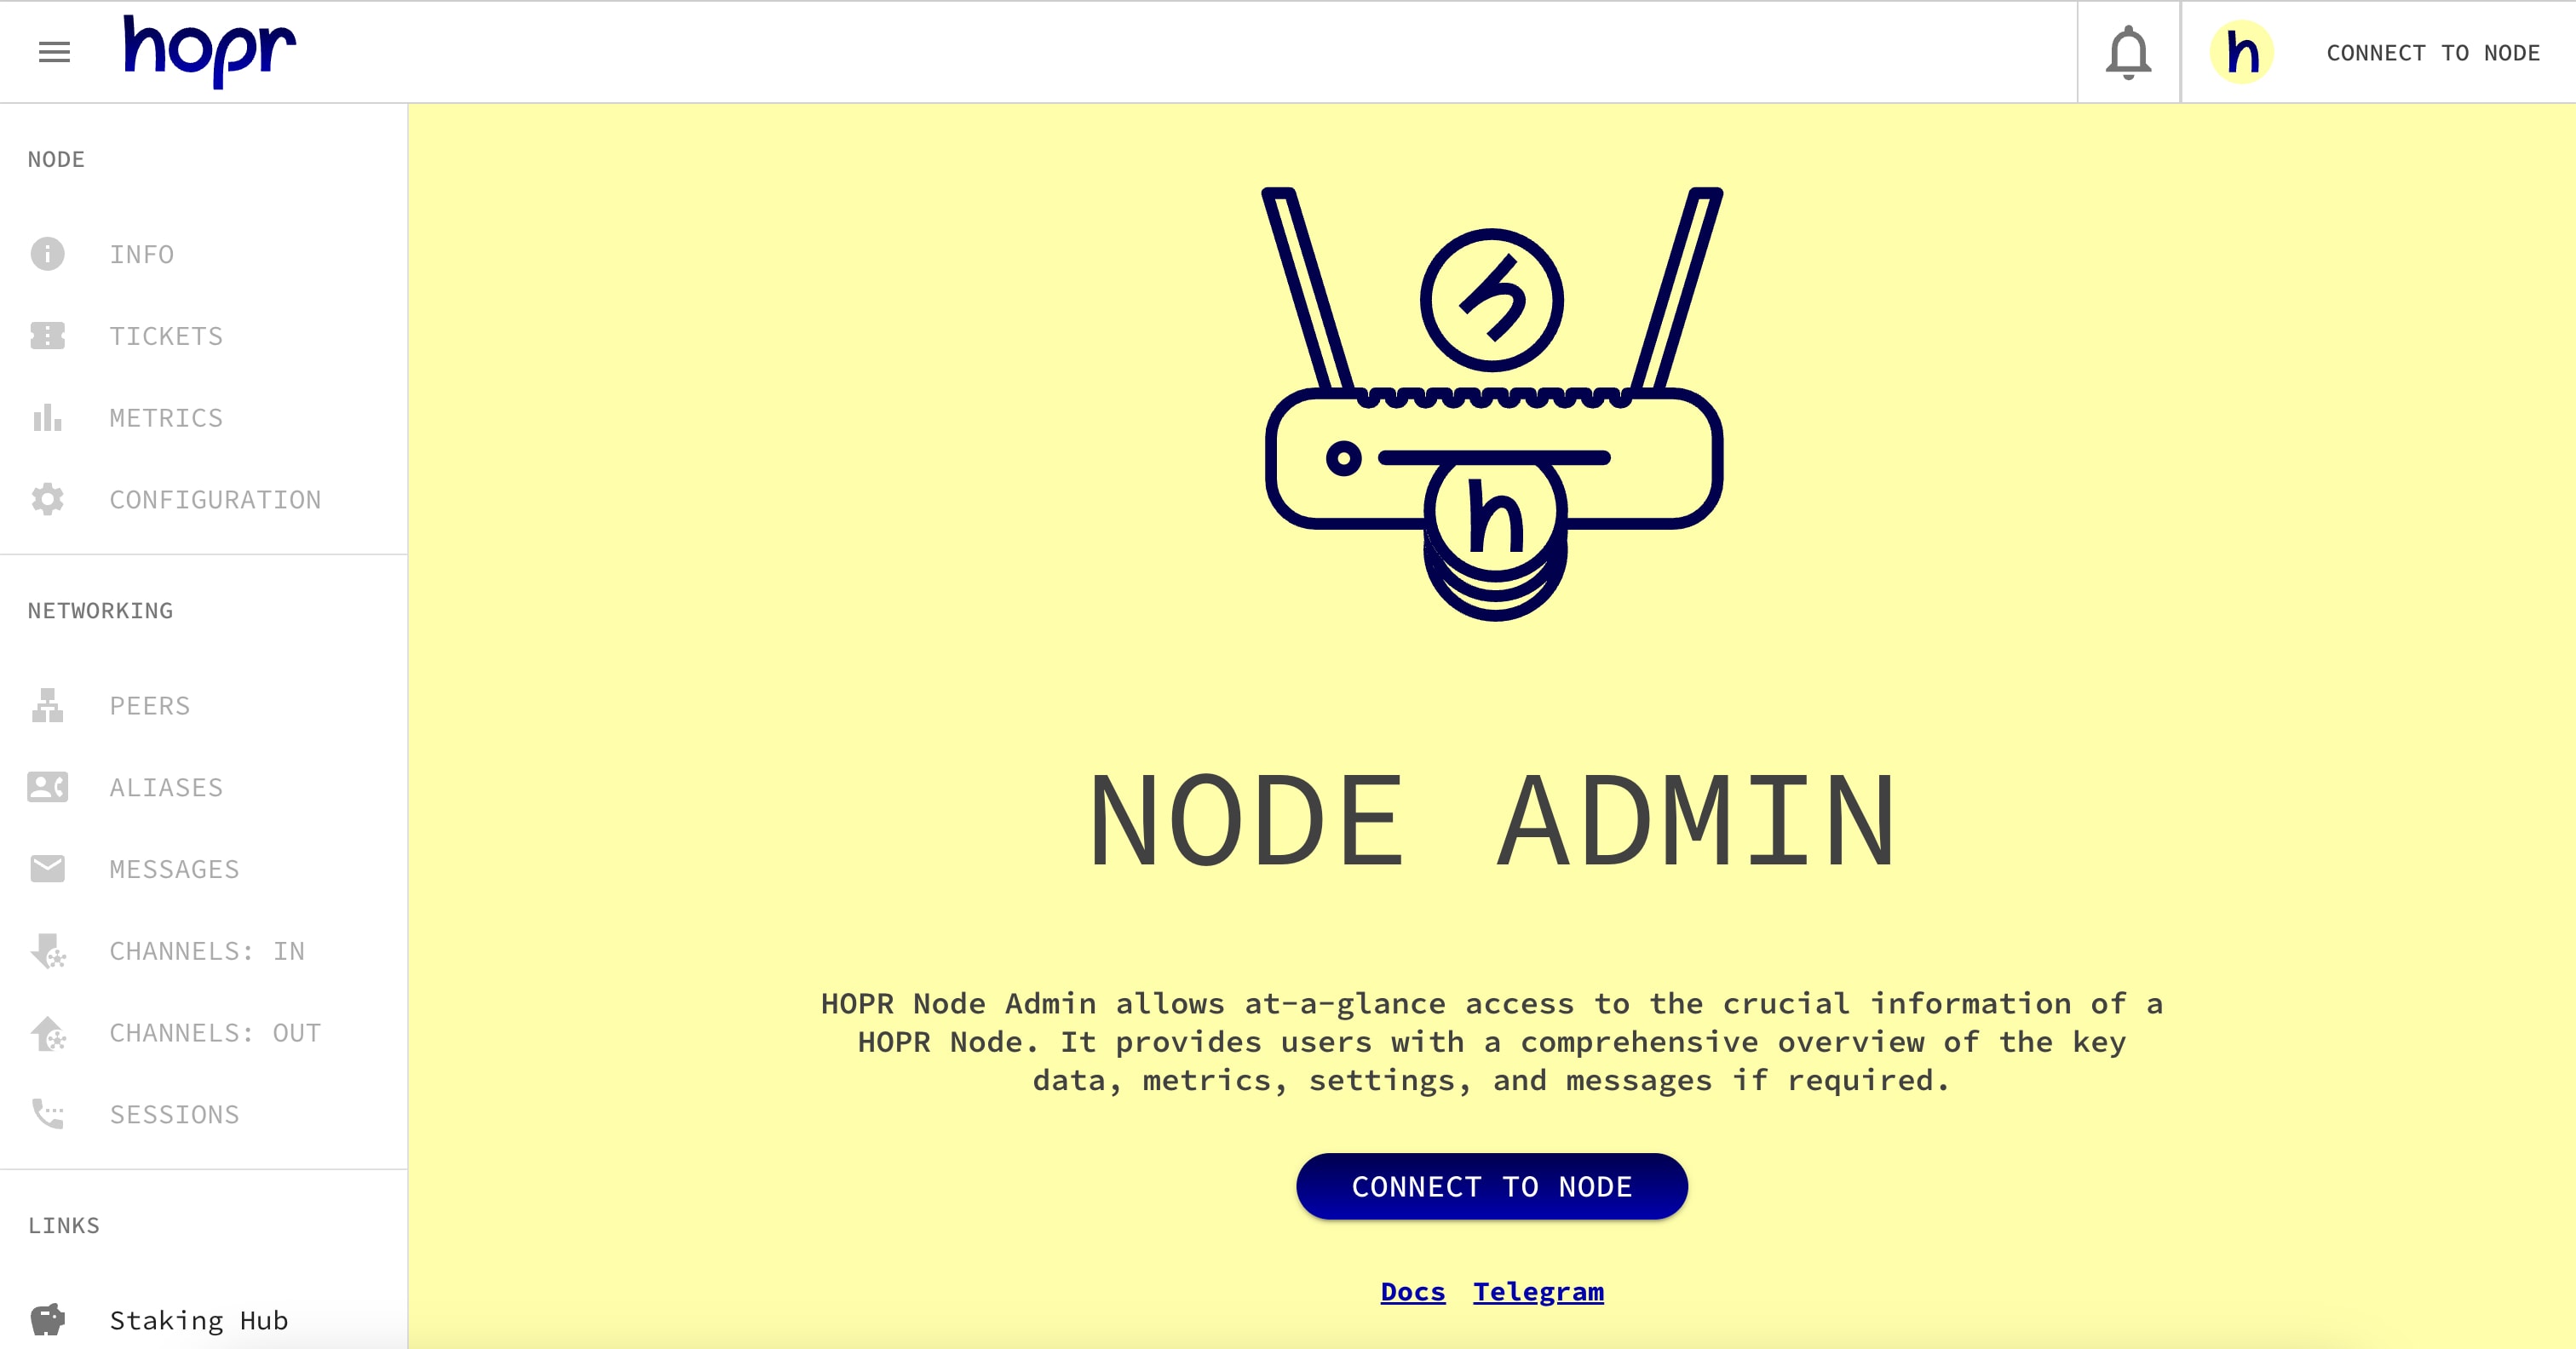
To use the HOPR Admin UI, you first need to connect to your HOPR node.
-
In the top right corner of the initial HOPR Admin UI screen, click CONNECT TO NODE.
-
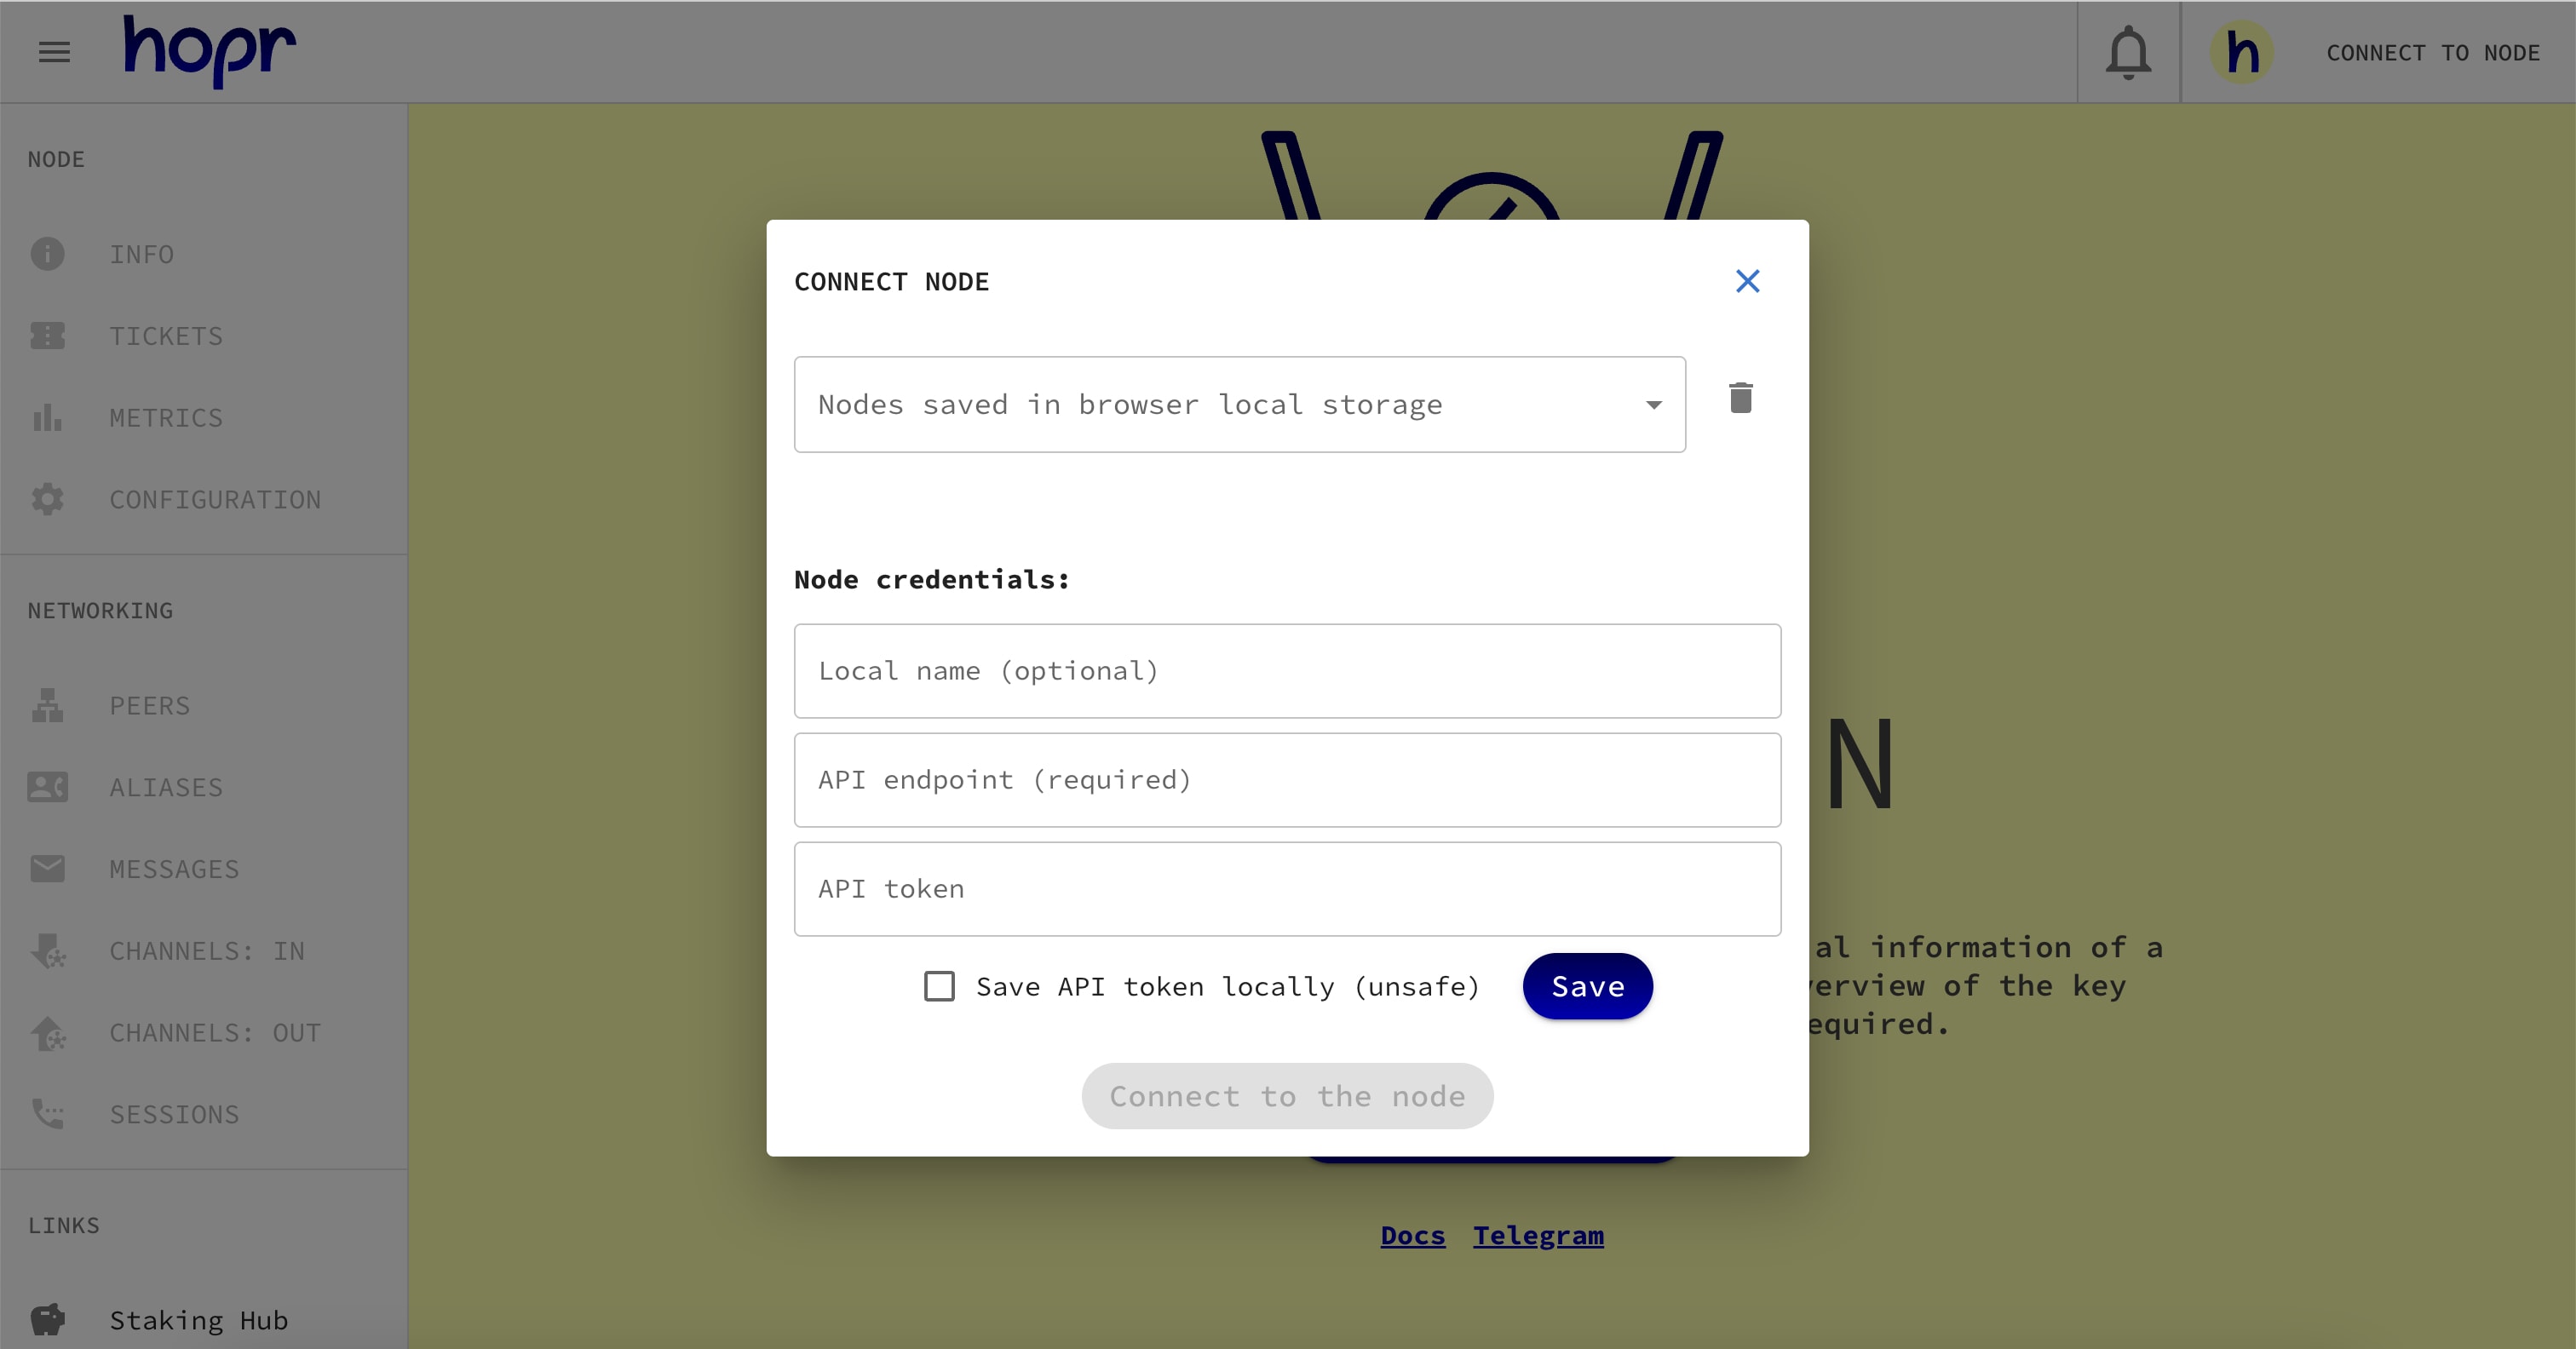
Under Node credentials: do the following:
-
In the Local name field, give this node a nickname. This is optional but may be useful if you are running multiple nodes.
-
In the API endpoint field, the default API endpoint for Docker users should be set to
http://localhost:3001. However, you may need to replace 'localhost' with your server's IP address if you used a VPS, and adjust the port if you modified the mapping during installation. For DAppnode users, this should be set tohttp://node.hopr.public.dappnode:3001by default. -
In the API token field, if you are using Docker, enter the custom security token you created during the initial HOPRd setup. If you are using DAppNode, enter the credentials you created.
noteIf you want to save your node credentials for login easier in the future, tick Save API token locally (unsafe) and click Save.
By clicking the Connect to the node button, you should connect to your node. If your connection is unsuccessful, refer to the Troubleshooting Issues section.
-
Using HOPR Admin UI
INFO
After connecting your node, you will be redirected to the node info section of the HOPR Admin. This page provides all the high-level information about your node and its performance.
Network
This section provides information about your node's eligibility to participate in the HOPR network and its connectivity status.
| Term | Description |
|---|---|
| Eligible | Indicates whether your node is registered on the Network as either true or false. |
| Sync Process | Shows the progress of the initial syncing process with the network. |
| Blockchain Network | Describes the blockchain network on which the HOPR node operates for its on-chain activities. |
| Hopr Network | Specifies the network/environment in which your node is running. |
| Connectivity Status | Displays the health of your connection to the network. Note: Please wait 15 minutes after starting or restarting your node before checking the connectivity status. - Unknown: The initial status when the node is started, indicating that connectivity has not yet been assessed. - Orange: Represents a low-quality connection (< 0.5) to at least one public node. - Yellow: Signals a high-quality connection to at least one public node. - Green: Denotes a high-quality connection to both a public and at least one non-public node. |
| Announced address | This is the IP address and port of the HOPRd node, which it announces on the network, allowing other nodes to establish connections. |
| Listening address | This is the IP address and port to which the HOPRd node is listening. |
| Current block | This is the last block that the node received from the RPC. |
| Last indexed block | This is the last indexed block from the chain that contains HOPR data. |
| Block checksum | This is the checksum of the last indexed block. |
Balances
There are two types of tokens:
- xDAI (Native): Tokens used to pay gas fees, specifically xDAI.
- wxHOPR (HOPR): Tokens used to fund payment channels and pay nodes for relaying data.
| Term | Description |
|---|---|
| xDAI: Node | This is the native token used within the HOPRd wallet to pay for gas fees associated with on-chain activities, such as opening and closing payment channels, and redeeming tickets. All transactions requiring blockchain interaction are paid for in xDAI. |
| xDAI: Safe | This token is the native currency within the HOPR Safe wallet. |
| wxHOPR: Safe | Represents HOPR tokens stored in the HOPR Safe wallet. |
| wxHOPR: Channels OUT | Indicates the amount of HOPR tokens held in the payment channels that your node has opened. |
| wxHOPR: Allowance | Specifies the amount of HOPR tokens that the HOPRd node is authorized to spend from the HOPR Safe. |
| wxHOPR: Total Staked | Represents the total amount of HOPR tokens, combining those in the HOPR Safe and those staked in the payment channels opened by your node. |
Addresses
All the essential addresses required for operating HOPRd node.
| Term | Description |
|---|---|
| Node PeerID | The address used by other nodes on the network to interact with your node—allowing them to ping or send data. |
| Node Address | Your node's Ethereum address, used to store native tokens. |
| Safe Address | The address of the Safe linked to your node. |
| Hopr Token Address | The address of the wxHOPR token smart contract. |
| Hopr Management Module Address | The address of the HOPR management module smart contract associated with your node. |
| Hopr Channels Address | The address of the HOPR channels smart contract, used for managing payment channel activities, such as opening and closing channels and redeeming tickets. |
Node
-
Version - Your node's current HOPRd version.
-
Start date - The date of the last start of the HOPRd node.
-
Uptime - The duration since the last start of the HOPRd node.
Channels
Shows the number of opened incoming & outgoing payment channels to and from this node.
Nodes on the network
-
Announced - The total number of nodes that have announced their presence on the HOPR network and are visible to your node. This includes also connected nodes with your node.
-
Connected - The number of nodes that have an active, direct connection to your node. These are the nodes your node can immediately communicate with.
Aliases
The number of nicknames/aliases you have assigned to the nodes.
TICKETS
Ticket statistics displays information about your redeemed and unredeemed tickets value. Tickets are earned by relaying data and can be redeemed for HOPR tokens.
METRICS
Node shows different metrics which are useful for troubleshooting.
CONFIGURATION
-
Notifications: Enable or disable notifications for specific sections.
-
Strategies: This section displays the current strategies of your node, which help you manage your node more effectively by allowing you to configure settings such as the threshold for ticket aggregation and the redemption process. Strategies can be customized via the configuration file.
PEERS
Displays a list of nodes visible to your node, with specific information for each node:
| Term | Description |
|---|---|
| Peer ID | The unique identifier used by other nodes on the network to interact with your node. |
| Node Address | The Ethereum address associated with the peer's node, used for on-chain interactions. |
| Last Seen | The timestamp of the most recent interaction or connection with this peer. |
| Quality | A measure of the connection quality with this peer, based on factors like latency and reliability. |
| Actions | Next to each Peer ID, there are buttons that allow you to interact directly with the nodes through the interface: - Ping Node: Ping a node and measure the latency between your node and the target node. - Add New Alias: Assign a nickname or alias to the node. - Open Outgoing Channel: Create a payment channel from your node to the target node. - Send Message: Send a message to the target node, either directly or via a randomized route. You can choose the number of intermediaries, or hops, with a maximum of 3 hops. |
If you haven't found a node on the list and you want to ping it, you'll find the Ping Node button at the top. This button allows you to ping any node, even if it's not on your node list.
You also have the ability to export the entire list of peers to a CSV file.
ALIASES
You can use the alias command to give an address a more memorable name. Also you can import / export a list of all current aliases.
MESSAGES
Displays a list of received messages and allows you to interact with them. Additionally, you can send a message to any recipient on the HOPR network. Clicking the send message button will open a message form popup with the following fields:
| Term | Description |
|---|---|
| Receiver (Peer Id) | The address used by other nodes on the network to interact with your node—allowing them to ping or send data. |
| Message | The address used by other nodes on the network to interact with your node—allowing them to ping or send data. |
| Send mode | You can send message in 4 methods: - direct message: This method will use 0-hop, sending a direct message means it is free of charge, because it is not mixed or private. - automatic path: When sending a message using the automatic path, it will automatically find a route via 3 nodes through which it will relay the message which is the most secure method. - number of hops: You need to specify the number of hops through which it will relay the message, and it will try to find a route automatically. - path: You can also specify a specific path of nodes through which you want to relay the message. |
CHANNELS: IN
Displays a list of open payment channels from other nodes to your node. Next to the peerID, you can ping, add an alias, open/close a payment channel, or send a message from your end.
| Term | Description |
|---|---|
| Node Address | The Ethereum address of the node that opened the channel to your node. |
| Status | It shows payment channel status. |
| Dedicated Funds | The balance of wxHOPR allocated to the payment channel. |
| Unredeemed | This indicates the number of unredeemed tickets on the specific payment channel. |
| Actions | Available actions for this channel, such as pinging the peer, adding an alias, or closing the channel. |
CHANNELS: OUT
Displays a list of opened payment channels from your node to other nodes on the HOPR network. Next to the peerID, you can ping, add an alias, close a payment channel, or send a message from your end.
| Term | Description |
|---|---|
| Closing Channel | To close a payment channel, you must perform two actions. First, click Close the Channel to initiate the closure. After a grace period of 5 minutes, if your node is not configured to automatically finalize the closure of the payment channel, you will need to manually click again to complete the process. Node manual configuration can be customized via the configuration file. |
| Open outgoing channel | By specifying the node address (0x...) and HOPR amount, you can open a payment channel to the specified node. |
| Open multiple outgoing channels | You can prepate a csv file to open multiple payment channels in bulk. |
| Fund outgoing channel | By specifying the node address (0x...) and HOPR amount, you can fund an outgoing payment channel with additional wxHOPR. |
| Export outgoing channels as a CSV | You can export the entire list of outgoing payment channels as a CSV file. |
SESSIONS
Use HOPR Sessions to tunnel traffic through the mixnet over UDP or TCP connections. Choose between a direct (zero-hop) route or a multi-hop path for enhanced privacy.
Some examples:
- Create TCP-based sessions to tunnel HTTP requests.
- Create UDP-based sessions to tunnel WireGuard requests.
To start using the sessions feature, your HOPRd node must have an open listening port. Choose your platform:
- Docker
- Docker Compose
- Dappnode
Update the docker run command to include the port forwarding:
Example:
docker run ... -p 1422:1422/udp -p 1422:1422/tcp ...
Locate docker-compose.yaml and update the ports: section of hoprd.
Example:
services:
  hoprd:
    ...
    ports:
      ...
      - "1422:1422/udp"
      - "1422:1422/tcp"
- Connect to your Dappnode.
- Navigate to the HOPR package.
- Go to the Network tab and locate the Public Port Mapping section.
- Add a new port entry by clicking on New port +.
- Configure the following settings:
- HOST PORT: 1422
- PACKAGE PORT NUMBER: 1422
- PROTOCOL: Select UDP
- Click Update Port Mappings to save your changes.
- Repeat step 4, but this time select the TCP protocol instead.
Important: If you are running a HOPRd node behind NAT (Network Address Translation)—such as on a computer or server at home or in an office environment—you must expose the listening port 1422 using both UDP and TCP protocols to the public. This allows other nodes on the HOPR network to connect to your node. For instructions, see our port forwarding guide.
| Term | Description |
|---|---|
| Destination | You have to specify the destination HOPRd node's PeerID. The destination HOPR node forwards all the data to the given session target over the selected IP protocol. |
| Listen host | The entry point of the session consists of the HOPRd node’s IP address and the exposed listening port. To use this, you must run a HOPRd node and expose both UDP and TCP ports (e.g., 1422) to receive response traffic.If you are running the HOPRd node natively (using the binary), you must specify the public IP address and listening port of the node — for example: 1.2.3.4:1422. If you are running the HOPRd node in Docker or on Dappnode, you can specify only the listening port — for example: :1422 — and the system will automatically resolve the internal IP address of the Docker container. |
| Session Target | Enter the session target that the destination node will connect to. You must specify either a domain or an IP address with a port. For example: example.com:80 Note: By default, HOPRd nodes are not allowed to access any website. You must ensure that the Destination node has the session target domain/IP address in its allow list. |
| Capabilities | Retransmission and Segmentation capabilities are used only with the TCP protocol. Retransmission ensures reliability by guaranteeing that every piece of your data eventually arrives at the other end in order. Segmentation is the process of breaking your continuous data stream into discrete chunks called segments before sending them out as IP datagrams. It minimizes fragmentation, reduces latency, and helps TCP’s congestion-control algorithms manage flow. |
| Protocol | Select the IP protocol: either UDP or TCP. |
| Path | You can select up to 3 intermediate nodes, the default is 0 hops. If using intermediate nodes, you must ensure that your node has an open channel with the first intermediate node, and that all subsequent nodes have open channels with one another. |